Egito
Instalação
Instale <general/install> os seguintes módulos para obter todos os recursos da localização egípcia:
Name |
Technical name |
Description |
|---|---|---|
Egypt - Accounting |
l10n_eg |
Default fiscal localization package <fiscal_localizations/packages> |
Egyptian E-invoice Integration |
l10n_eg_edi_eta |
Egyptian Tax Authority (ETA) e-invoicing integration <egypt/e-invoicing> |
Faturamento eletrônico egípcio
O Odoo está em conformidade com os requisitos de faturamento eletrônico da Autoridade Tributária Egípcia (ETA).
Registre o Odoo em seu portal ETA
Você deve registrar seu sistema Odoo ERP em seu portal ETA para obter suas credenciais de API. Você precisa desses códigos para configurar seu aplicativo Odoo Contabilidade <egypt/e-invoicing-configuration>.
Acesse o perfil da sua empresa no portal ETA clicando em Visualizar Perfil do Contribuinte.
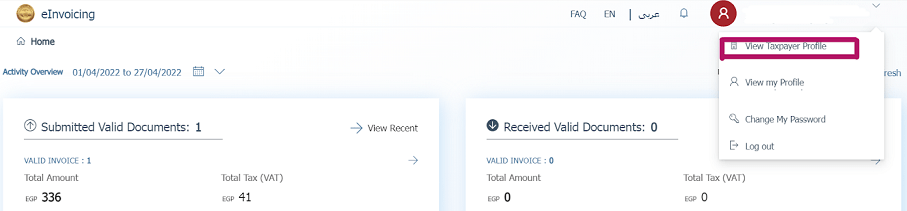
A seguir, vá para a seção Representantes e clique em Registrar ERP. Preencha o Nome do ERP (ex: Odoo) e deixe os outros campos vazios.

Uma vez registrado com sucesso, o site exibe suas credenciais de API:
Client ID
Client Secret 1
Client Secret 2
Configuração no Odoo
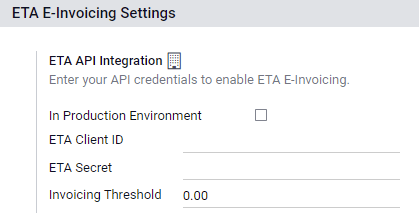
Para conectar seu banco de dados Odoo à sua conta do portal ETA, vá para , e defina o ID do Cliente ETA e Segredo ETA que você recuperou quando registrou Odoo em seu portal ETA <egypt/e-invoicing-eta-portal>. Defina um limite de faturamento se necessário.
Códigos ETA
O e-faturamento funciona com um conjunto de códigos fornecidos pelo ETA. Você pode usar a documentação ETA para codificar seus atributos de negócio.
A maioria desses códigos é tratada automaticamente pelo Odoo, desde que suas filiais <egypt/e-invoicing-branches>, clientes <egypt/e-invoicing-customers> e produtos <egypt/e-invoicing-products> estejam corretamente configurados.
Company Information:
Company Tax ID
- Branch IDIf you have only one branch, use 0 as the branch code.
Activity type Code
Other Information:
- Product CodesYour company's products should be coded and matched with their GS1 or EGS codes.
- Tax CodesMost of the taxes codes are already configured on Odoo in the ETA Code (Egypt) field. We advise you to make sure these codes match your company's taxes.
Filiais
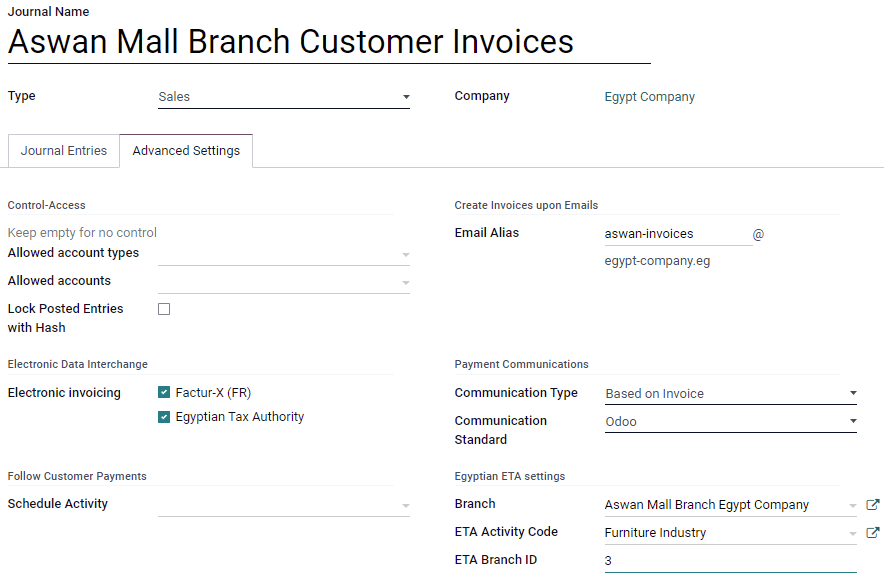
Crie um contato e um diário para cada filial da sua empresa e configure suas configurações de ETA.
Para isso, vá para , depois clique em Criar.
Nomeie o diário de acordo com a filial da sua empresa e defina o Tipo como Vendas. Em seguida, abra a aba e preencha a seção Configurações ETA Egípcias:
In the Branch field, select the branch's contact or create it.
Set the ETA Activity Code.
Set the ETA Branch ID (use 0 if you have one branch only).
Clientes
Certifique-se de que os formulários de contato dos seus clientes estão corretamente preenchidos para que suas e-faturas sejam válidas:
contact type: Individual: or Company:
Country:
Tax ID: Tax ID or Company registry for companies. National ID for individuals.
Produtos
Certifique-se de que seus produtos estão corretamente configurados para que suas e-faturas sejam válidas:
Product Type: storable products, consumables, or services.
Unit of Measure: if you also use Odoo Inventory and have enabled Units of Measure.
Barcode: GS1 or EGS barcode
ETA Item code (under the tab): if the barcode doesn't match your ETA item code.
Autenticação por USB
Cada pessoa que precisa assinar eletronicamente faturas precisa de uma chave USB específica para autenticar e enviar faturas para o portal ETA através de um ERP.
Install Odoo's Windows virtual IoT
The Windows virtual IoT acts as a bridge between your computer and your Odoo database hosted online.
Follow the installation instructions for the Windows virtual IoT <iot/windows-iot/installation>. Once installed:
Open the virtual IoT homepage <iot/windows-iot/homepage>
Click the fa-cogs (cogs) button then Credentials.
Copy the content under the Proxy Access Token (for Egypt only) field and save it for the next step.
Configure a chave USB
Once the Windows virtual IoT is installed, configure your USB key by going to and clicking New:
Select the Company.
Enter the ETA USB Pin given to you by your USB key provider.
Paste the Access Token provided on the virtual IoT homepage <egypt/e-invoicing-virtual-iot>.
Click Get certificate.
