Certificado próprio para impressoras de ePOS
Para trabalhar com Odoo, alguns modelos de impressora que podem ser usados sem um sistema IoT podem exigir o protocolo HTTPS para estabelecer uma conexão segura entre o navegador e a impressora. No entanto, tentar alcançar o endereço IP da impressora usando HTTPS resulta em uma página de aviso na maioria dos navegadores da web. Force a conexão para estabelecer um link HTTPS e habilite a impressora no Odoo.
Geração, exportação e importação de certificados autoassinados
Impressoras que operam sem um sistema IoT ainda exigem comunicação segura, que pode ser alcançada por geração <pos/epos-ssc/certificate-generation>, exportação <pos/epos-ssc/certificate-export> e/ou importação <pos/epos-ssc/certificate-import> de um certificado auto-assinado.
Geração de certificado auto-assinado
O processo de geração depende do SO (Sistema Operacional) e do navegador.
Para gerar um certificado auto-assinado no Google Chrome, siga as próximas etapas:
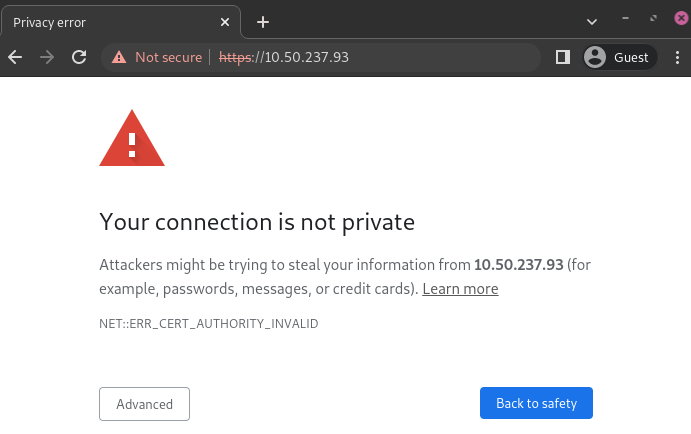
Open the browser, type the printer's IP address in the search bar (e.g., https://192.168.1.25), and press Enter.
On the security warning page, click Advanced, then Proceed to [IP address] (unsafe) to force the connection.
On the EPSON platform, click Advanced Settings, then Administrator Login to log in to the printer's homepage.
Type the initial password located at the back of the printer in the Current Password field, then press Enter.
Go to .
On the Certificate page, click Update under the Self-signed Certificate section.
Adapt the Common Name field to retain only the IP address, then click Next, then OK. Wait for the printer's lights to stop blinking.
A página inicial do Epson pode variar dependendo do modelo da impressora usado. Para a Epson TM-m30 ii, acesse a página inicial do Epson digitando epson como o nome de usuário e o número de série da impressora como a senha.
Para gerar um certificado auto-assinado usando o aplicativo Keychain Access no Mac, siga as próximas etapas:
Access the Keychain Access app on Mac.
From the menu bar, go to .
Enter a name for the certificate.
Select an identity type, then the type of certificate.
Click Create.
Review the certificate, then click Done.
Exportação de certificado auto-assinado
O processo de exportação depende do SO (Sistema Operacional) e do navegador.
Para exportar o certificado, siga as próximas etapas:
Once the printer's lights are solid, hover the mouse over the browser's search bar and click Not secure, then Certificate details.
Click the Details tab in the Certificate Viewer popover, then click Export.
Add .crt next to the IP address in the File name field.
Set the Save as type field to Base64-encoded ASCII, single certificate.
Click Save.
Para exportar o certificado, siga as próximas etapas:
Click Not secure next to the search bar.
Go to .
Click View certificate in the Security tab, then Details.
Select the certificate, click Export, then select a folder in your local drive.
Click Close.
Para exportar o certificado, siga as próximas etapas:
Open the browser, type the printer's IP address in the search bar (e.g., https://192.168.1.25), and press Enter.
On the security warning page, click Advanced, then Proceed to [IP address] (unsafe) to force the connection.
Click Not secure next to the search bar, then Certificate is not valid.
Go to the Details tab and click Export.
Add .crt at the end of the file name to ensure it has the correct extension.
Select Base64-encoded ASCII, single certificate, at the bottom of the popover.
Click Save.
Para exportar o certificado, siga as próximas etapas:
Open the browser, type the printer's IP address in the search bar (e.g., https://192.168.1.25), and press Enter.
Click Not secure next to the search bar.
Go to .
Click View certificate in the Security tab, then Details.
Select the certificate, click Export, then select a folder in your local drive.
Click Close.
Importação de certificado auto-assinado
O processo de importação depende do SO (Sistema Operacional) e do navegador.
Para importar um certificado auto-assinado do Google Chrome:
Open the browser.
Go to , and click Manage certificates.
Click Manage imported certificates from Windows on the Certificate Manager page.
Click Import in the Certificates popover.
In the Certificate Import Wizard, click Next, then Browse to select the certificate, and click Next again.
Select the Place all certificates in the following store option.
Click Browse, select the Trusted Root Certification Authorities folder, and click OK.
Click Next, then Finish.
Click Yes in the Security Warning popover.
Para importar um certificado auto-assinado usando Mozilla Firefox no Windows, consulte as etapas na aba Linux.
Para importar um certificado auto-assinado, siga as próximas etapas:
Open the browser.
Go to , and click Manage certificates.
Click Installed by you under the Custom section on the Local certificates tab.
Click Import next to Trusted Certificates, and select the exported certification file from your local drive.
Accept all warnings.
Click ok.
Para importar um certificado auto-assinado, siga as próximas etapas:
Open the browser.
Go to .
In the Certificate Manager popover, click the Your Certificates tab, then Import, and select the certificate in your local drive.
Click the Servers tab in the Certificate Manager popover.
Click Add Exception.
Enter the printer's IP address in the Location field, then click Get Certificate.
Enable the Permanently store this exception option and confirm.
As etapas específicas para instalar um certificado podem variar dependendo da versão do Android e do fabricante do dispositivo.
Para importar um certificado auto-assinado em um dispositivo Android, primeiro crie e exporte-o de um computador. Em seguida, transfira o arquivo .crt para o dispositivo por email, Bluetooth ou USB. Assim que o arquivo estiver no dispositivo, instale o EPSON ePOS SDK for JavaScript se necessário e siga as próximas etapas:
Go to the device settings.
Type certificate in the search bar.
Click Certificate AC, then Install from device storage.
Select the certificate file to install it on the device.
Baixe o certificado em um computador se o tablet restringir downloads diretos. Encaminhe o arquivo por email e abra-o diretamente do tablet para concluir a instalação.
Para importar um certificado auto-assinado em um dispositivo iOS, primeiro crie e exporte-o de um computador. Em seguida, transfira o arquivo .crt para o dispositivo por email, Bluetooth ou qualquer serviço de compartilhamento de arquivos.
Baixar este arquivo dispara um popover de aviso. Clique em Permitir para baixar o perfil de configuração e feche o segundo popover. Em seguida, siga as próximas etapas:
Go to the Settings app on the iOS device.
Click Profile Downloaded under the user's details box.
Locate the downloaded .crt file and select it.
Click Install in the top-right corner.
Enter a passcode if needed.
Click Install in the top-right corner of the certificate warning screen and the popover.
Click Done.
Após o certificado ser instalado, autentique-o conforme segue:
Go to .
Enable the installed certificate using the fa-toggle-on (switch) toggle.
Click Continue in the popover.
Verificação de importação de certificado
Para confirmar que a conexão da impressora é segura, conecte-se ao seu endereço IP usando HTTPS. Por exemplo, navegue até https://192.168.1.25 em um navegador. Se o certificado auto-assinado foi aplicado corretamente, nenhuma página de aviso aparece e a barra de endereços deve exibir um ícone de cadeado, indicando uma conexão segura.