Índia
Instalação
Instale <general/install> os seguintes módulos para obter todos os recursos da localização Indiana:
Name |
Technical name |
Description |
|---|---|---|
Indian - Accounting |
l10n_in |
Default fiscal localization package <fiscal_localizations/packages> |
Indian E-invoicing |
l10n_in_edi |
Indian e-invoicing integration <india/e-invoicing> |
Indian E-waybill |
l10n_in_ewaybill |
Indian E-way bill integration <india/e-waybill> |
Indian E-waybill Stock |
l10n_in_ewaybill_stock |
E-waybill creation from the Inventory app <india/e-waybill-stock> |
Indian - Accounting Reports |
l10n_in_reports |
Adds the Indian GST Return filing <india/gstr> and the Indian Tax reports <india/gstr_reports>. |
Empresa
Para configurar as informações da sua empresa, abra o aplicativo Configurações, role para baixo até a seção Empresas, clique em Atualizar Informações e configure o seguinte:
Company Name
Address, including the Street, City, State, ZIP, and Country
PAN: essential for determining the type of taxpayer.
GSTIN: necessary for generating e-Invoices, E-waybills and filing GST returns.
Configuração do GSP
Para usar os serviços de e-Faturamento <india/e-invoicing>, Conhecimento de Transporte Eletrônico <india/e-waybill> e preenchimento de declaração GST <india/gstr> no Odoo, configure BVM IT Consulting Services India Private Limited como o GSP (Provedor de Suvidha GST). Para isso, siga estas etapas:
If needed Upgrade <general/upgrade> the Indian - Accounting (l10n_in) module.
Go to .
Scroll down to the Select GSP Provider section, and set the GSP field to BVM IT Consulting.
Log into the NIC e-invoice portal <india/e-invoicing-api> and NIC E-Way bill portal <india/e-waybill-api> and create a new API user for each.
Go to , scroll down to the Indian Integration section, and enter the new Username and Password for the e-Invoicing <india/e-invoicing-configuration> and E-Way bill <india/e-waybill-configuration> features.
Configuração Indiana
A seção Integração Indiana oferece recursos essenciais de tributação e conformidade para simplificar operações financeiras. Para ativar esses recursos, navegue para e role para baixo até a seção Integração Indiana.

TDS/TCS: Activate this to enable TDS/TCS <india/tds-tcs-threshold> functionality along with account-based TDS/TCS section suggestions.
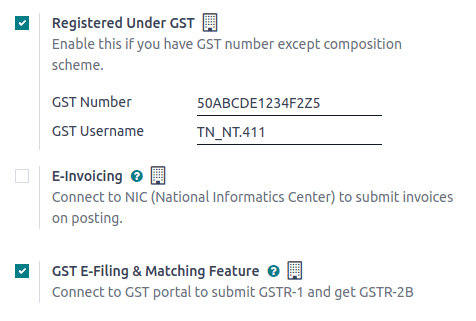
Registered Under GST: Select this if your business is registered under GST to access GST-related features, including e-invoice, e-waybill, GST e-filing, fetch vendor e-invoiced document and check GST number status.
E-Invoicing: Connects to the e-invoice <india/e-invoicing> NIC (National Informatics Center) portal to submit invoices.
E-Way bill: Connects to the e-waybill <india/e-waybill> NIC (National Informatics Center) portal to generate e-waybills.
GST E-Filing & Matching: Enable the feature to facilitate GST return filing <india/gstr> and connect with the GST portal to submit GSTR-1 and retrieve GSTR-2B.
Check GST Number Status: Enable to verify GSTIN Status <india/gstin_status>.
Fetch Vendor E-Invoiced Document: Helps in creating draft vendor bills using e-invoice data submitted by vendors on GST portal.
Sistema e-Invoice
O Odoo está em conformidade com os requisitos do sistema indiano de e-Invoice de Imposto sobre Bens e Serviços (GST).
Configuração
Registro NIC e-Invoice
Você deve se registrar no portal NIC (National Informatics Centre) e-Invoice para obter suas credenciais API. Você precisa dessas credenciais para configurar seu aplicativo Odoo Accounting <india/e-invoicing-configuration>.
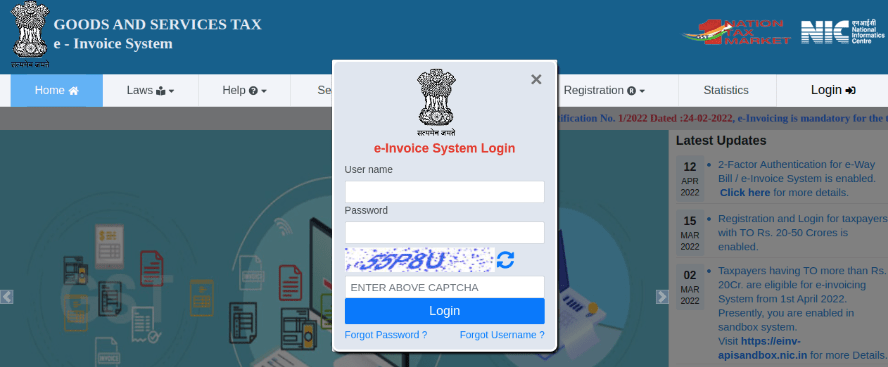
Log in to the NIC e-Invoice portal by clicking Login and entering your Username and Password;
Se você já está registrado no portal NIC, pode usar as mesmas credenciais de login.
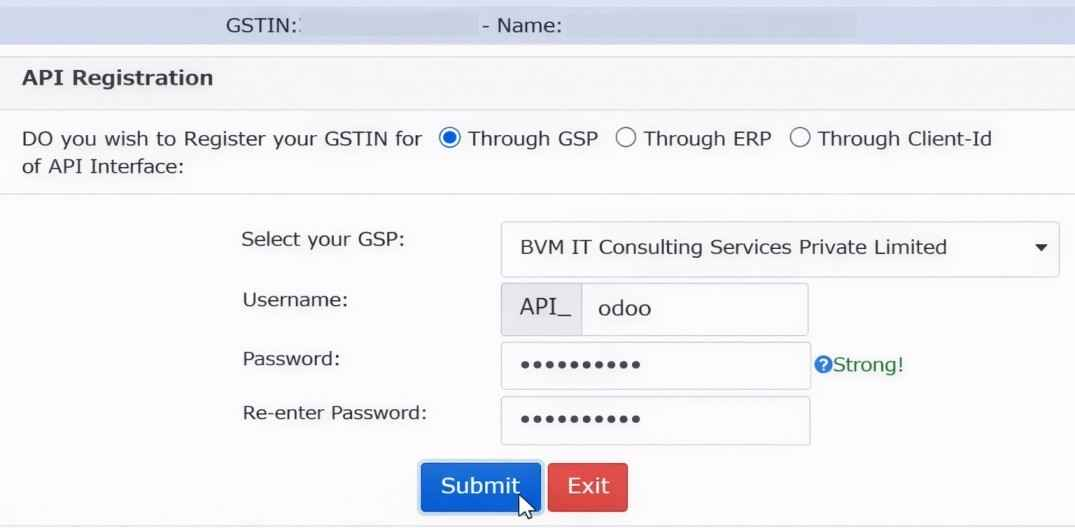
From the dashboard, go to ;
After that, you should receive an OTP (one-time password) code on your registered mobile number. Enter the OTP code and click Verify OTP;
Select Through GSP for the API interface, set BVM IT Consulting Services India Private Limited as GSP, and type in a Username and Password for your API. Once it is done, click Submit.
Configuração no Odoo
Para ativar o serviço de e-Invoice no Odoo, ative <india/indian-configuration> o recurso E-Invoicing e insira o Nome de usuário e Senha previamente definidos para a API.
Além disso, certifique-se de que o campo GSP está configurado <india/gsp_configuration> nas configurações de Contabilidade.
Fluxo de trabalho
Gerar e-Invoice
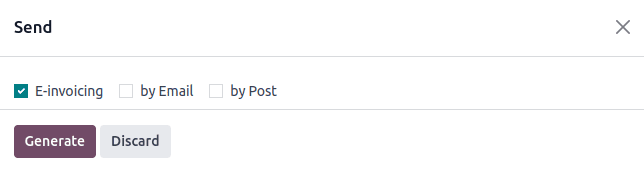
Após uma fatura ser confirmada, clique no botão Enviar para abrir o assistente. Selecione E-Invoicing, depois clique no botão Gerar. O Odoo fará upload do arquivo assinado JSON da fatura para o portal NIC e-Invoice.
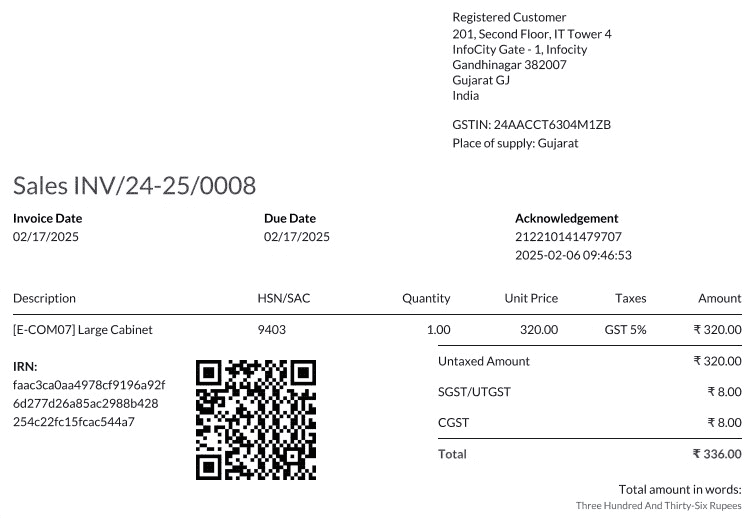
Relatório PDF da fatura
Após validar e enviar uma fatura, o relatório PDF da fatura pode ser impresso. O relatório inclui IRN (Invoice Reference Number), Acknowledgement (número e data) e código QR. Estes certificam que a fatura é um documento fiscal válido.
Cancelamento de e-Invoice
Para cancelar uma e-Invoice, clique no botão Request Cancel na fatura relacionada. Na janela Cancel E-Invoice, preencha Cancel Reason e Cancel Remarks.
Gestão de linhas negativas em e-Invoices
Linhas negativas são tipicamente usadas para representar descontos ou ajustes associados a produtos específicos ou descontos globais. O portal do governo proíbe a submissão de dados com linhas negativas, o que significa que precisam ser convertidas com base no código HSN e na alíquota GST. Isso é feito automaticamente pelo Odoo.
Considere o seguinte exemplo:
Product Details
Product Name
HSN Code
Tax Excluded
Quantity
GST Rate
Total
Product A
123456
1,000
1
18%
1,180
Product B
239345
1,500
2
5%
3,150
Discount on Product A
123456
-100
1
18%
-118
Aqui está a representação transformada:
Product Details
Product Name
HSN Code
Tax Excluded
Quantity
Discount
GST Rate
Total
Product A
123456
1,000
1
100
18%
1,062
Product B
239345
1,500
2
0
5%
3,150
Nesta conversão, linhas negativas foram transformadas em descontos positivos, mantendo cálculos precisos com base no Código HSN e alíquota GST. Isso garante uma representação mais direta e padronizada nos registros de E-invoice.
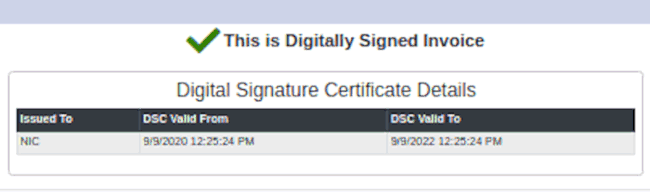
Verificação de GST e-Invoice
Após enviar uma e-Invoice, você pode verificar se a fatura está assinada no site do sistema GST e-Invoice.
Download the JSON file from the attached files. It can be found in the chatter of the related invoice;
Open the NIC e-Invoice portal and go to ;
Select the JSON file and submit it;
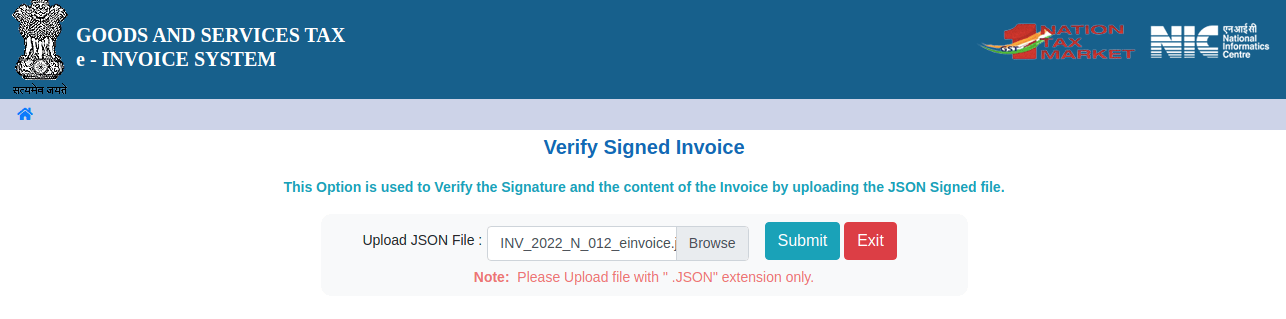
Se o arquivo estiver assinado, uma mensagem de confirmação será exibida.
E-Way bill;
Configuração
O Odoo está em conformidade com os requisitos do sistema Indian Goods and Services Tax (GST) E-waybill.
Registro de API no NIC E-Way bill;
Você deve se registrar no portal E-Way bill do NIC (National Informatics Centre) para criar suas credenciais de API. Você precisa dessas credenciais para configurar seu aplicativo Odoo Accounting <india/e-waybill-configuration>.
Log in to the NIC E-Way bill portal by clicking Login and entering your Username and Password;
From your dashboard, go to ;
Click Send OTP. Once you have received the code on your registered mobile number, enter it and click Verify OTP;
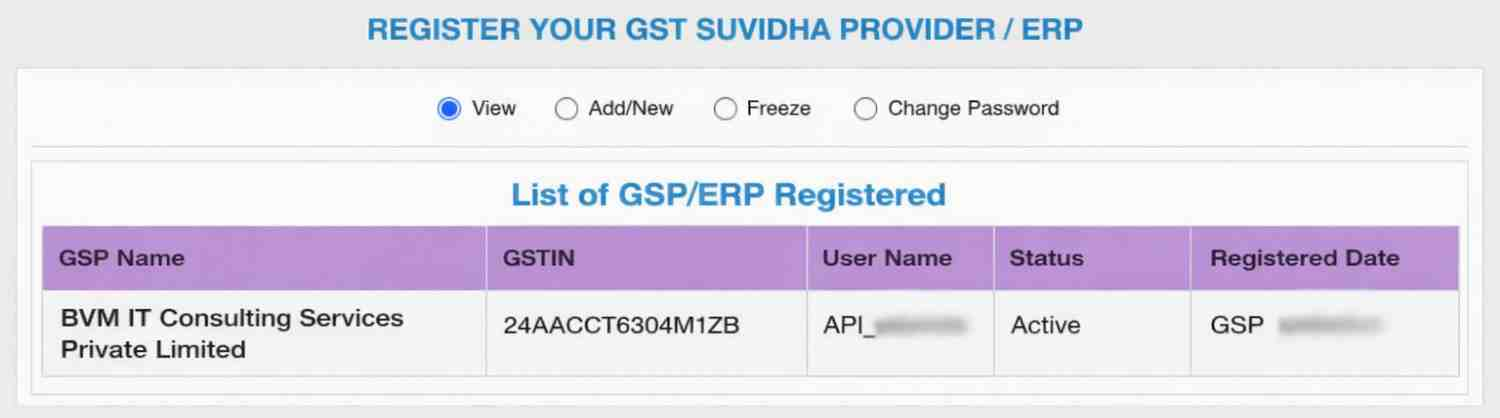
Check if BVM IT Consulting Services India Private Limited is already on the registered GSP/ERP list. If so, use the username and password used to log in to the NIC portal. Otherwise, follow the next step.
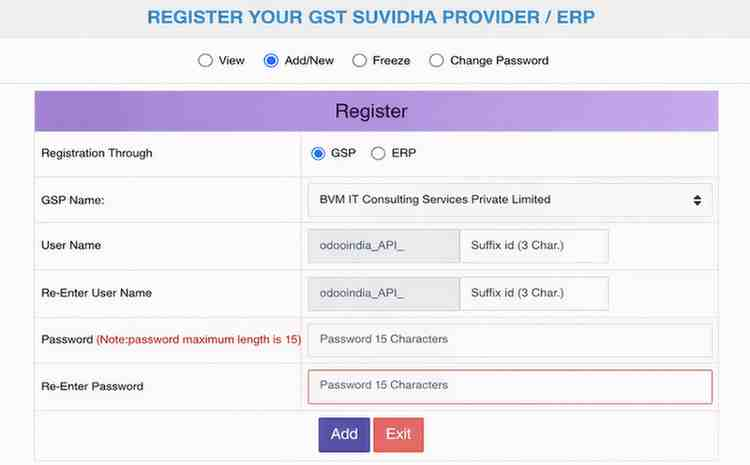
Select Add/New, select BVM IT Consulting Services India Private Limited as your GSP Name, create a Username and a Password for your API, and click Add.
Configuração no Odoo
Para ativar o serviço E-Way bill no Odoo, ative <india/indian-configuration> o recurso E-Way bill e insira o Nome de Usuário e a Senha.
Além disso, certifique-se de que o campo GSP está configurado <india/gsp_configuration> nas configurações de Contabilidade.
Fluxo de trabalho
Gerar E-Way bill;
Para gerar uma E-Way bill, confirme a nota fiscal do cliente/fatura do fornecedor e clique em Criar e-Waybill. Insira os detalhes necessários e clique em Gerar e-Waybill para prosseguir.
Relatório PDF da fatura
Você pode imprimir o relatório em PDF da nota fiscal depois de enviar a E-Way bill. O relatório inclui o número da E-Way bill e a data de validade da E-Way bill.
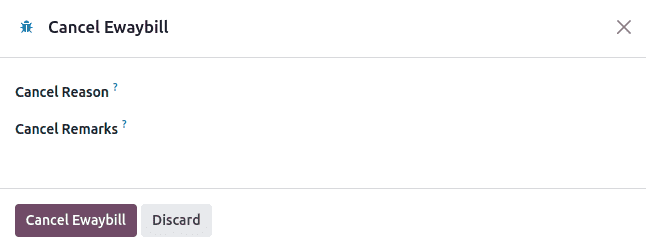
Cancelamento de E-Way bill;
Para cancelar uma E-Way bill, clique em e-Waybill na nota fiscal/fatura relacionada e, em seguida, em Cancelar e-Waybill. Na janela Cancelar Ewaybill, preencha o Motivo do Cancelamento e as Observações do Cancelamento.
Criação de e-waybill a partir de recebimentos e pedidos de entrega;
Para criar E-Way bills a partir de recebimentos e entregas no aplicativo Inventory, siga estas etapas:
Go to or and select an existing delivery order/receipt or create a new one.
Click Create E-waybill/Challan.
Para criar uma E-way bill:
A delivery order must be in the Done state (i.e., validated)
A receipt must have the Ready or Done state.
Click Generate e-Waybill to validate the E-Way bill and send it to the NIC E-Way bill portal.
Para usar a E-Way bill como challan para entregas de mercadorias sem enviá-la ao portal NIC E-Waybill, clique em Usar como Challan.
Para imprimir a E-waybill ou o challan, clique no ícone fa-cog (engrenagem) e selecione fa-print Ewaybill / Challan de Entrega.
Verificação de Status GSTIN Indiano
O Indiano - Verificar Status do Número GST permite que você verifique o status de um GSTIN (Número de Identificação de Imposto sobre Bens e Serviços) diretamente do Odoo.
Para verificar o status do número GST de um contato, acesse o formulário do cliente/fornecedor e clique em Verificar Status GSTIN ao lado do campo GSTIN.
Para verificar o status de um número GST inserido em uma fatura/conta a pagar, acesse a fatura/conta a pagar e clique no botão fa-refresh (atualizar) ao lado do campo Status GST.
Uma notificação é exibida para confirmar a atualização do status e o status GSTIN e data de verificação são registrados no chatter do contato.
Preenchimento de Retorno GST Indiano
Ativar acesso à API
Para arquivar Retornos GST no Odoo, você deve primeiro ativar o acesso à API no portal GST.
Log into the GST portal by entering your Username and Password, and go to My Profile on your profile menu;
Select Manage API Access, and click Yes to enable API access;
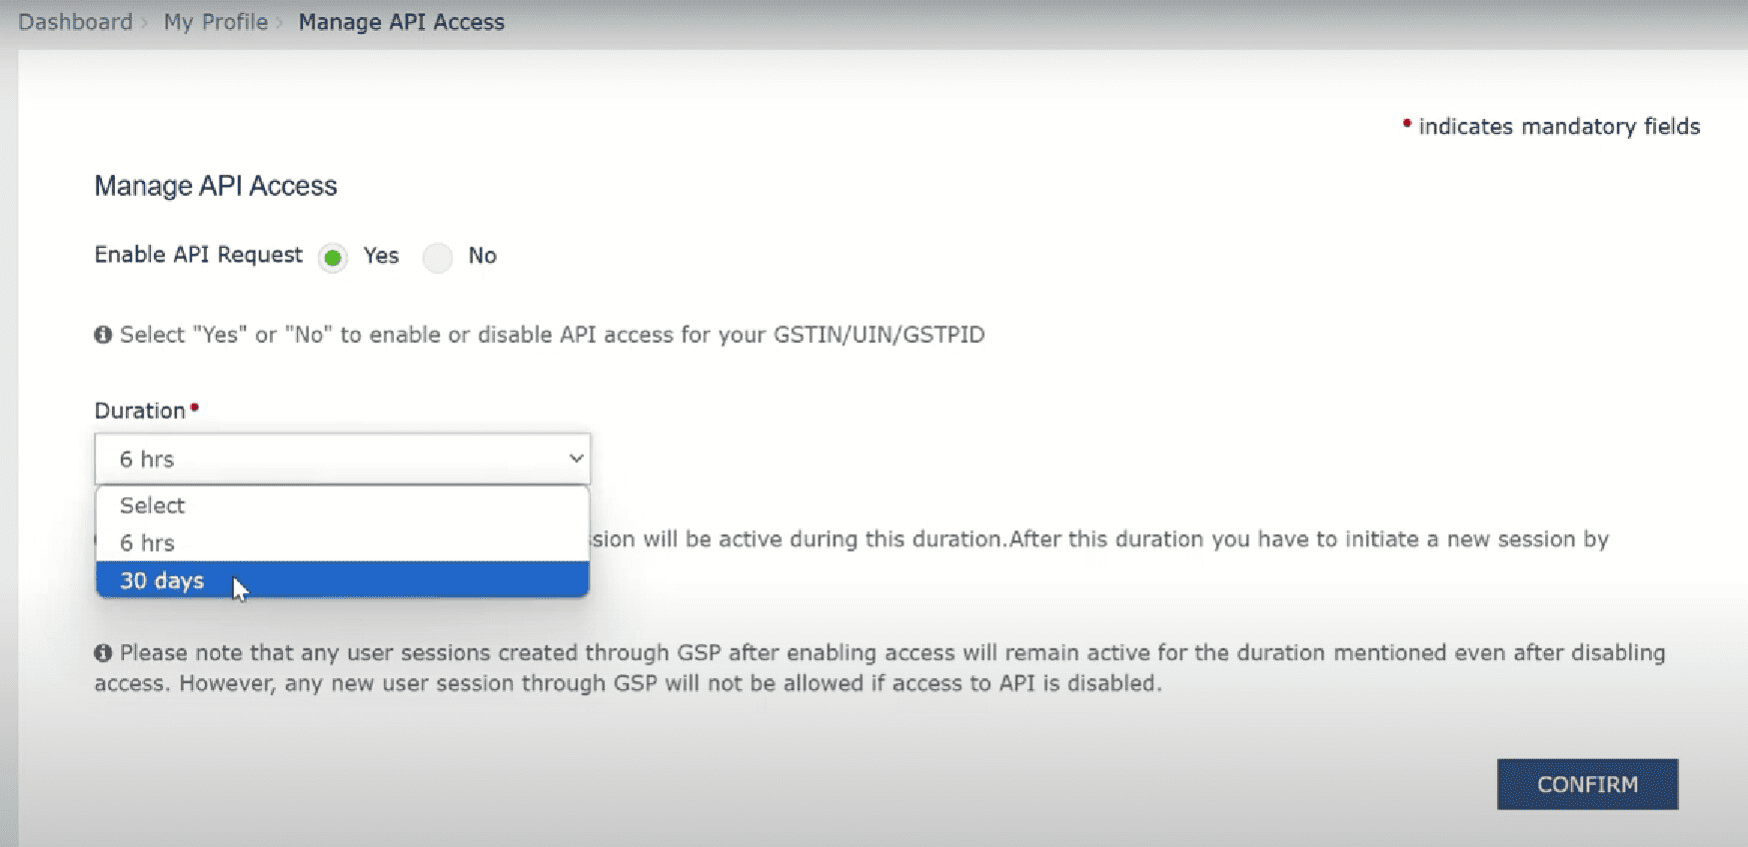
Doing so enables a Duration drop-down menu. Select the Duration of your preference, and click Confirm.
Serviço GST Indiano no Odoo
Depois de ativar o acesso à API <india/gstr_api> no portal GST, ative <india/indian-configuration> o Recurso de E-Filing & Matching de GST para começar a usar o Serviço GST. Então, na seção Registrado sob GST, preencha o Nome de usuário GST obrigatório.
Além disso, certifique-se de que o campo GSP está configurado <india/gsp_configuration> nas configurações de Contabilidade.
Arquivar Retorno GST
Para arquivar um retorno GST, verifique se o Recurso de E-Filing & Matching de GST <india/indian-configuration> está ativado. Então, vá para o painel Contabilidade e clique em Retornos de Impostos no diário Retornos de Impostos. Na janela Períodos Contábeis, preencha os campos a seguir.
Opening Date: Starting date from which tax return periods are created.
Fiscal Year End: End date of the fiscal year (e.g., 31 March).
GSTIN Periodicity: Frequency of return filing (e.g., Monthly).
Arquivamento da declaração de imposto GSTR-1
Para arquivar uma declaração de imposto GSTR-1, siga estas etapas:
Click the suitable GSTR-1 report for the desired period to open the filing view.

Recomenda-se arquivar a declaração cinco dias antes da data de arquivamento para evitar penalidades.
Odoo automatically performs validation checks before submission to ensure compliance with GST portal requirements that must be addressed before filing.
Os seguintes tipos de problemas de validação podem ser levantados:
Apply Appropriate Tax: IGST is not applicable for intra-state transactions.
Wrong CGST/SGST on Inter-State Transactions: CGST/SGST cannot be applied on inter-state transactions.
Fiscal Year Reversed Move: Credit Notes for invoices issued in a given financial year should not be included in GSTR-1 after November 30th; remove tax from these lines.
Invalid HSN Codes: - For products (non-services), HSN codes must not begin with 99. - For services, HSN codes must begin with 99.
Missing HSN Codes: Some product lines do not have HSN codes for journal items.
Invalid UQC Codes: The Unit Quantity Code (UQC) must comply with Indian GST standards.
Missing Document Summary: Document summary lines are mandatory for GSTR-1. This check is always marked as Anomaly initially. After reviewing the summary by clicking the relevant check, it changes to Reviewed.
Missing E-Invoice: Some invoices are not linked to an e-invoice.
Unlinked Unregistered Credit Notes: Credit Notes have been issued without referencing an invoice.
As verificações de validação têm quatro estágios:
To Review: Check requires review.
Reviewed: Check has been reviewed.
Supervised: Check is supervised, and a supervisor is assigned.
Anomaly: Check has failed.
Clique em qualquer verificação individual para visualizar e resolver o problema correspondente.
Uma declaração de imposto só pode ser validada quando todas as verificações estão no estágio Revisado ou Supervisionado.
Após revisar as verificações, clique em Validar. O estágio Revisão aparece em verde em seguida.
Click GSTR-1 (IN) to review the report.
Click Submit, and click Push Data in the Submission Instructions window to send the report to the GST portal.
Durante esta etapa, as credenciais do portal GST devem ser verificadas. Conforme os dados estão sendo enviados, o estágio Enviar na barra de progresso aparece em laranja. Uma vez que o portal GST confirma o recebimento, o estágio fica verde. Se ocorrer um erro, o estágio Enviar muda para vermelho.
Clique no ícone fa-ellipsis-v (reticências) na linha GSTR-1 relevante para exibir opções adicionais:
Generate XLSX: Download the GSTR-1 report as an XLSX file.
Reset: Clear the current state and revert the return to the initial stage.
Click Check Status to retrieve the current status from the GST portal. Once the confirmation is received, the Review stage in the progress bar turns green. Then, click Mark as Filed to finalize and submit the return as filed.
Após uma devolução ser marcada como Protocolada, ela não pode ser redefinida ou protocolada novamente.
Receber reconciliação de imposto GSTR-2B
Select the relevant GSTR-2B report for the desired period that needs to be reconciled.
In the validation checks view, click Fetch E-Invoice to retrieve vendor e-invoice data for the reconciliation period. The check is initially marked as Anomaly and changes to Reviewed after fetching. Then, click Validate to confirm and mark the Review stage as green.
A verificação Buscar Nota Fiscal Eletrônica fica verde apenas se os dados da nota fiscal eletrônica forem buscados dois dias após o término do período de reconciliação do último mês.
Click Fetch GSTR-2B to retrieve all invoices from the GST portal. Once the data is fetched, the Fetch stage in the progress bar turns green. To view the raw report data, click GSTR-2B (IN).
The fetched invoices are automatically matched with the E-invoices. Click View Bills to see detailed matching results.
O estágio Correspondência indica o status da reconciliação:
Orange: Partially matched (some bills require correction).
Green: Fully matched (all bills reconciled).
Em caso de incompatibilidades, corrija as contas a pagar afetadas e clique no ícone fa-ellipsis-v (reticências) para acessar opções adicionais:
Re-Match: Re-run the matching process after making corrections.
Reset: Reset the reconciliation to the Match stage.
After all bills are fully matched, click the fa-ellipsis-v (ellipsis) icon and select Mark as Complete. The Complete stage in the progress bar turns green, finalizing the bill reconciliation.
Relatórios fiscais
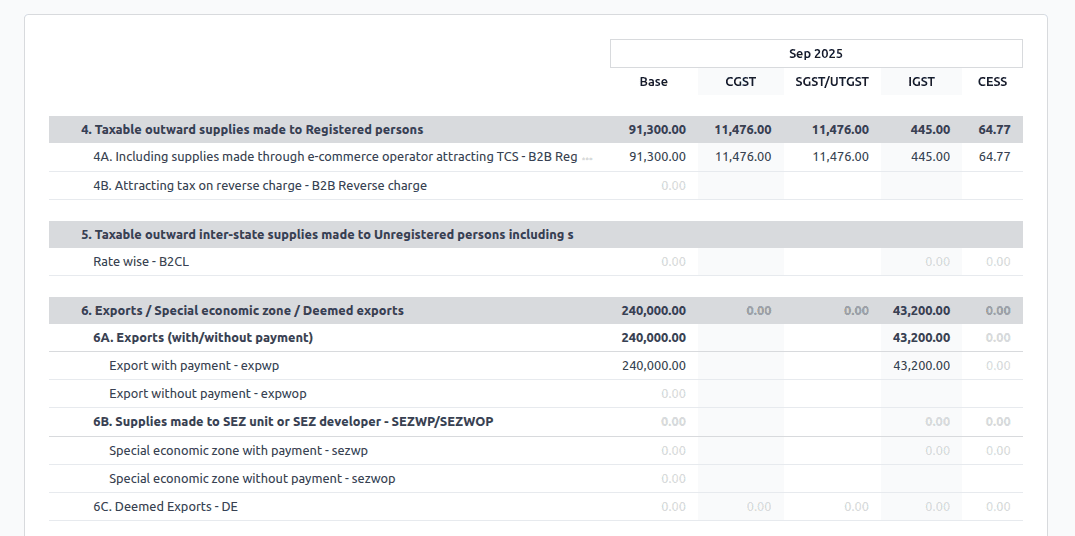
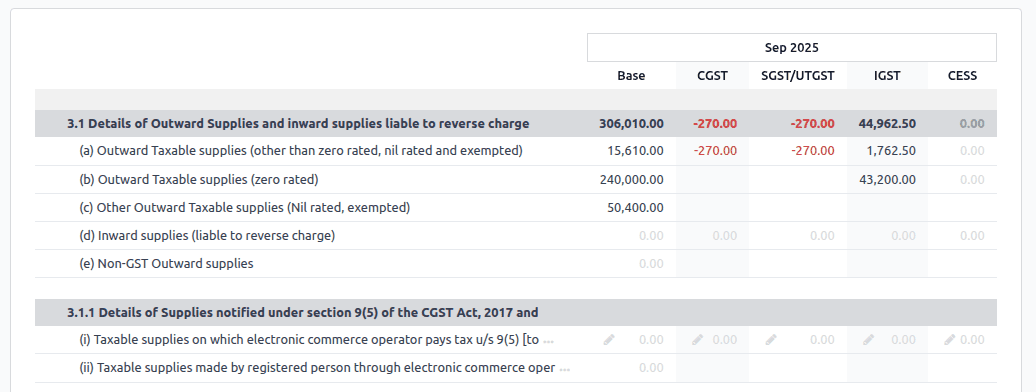
Relatório GSTR-1
O relatório GSTR-1 é dividido em seções. Ele exibe o valor Base, CGST (Imposto Central sobre Bens e Serviços), SGST (Imposto Estadual sobre Bens e Serviços), IGST (Imposto Integrado sobre Bens e Serviços) e CESS para cada seção.
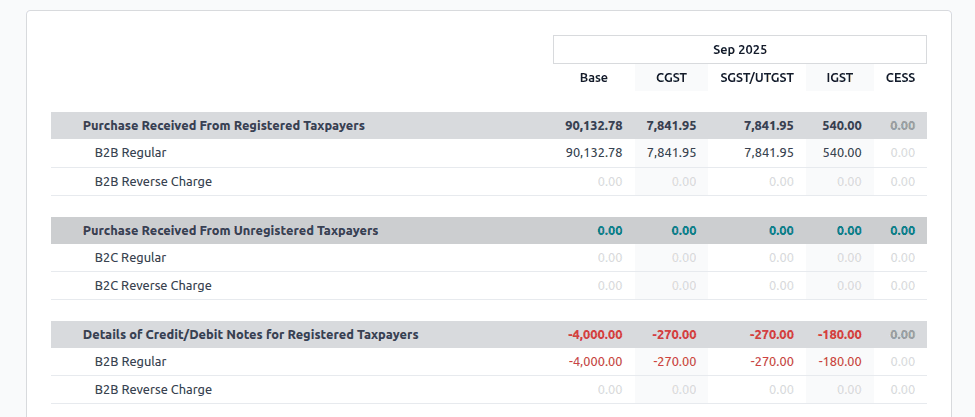
Relatório GSTR-2B
O relatório GSTR-2 é dividido em seções. Ele exibe o valor Base, CGST (Imposto Central sobre Bens e Serviços), SGST (Imposto Estadual sobre Bens e Serviços), IGST (Imposto Integrado sobre Bens e Serviços) e CESS para cada seção.
Relatório GSTR-3B
O relatório GSTR-3B contém diferentes seções:
Details of inward and outward supply subject to a reverse charge;
Eligible ITC (Income Tax Credit);
Values of exempt, Nil-rated, and non-GST inward supply;
Details of inter-state supplies made to unregistered persons.
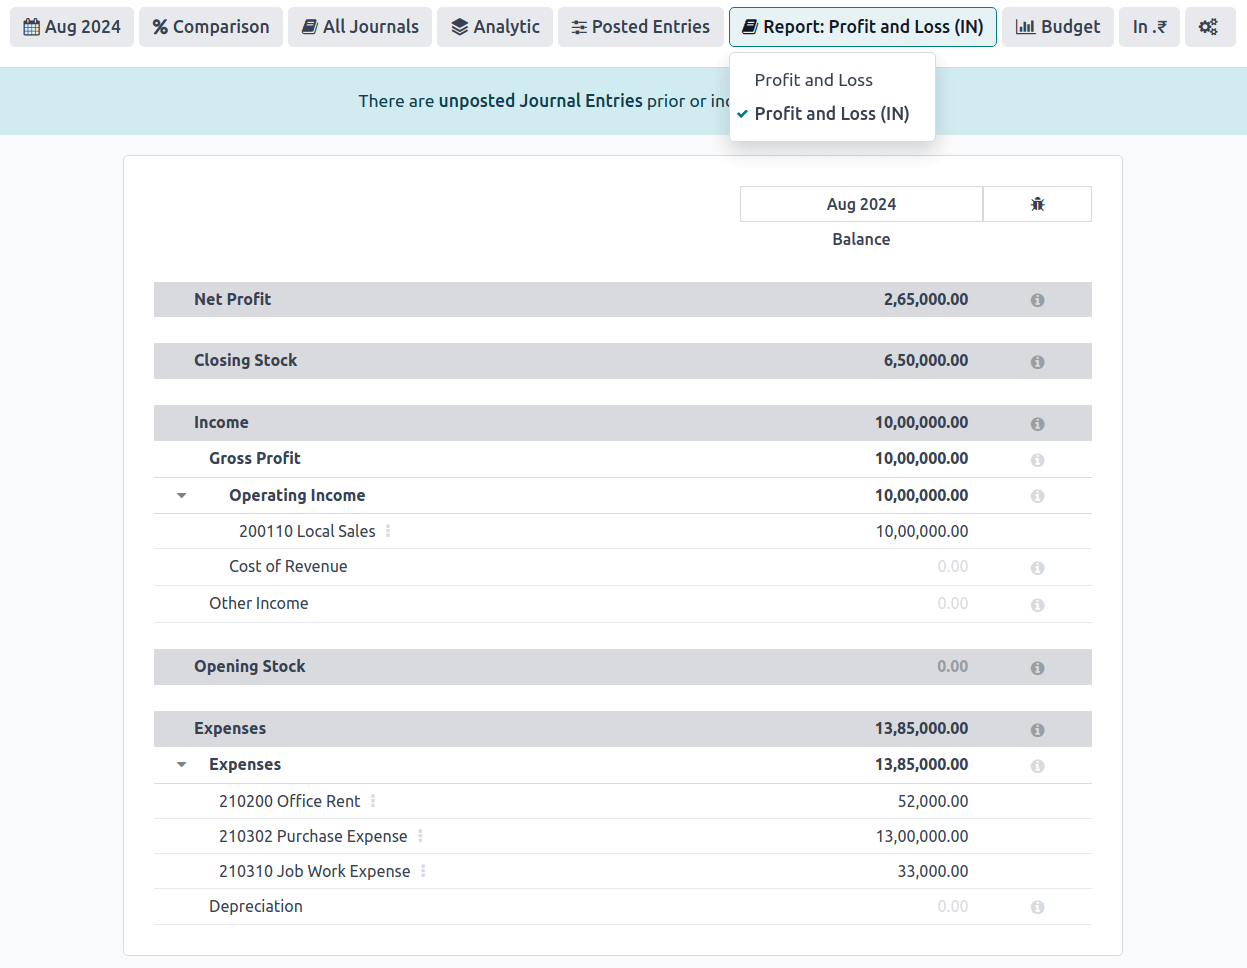
Relatório de Lucros e Perdas (IN)
Este é um relatório de Lucros e Perdas que exibe os saldos de Estoque de Abertura e Estoque de Fechamento. Ajuda usuários que utilizam contabilidade Continental a determinar com precisão o custo das mercadorias (ou seja, Estoque de Abertura + compras durante o período - Estoque de Fechamento).
Alerta de limite de TDS/TCS
TDS (imposto deduzido na fonte) e TCS (imposto cobrado na fonte) são provisões fiscais sob a lei indiana, acionadas quando os valores das transações excedem limites especificados. Este alerta notifica os usuários quando o valor das faturas ou contas a pagar ultrapassa esses limites, solicitando a aplicação do TDS/TCS apropriado.
Para configurar o Odoo para aconselhá-lo sobre quando aplicar TDS/TCS, defina o campo Seção TDS/TCS na conta correspondente no plano de contas. O Odoo exibirá um banner sugerindo a seção TDS/TCS sob a qual o imposto pode ser aplicável ao registrar uma fatura ou conta a pagar.
Configuração
Navigate to
In the Indian Integration section, enable the TDS or TCS feature as required.
Navigate to .
Click View on the desired account, and set the TDS/TCS Section field.
Aplicando TCS/TDS em faturas e contas a pagar
Com base na conta utilizada na fatura do cliente ou conta a pagar do fornecedor, o Odoo verifica o limite de limite TCS/TDS. Se o limite especificado na Seção TCS/TDS da conta for excedido, o Odoo exibe um alerta que sugere aplicar o TCS/TDS apropriado. O alerta desaparecerá assim que o TCS/TDS for aplicado.
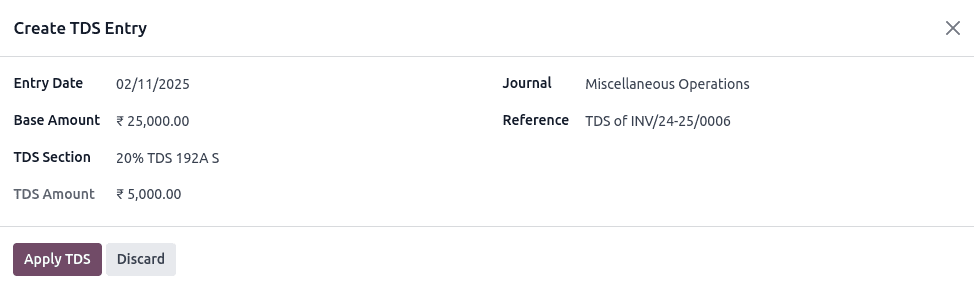
TCS é diretamente aplicável no imposto nas linhas da fatura. Para aplicar TDS, clique no botão inteligente Entrada TDS na conta a pagar/pagamento do fornecedor. A janela pop-up permite especificar os detalhes do TDS. Confirme a entrada para aplicar o TDS.
No Odoo, o total agregado é calculado para parceiros que compartilham o mesmo número PAN, em todos os ramos da empresa.