Self-ordering
The self-ordering feature allows customers to browse your menu or product catalog, place an order, and complete payment using their mobile device or a self-ordering kiosk.
Configuração
Feature activation
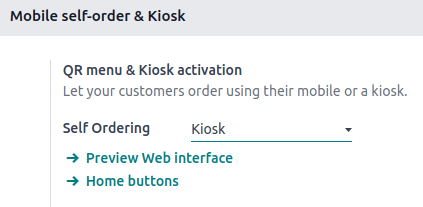
Para ativar este recurso e selecionar um tipo de auto-atendimento, acesse as configurações do PDV <pos/use/settings>, role para baixo até a seção Auto-atendimento móvel e Quiosque, e selecione um tipo de Auto-atendimento na seção Ativação de menu QR e Quiosque.
You can choose from:
Select QR menu or QR menu + Ordering to give customers access to your menu or product catalog by scanning a QR code on their personal device. The latter also allows them to place an order and make a payment.
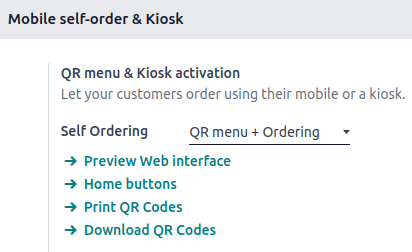
Click fa-arrow-right Print QR Codes to download a .pdf document with the generated QR codes.
Click fa-arrow-right Download QR Codes to download a compressed file with the generated QR codes.
Em restaurantes <pos/restaurant/floors>, imprimir ou baixar códigos QR gera tantos códigos QR quanto o número de mesas disponíveis. Em lojas, gera apenas um código QR genérico.
To customize QR codes,
Scan the relevant QR code to acquire its URL.
Use a QR code generator (e.g., QR code monkey or QR code generator) to create a custom QR code.
When Kiosk is selected, customers can access the menu or product catalog, place orders, and pay from a self-ordering kiosk.
Once a self-ordering type is selected, the additional settings <pos/self_order/add-settings> update to fit the selected type's needs.
Additional settings
The Home buttons are displayed on the kiosk or mobile device interfaces when customers are self-ordering. To set them up, click fa-arrow-right Home buttons. Then,
Click New to add a new button.
Set the Label.
Enter a URL preceded by https:// to redirect customers to a specific URL when clicking the button. For instance, you might want to redirect them to a campaign video for a new product or to a contest page.
In the same URL column, enter /products to create a button that redirects customers to the product catalog.
Select the Points of Sale to ensure this button only appears on the selected POS' self-ordering interface.
Select a predefined Style from the dropdown menu.
Zonas de atendimento também podem ser definidas para predefinições usadas para auto-atendimento.
Define when and how customers pay in the Pay after field. Customers can pay after Each meal or for Each order.
The service location and payment options available depend on the type of self-ordering service and POS:
QR menu + Ordering:
Restaurants: Customers can be served at their table or the pickup zone.
When served at their table, they can pay after each meal or each order.
When served at the pickup zone, they can only pay after each order.
Shops: Customers can only be served at the pickup zone and pay after each order.
Regardless of the type of POS, customers can pay online or using any configured payment method.
Kiosk:
Idioma
This option allows you to enable multiple languages for the self-ordering interface. The suggested languages are those already installed in Odoo. To expand the selection, add more languages:
Click fa-arrow-right Add Languages.
Add as many languages as needed to the Languages field.
Click Add.
Add those languages to the Available field.
Veja também:
Splash screens are introductory screens displayed when the self-ordering interface or kiosk is launched. They typically contain branding, welcome messages, or usage instructions.
To add a splash screen image, click fa-paperclip Add images, select and open an image.
To remove a splash screen image, hover over the image and click fa-times (Delete).
You can add multiple splash screen images at once.
Ative esta configuração para ajustar a alíquota de imposto <pos/pricing/taxes> com base em se os clientes comem no local ou levam seu pedido para ir. Em seguida,
Fill in the field with an existing Alternative Fiscal Position;
Create and set up a new fiscal position by filling in the field and clicking Create & Edit; or
Create and set up a new fiscal position by clicking fa-arrow-right Fiscal Positions.
Veja também:
pos/pricing/taxes
Esta opção permite usar uma IoT Box conectada a uma tela sensível ao toque como um quiosque de auto-atendimento.
Connect an IoT Box to your Odoo database.
Ensure a touchscreen display is connected
Select the IoT Box from the Launch on field.
Após conectado à caixa IoT, a tela sensível ao toque aparece como dois dispositivos separados na lista de dispositivos da caixa IoT: um display e um dispositivo de entrada de teclado.
Visualizar
Review the interface before making the self-ordering feature available to customers to ensure all settings are applied correctly. Click fa-arrow-right Preview Web interface under the Self Ordering field to ensure all additional settings <pos/self_order/add-settings> are correctly applied.
Usage guidelines
On the POS user's end, access the self-ordering interface by
Scanning a downloaded or printed QR code; or
Clicking the fa-ellipsis-v (vertical ellipsis) icon on the POS card, then Mobile Menu.
On the customers' end,
Access the self-ordering interface by scanning a downloaded or printed QR code.
Click the home button <pos/self_order/add-settings> to reach the menu or catalog.
Select the items and click Order to place an order.
Follow the instructions on-screen to assign a table and pay for the order.
No lado do usuário do PDV, clique em Iniciar Quiosque.
On the customers' end,
Click the home button <pos/self_order/add-settings> from a self-ordering kiosk to reach the menu or product catalog.
Select the items and click Order to place an order.
Follow the instructions on-screen to assign a table and pay for the order.
