Crie oportunidades a partir de formulários de contato da web
Adicionar um formulário de contato a um site facilita a conversão de visitantes em leads e oportunidades. Depois que um visitante envia suas informações, uma oportunidade pode ser criada automaticamente e atribuída a uma equipe de vendas e a um vendedor designados.
Personalizar formulários de contato
Por padrão, a página Entre em contato em um site Odoo exibe um formulário de contato pré-configurado. Esse formulário pode ser personalizado, conforme necessário, para atender às necessidades de uma equipe de vendas específica.
Navegue até o e, em seguida, clique em Editar no canto superior direito da tela para abrir o editor da web. Clique no bloco de construção do formulário no corpo da página da web para abrir as definições de configuração do formulário na barra lateral direita. As seguintes opções estão disponíveis para personalizar o formulário de contato na seção De da barra lateral direita:
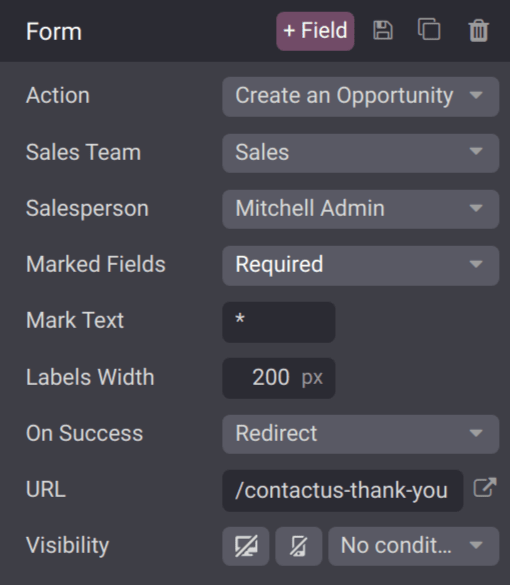
Action: the default action for a contact form is Send an Email. Select Create an Opportunity from the drop-down list to capture the information in the CRM app.
Sales Team: choose a sales team from the drop-down menu that the opportunities from this form should be assigned to. This field only appears if the Action field is set to Create an Opportunity.
Salesperson: if the opportunities should be assigned to a specific salesperson, select them from the drop-down menu. If no selection is made in this field, the opportunities are assigned based on the team's existing rules.
Marked Fields: use this field to alter how the form handles marked fields. The default option is to treat marked fields as Required, which is the recommended setting.
Mark Text: choose how Marked Fields should be identified. The default character is an asterisk (*).
Labels Width: use this field to alter the pixel width of the labels, if desired.
On Success: select how the webpage reacts after a customer successfully submits a form. Nothing keeps the customer on the same screen, with the addition of a confirmation message that the form was submitted successfully. Redirect sends the customer to a new webpage, based on the address provided in the URL field below. Show Message replaces the form with a preconfigured message that informs the customer someone should respond to them as soon as possible.
URL: if Redirect is selected in the On Success field, enter the URL for the webpage, where customers should be directed after successfully submitting a form.
Visibility: use the drop-down menu to add any visibility conditions for this field, if desired.
Personalizar campos de formulários de contato
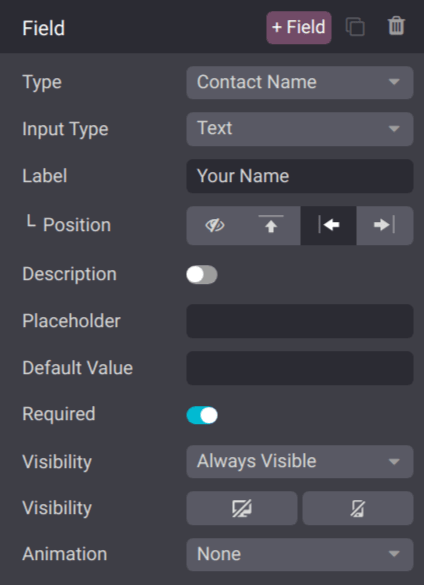
Além das definições do formulário, as configurações de cada campo também podem ser personalizadas. Com o menu do editor da web ainda aberto, clique em um campo para abrir a seção de definições de configuração de Campo na barra lateral. As seguintes opções estão disponíveis para personalizar um campo:
Type: choose a custom field option or an existing field type.
Input Type: determine the type of information customers should input. Available options are Text, Email, Telephone, or Url. The selection made in this field limits the format that customers can use when entering information.
Label: enter the name for the field.
Position: choose the way the label is aligned with the rest of the form. The label can be hidden, above the field, to the left of the field, or right adjusted and closer to the field.
Description: slide the toggle to add a description for the field, which can provide additional instructions to customers. Click under the field on the form to add the description.
Placeholder: enter an example to help users know how to input information where formatting is important, such as a phone number or email address.
Default Value: enter a value to include in the form, by default, if the customer does not provide information in the field. It is not recommended to include a default value for required fields.
Required: slide the toggle to mark this field as required if it must be filled in for every submission.
Visibility: select when this field should be visible. Use the button on the left to choose whether to show or hide this field on a desktop users. Use the button on the right to choose whether to show or hide this field to mobile users.
Animation: select if this field should have any animation.
Ver oportunidades
Depois que um cliente envia um formulário de contato e uma oportunidade é criada, ela é atribuída com base na configurações do formulário <crm/customize-contact-form>. Para visualizar as oportunidades, navegue até .
Navegue até para visualizar os leads recém-criados.
No painel Meu funil, clique em um cartão de oportunidade na visualização Kanban para abrir o registro da oportunidade. As informações enviadas pelo cliente ficam visíveis no registro da oportunidade.
Se o formulário de contato pré-configurado for usado, o campo Assunto será adicionado ao campo Título e o conteúdo do campo Notas, que é rotulado como Sua pergunta, será adicionado à aba Notas internas.
Website forms <website/building_blocks/form>