Windows virtual IoT
Para começar a usar a IoT virtual do Windows:
Make sure the computer runs an updated version of Windows (Windows 10 or Windows 11), whether it's a laptop, desktop, or server.
Install the Windows virtual IoT <iot/windows-iot/installation> on the Windows computer.
Connect your devices to the Windows virtual IoT.
Configure the Windows Firewall <iot/windows-iot/firewall>.
Instalação
Para instalar o IoT virtual do Windows em um computador com Windows:
Access Odoo's download page, scroll down to the Virtual IOT section, and click Download.
Open the downloaded .exe file, allow the app to make changes to your device, select a language, and click OK.
Click Next, then I Agree to accept the terms and conditions and continue.
Verify you have the required space on your computer and click Next.
In the Destination folder, enter C:\odoo and click Install.
Não instale o Windows virtual IoT da Odoo em nenhum diretório de usuário do Windows, pois isso pode causar problemas com geração de certificado HTTPS <iot/connect/https_certificate>.
Set up GPL Ghostscript: Click Next, agree to the terms and conditions, click Install, then Finish.
Click Next and Finish to complete the setup. The IoT system's homepage <iot/windows-iot/homepage> automatically opens in a web browser with the URL http://localhost:8069.
Restart <iot/windows_iot/restart> the Windows virtual IoT service.
Check that you can access the IoT system's homepage <iot/windows-iot/homepage> in a web browser:
on the Windows virtual IoT computer, and
on another device on the same network as the IoT system by navigating to the URL http://xxx:8069 (where xxx is the IoT system's IP address).
on another device on the same network as the IoT system by navigating to the URL https://xxx (where xxx is the IoT system's IP address) to test for HTTPS <iot/connect/https_certificate> connection.
Se não for possível acessar a página inicial do sistema IoT <iot/windows-iot/homepage> a partir de outro dispositivo, crie uma regra Windows Firewall <iot/windows-iot/firewall> para permitir a comunicação por meio da porta 8069.
Conexão de dispositivos
A maioria dos dispositivos se conecta automaticamente ao computador Windows usado pela Windows Virtual IoT por meio do Windows Plug and Play (PnP). No entanto, se o Windows não reconhecer o dispositivo automaticamente após a conexão, pode ser necessário que o administrador instale manualmente os drivers apropriados.
Configuração do Firewall do Windows
Firewalls ajudam a manter os dispositivos seguros, mas às vezes podem bloquear conexões legítimas. Se a máquina virtual Windows IoT não estiver acessível na LAN (Local Area Network), por exemplo, de outro dispositivo, pode ser devido a um firewall bloqueando a conexão. Para evitar este problema, configure exceções para descoberta de rede nas configurações do SO (Sistema Operacional) ou firewall.
Para criar uma regra no Windows Defender e permitir comunicação através das portas necessárias, siga estas etapas:
Search the Windows start menu for firewall and select the Windows Defender Firewall with Advanced Security app.
In the left part of the window, select Inbound Rules.
In the right part of the window, under Actions, click New Rule.
In the New Inbound Rule Wizard that opens, select the Port type of rule and click Next.
On the Protocols and Ports page, make sure TCP and Specified local ports are selected, enter the following in the field: 8069, 80, 443, and click Next.
Outras portas podem ser necessárias dependendo dos seus dispositivos IoT. Por exemplo, adicione a porta 9050 para o terminal de pagamento /applications/sales/point_of_sale/payment_methods/terminals/worldline e porta 9000 para o terminal de pagamento /applications/sales/point_of_sale/payment_methods/terminals/ingenico.
On the Action page, select Allow the connection and click Next.
On the Profile page, disable any connection type(s) that don't apply to your Windows computer and click Next.
On the Name page, provide a Name (e.g., Odoo) and, optionally, a brief Description, then click Finish.
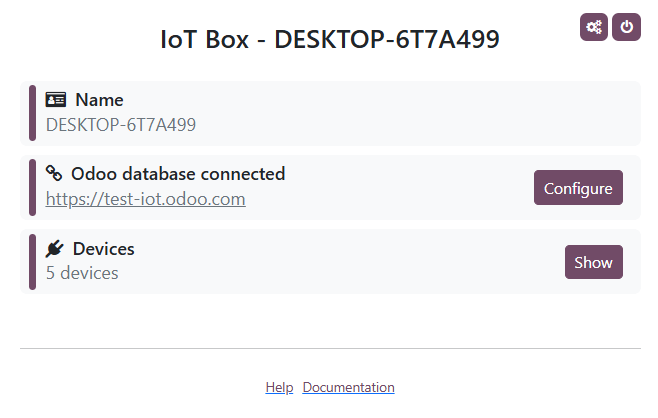
Página inicial da Windows virtual IoT
Para acessar a página inicial da IoT virtual do Windows, navegue até o URL http://localhost:8069 no computador da IoT virtual do Windows ou abra um navegador da web em outro computador na mesma rede que o sistema IoT e navegue até o URL http://xxx:8069 (em que xxx é o endereço IP do sistema IoT).
Uma vez que a máquina virtual Windows IoT está conectada ao banco de dados Odoo, sua página inicial pode ser acessada pelo Odoo abrindo o aplicativo IoT, clicando no cartão da caixa IoT relevante e clicando em Página inicial.
Reiniciar IoT virtual do Windows
Para reiniciar manualmente o servidor Windows IoT, procure no menu inicial do Windows por services e selecione o aplicativo Serviços. Role para baixo até o serviço odoo-server-xxx, clique com o botão direito e selecione Iniciar ou Reiniciar.
Desinstalação da IoT virtual do Windows
Para desinstalar a IoT virtual do Windows, desinstale <https://support.microsoft.com/en-us/windows/uninstall-or-remove-apps-and-programs-in-windows-4b55f974-2cc6-2d2b-d092-5905080eaf98#ID0EBD=Windows_11> o programa Odoo em seu computador Windows. Confirme a desinstalação e conclua as etapas na caixa de diálogo Desinstalar Odoo.