Taiwan
Módulos
Os seguintes módulos relacionados à localização de Taiwan estão disponíveis:
Name |
Technical name |
Description |
|---|---|---|
Taiwan - Accounting |
l10n_tw |
This is the base module to manage the accounting chart for Taiwan. |
Taiwan - E-invoicing |
l10n_tw_edi_ecpay |
This module allows the user to send their invoices to the Ecpay system. |
Taiwan - E-invoicing Ecommerce |
l10n_tw_edi_ecpay_website_sale |
This module allows the user to input Ecpay information in ecommerce for sending their invoices to the Ecpay system. |
Taiwan - Accounting Reports |
l10n_tw_reports |
This module includes the accounting reports for Taiwan. |
Visão geral da localização
O pacote de localização de Taiwan garante conformidade com as regulamentações fiscais e contábeis de Taiwan. Inclui ferramentas para gerenciar impostos, posições fiscais, relatórios e um plano de contas predefinido adaptado aos padrões de Taiwan.
O pacote de localização de Taiwan fornece os seguintes recursos principais para garantir conformidade com as regulamentações fiscais e contábeis locais:
../accounting/get_started/chart_of_accounts: a predefined structure tailored to Taiwanese accounting standards.
Taxes <localizations/taiwan/taxes>: pre-configured tax rates.
E-invoicing (ECPay) <localizations/taiwan/ecpay-integration>: integration for electronic invoicing in line with Taiwanese government requirements.
Impostos
A alíquota de imposto padrão em Taiwan é de 5%, embora alíquotas especiais se apliquem a indústrias específicas. Para configurar impostos especiais para a GBRT (Imposto sobre Receita Bruta de Negócios), vá para , clique em Novo e configure o seguinte:
Fill in the standard fields <taxes/configuration/back-end> and tax computation.
In the Ecpay Tax Type field, select Taxable (special tax rate).
In the new Ecpay Special Tax Type field that appears, select the applicable industry.
Contatos
Para gerenciar a distinção entre faturas B2C (Empresa para Consumidor) e B2B (Empresa para Empresa), configure os seguintes campos no formulário de contato:
Financeiro
Integração ECPay
O Odoo suporta integração com ECPay para enviar faturas geradas diretamente para seu sistema.
Configuração
Para configurar a integração, credenciais válidas devem ser recuperadas do painel do vendedor ECPay. Acesse para obter as informações necessárias:
MerchantID
Hashkey
HashIV
Configuração no Odoo
Acesse , role para baixo até a seção Emissão de Notas Fiscais Eletrônicas de Taiwan e preencha os campos ID do Comerciante, Chave de Hash e Hash IV, recuperados do painel do vendedor ECPay <localizations/taiwan/ecpay-setup>.
Fluxo de trabalho
Enviar faturas para ECPay
Fatura B2C (pessoa física)
Para enviar uma fatura B2C, siga estas etapas:
Navigate to and create a new invoice <accounting/invoice/creation>.
Select a customer <localizations/taiwan/contacts> of the type Individual.
In the Ecpay tab, configure delivery options:
Get Printed Version: Check this to allow the customer to receive a printable ECPay invoice.
Love Code: Enter the Love Code if the customer wishes to donate the invoice to a charity.
Carrier Type: Select the carrier type if the customer uses a cloud-based carrier, and enter the Carrier Number (and Carrier Number 2) if required.
Confirm the invoice, and click Send. Then, ensure the Send to Ecpay checkbox is selected, and click Send.
The Invoice Status, Ecpay Invoice Number, and Creation Date in the Ecpay tab will update automatically upon successful submission.
Fatura B2B (empresa)
Para enviar uma fatura B2B, siga estas etapas:
Navigate to and create a new invoice <accounting/invoice/creation>.
Select a customer <localizations/taiwan/contacts> who is either a Company or an Individual belonging to a Company.
Confirm the invoice, and click Send. Then, ensure the Send to Ecpay checkbox is selected, and click Send.
The Invoice Status, Ecpay Invoice Number, and Creation Date in the Ecpay tab will update automatically upon successful submission.
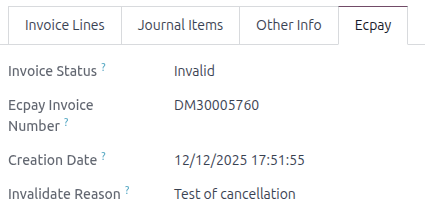
Cancelamento de Fatura
Para cancelar uma fatura submetida:
Open the relevant invoice and click Request Cancel.
In the pop-up window, provide a cancellation Reason, then click Cancel Invoice.
The Invoice Status changes to Invalid, and the Invalidate Reason is filled in with the cancellation Reason.
Enviar notas de crédito para ECPay
Antes de enviar uma nota de crédito, a fatura original deve ser submetida com sucesso ao ECPay.
Notas de Crédito B2C
Para enviar uma nota de crédito B2C para ECPay, siga estas etapas:
Click Credit Note on the relevant invoice and enter the Reason displayed on Credit Note.
Select the Agreement Type and the Allowance Notify Way, and click Reverse.
Click Confirm, then Send, ensuring Send to Ecpay (Issue Allowance) is selected.
Em seguida, o Status do Reembolso é atualizado para Acordado (para Acordos Offline) ou A ser acordado (para Acordos Online). Além disso, o Número da Fatura de Reembolso, Tipo de Acordo da Fatura de Reembolso e Forma de Notificação de Abatimento são atualizados de acordo na aba Ecpay.
Notas de crédito B2B
Para enviar uma nota de crédito B2B para ECPay, siga estas etapas:
Click Credit Note on the relevant invoice, enter the Reason displayed on Credit Note, then click Reverse.
Click Confirm, then Send, ensuring Send to Ecpay (Issue Allowance) is selected.
Depois, o Número da Fatura de Reembolso é atualizado automaticamente na aba Ecpay.
e-Commerce
Configuração
Para habilitar a submissão direta de faturas via eCommerce:
Go to .
In the Invoicing section, enable Automatic Invoice.
Isso garante que as faturas sejam geradas e enviadas ao ECPay automaticamente assim que o pagamento online for confirmado.
Processo de Checkout
B2C Customers: During checkout, customers must indicate whether they want to receive a physical invoice using the Request a paper copy field
No: No copy is provided.
Yes: The invoice can be downloaded from the invoice view.
B2B Customers: An Invoicing Info page appears after delivery confirmation. Customers can either select the Donate checkbox to donate the invoice, or choose an Ecpay e-invoice carrier from the following options, and provide the Carrier Number and Carrier Number 2 where applicable.
Member Account
Citizen Digital Certificate
Mobile Barcode
EasyCard
iPass