Alocações
Alocações são quantidades de tempo de folga concedidas aos funcionários, seja concedidas imediatamente ou ganhas conforme o funcionário trabalha, por meio de um plano de acréscimo.
Once time off type and accrual plans <time_off/accrual-plans> have been configured, the next step is to allocate, or give, time off to employees.
A página Alocações do aplicativo Folgas é somente visível para usuários que tenham direitos de acesso Administrador de folgas ou Administrador para o aplicativo Folgas. Para obter mais informações sobre direitos de acesso, consulte a documentação direitos de acesso.
Alocar folgas
Para criar uma nova alocação, navegue até .
Apresenta uma lista de todas as alocações atuais, incluindo seus respectivos status.
Clique em Novo para alocar folgas, e um formulário Alocação em branco será exibido.
Depois de inserir um nome para a alocação no primeiro campo em branco do formulário, insira as seguintes informações:
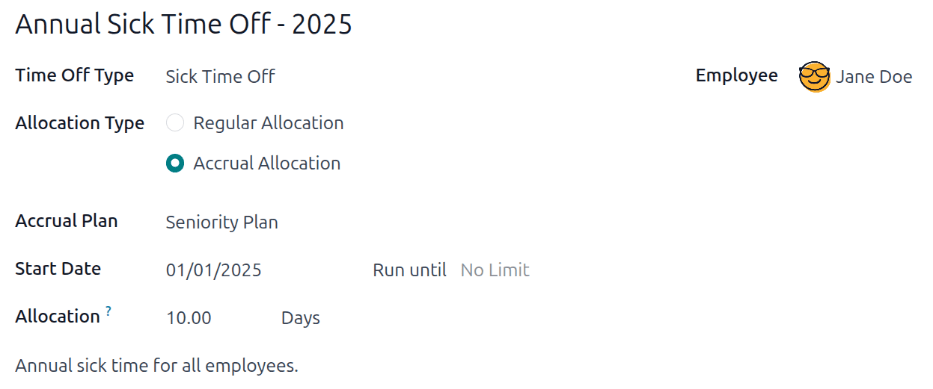
Name: Enter a name for the allocation, typically containing the type of time off, and the period of time it is available (example: Annual Vacation Time Off - 2025).
Time Off Type: Using the drop-down menu, select the type of time off that is being allocated to the employees.
Allocation Type: Select how the allocation is granted. Choose Regular Allocation if the time off is given immediately, or Accrual Allocation if the time off is earned through an accrual plan <time_off/accrual-plans>.
Accrual Plan: If Accrual Allocation is selected for the Allocation Type, the Accrual Plan field appears. Using the drop-down menu, select the accrual plan associated with the allocation. An accrual plan is required when using the Accrual Allocation type.
Validity Period/Start Date: If Regular Allocation is selected for the Allocation Type, this field is labeled Validity Period. If Accrual Allocation is selected for the Allocation Type, this field is labeled Start Date.
A data atual preenche o primeiro campo de data por padrão. Para selecionar outra data, clique na data pré-preenchida para exibir uma janela de calendário pop-over. Navegue até a data de início desejada para a alocação e clique na data para selecioná-la.
Se a alocação expirar, selecione a data de expiração no próximo campo de data. Se o tempo de folga não expirar, deixe o segundo campo de data em branco.
If Accrual Allocation is selected for the Allocation Type, this second field is labeled Run until.
Allocation: Enter the amount of time that is being allocated to the employees. This field displays the time in either Hours or Days, depending on how the selected Time Off Type is configured.
Employee: Using the drop-down menu, select the employee being allocated the time off.
Add a reason...: If any description or note is necessary to explain the time off allocation, enter it in this field at the bottom of the form.
Comportamento da data de início do acréscimo
Se a Data de Início estiver no meio de um período de acréscimo, o Odoo a ajusta para o início ou fim desse período com base no Ganho Acumulado inserido no plano de acréscimo <time_off/accrual-plans>.
Ajustes automáticos na data de início para o início ou fim de um período de acréscimo garantem que os acréscimos se alinhem com os limites do período definido, em vez da data exata inserida.
Múltiplas solicitações
Ao alocar tempo livre, é comum alocar tempo para vários funcionários ao mesmo tempo. Isso é feito usando o recurso Várias solicitações.
Para alocar horas para vários funcionários em uma única alocação, navegue até . Em seguida, clique no ícone fa-gear (Ações) no canto superior esquerdo e, depois, clique em fa-users Múltiplas solicitações, o que abre uma janela pop-up.
Este formulário é idêntico ao formulário de Alocação <time_off/allocation-form>, com um campo Modo adicional. O campo Modo determina como múltiplos funcionários são selecionados.
Usando o menu suspenso, selecione um Modo de uma das seguintes opções:
By Employee: This option allows for the selection of multiple individual employees that are unrelated in terms of department, company, or tags. Selecting this reveals an Employees field. Select the employees to receive the allocation in the Employees field. There is no limit to the amount of employees that can be selected.
By Company: This option allows for the selection of all employees within a specific company. Selecting this reveals a Company field. Select the Company to assign the allocation to. Only one company can be assigned in the Company field. When a company is selected, all employees within the company receive the allocation.
By Department: This option allows for the selection of all employees within a specific department. Selecting this reveals a Department field. Select the Department to assign the allocation to. Only one department can be assigned in the Department field. When a department is selected, all employees within the department receive the allocation.
By Employee Tag: This option allows for the selection of all employees with a specific tag. Selecting this reveals an Employee Tag field. Select the desired Employee Tag to select all employees with that tag. Only one tag can be assigned in the Employee Tag field. When a tag is selected, all employees with that tag receive the allocation.
Em seguida, selecione o Tipo de folga usando o menu suspenso. Quando um Tipo de folga for selecionado, o nome do espaço reservado, 'Solicitação de alocação', será alterado para o nome do Tipo de folga selecionado, incluindo a quantidade de dias. Altere o nome da alocação, se preferir.
Preencha o restante do formulário Formulário de solicitações múltiplas <time_off/allocation-form> e clique em Criar alocações quando terminar.
O responsável por licenças cria múltiplas alocações e configura o formulário de Múltiplas Solicitações <time_off/allocation-form> da seguinte forma:
O nome da alocação é Dia de Férias - Prêmio do Sorteio - Piquenique 2025. O Modo é definido como Por Tag de Funcionário, e a Tag identificada é Vencedor do Sorteio - Prêmio do Piquenique dos Funcionários de 2025.
O Tipo de Folga está definido como Folga por Férias, com o Tipo de Alocação definido como Alocação Regular, já que a folga é concedida antecipadamente e não é ganha.
O Período de Validade está definido como 07/18/2025 oi-arrow-right 12/31/2025, já que o piquenique da empresa foi naquele dia, e o dia de férias ganho expira no final do ano.
A Alocação está definida como 1.00 Dias, e Um dia de férias bônus ganho no Piquenique Anual da Empresa. aparece nos detalhes na parte inferior.

Solicitação de alocação
Se um funcionário tiver usado todas as suas folgas ou estiver prestes a ficar sem, ele poderá solicitar uma alocação de tempo adicional. As alocações podem ser solicitadas de duas maneiras: na visualização do Painel <time_off/dashboard> ou em Minhas alocações <time_off/my-allocations>.
Para criar uma nova solicitação de alocação, clique no botão Nova solicitação de alocação no painel principal Folgas ou no botão Novo na visualização de lista Minhas alocações. Ambos os botões abrem um novo formulário de solicitação de alocação.
Quando solicitado a partir da visualização de lista Minhas Alocações, a tela navega para uma nova página de solicitação de alocação, em vez de apresentar uma janela pop-up.
Insira as seguintes informações no formulário de solicitação de nova alocação:
Time Off Type: Using the drop-down menu, select the type of time off being requested for the allocation. After a selection is made, the title updates with the time off type.
Validity Period: By default, the current date populates this field, and it is not able to be modified. This field only appears when requesting an allocation from the My Allocations view ().
Allocation: Enter the amount of time being requested in this field. The format is presented in either Days or Hours, depending on how the Time Off Type is configured. Once this field is populated, the name of the allocation request is updated to include the amount of time being requested.
Add a reason...: Enter a description for the allocation request in this field. This should include any details that approvers may need to approve the request.
Se o pedido foi criado a partir do Painel, clique no botão Salvar e Fechar na janela pop-up Nova alocação para salvar as informações e enviar a solicitação.
Se o formulário foi preenchido a partir da visualização de lista Minhas Alocações, as informações são salvas automaticamente conforme são inseridas.
