Adicionando veículos
O aplicativo Fleet do Odoo gerencia todos os veículos e a documentação acompanhante que vem com manutenção de veículos e registros de motoristas.
Ao abrir a aplicação , todos os veículos são organizados dentro do painel Veículos, que é o painel padrão. Cada veículo é exibido em seu estágio Kanban correspondente, com base em seu status. Os estágios padrão são Nova Solicitação, Para Encomenda, Registrado e Rebaixado.
Definições
Antes de registrar qualquer veículo, revise duas configurações de Fleet que afetam diretamente as operações do dia a dia e os benefícios dos funcionários:
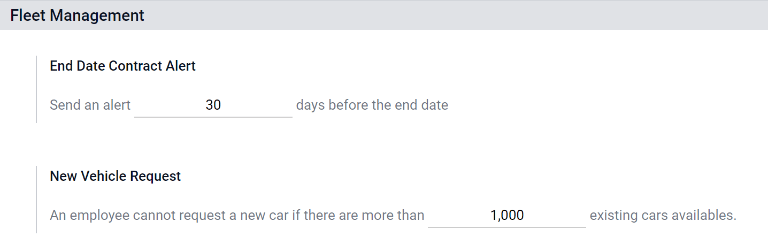
End Date Contract Alert <fleet/end-contract>: Emails the contract's Responsible person a set number of days before the vehicle agreement expires, so renewals or returns are not missed.
New Vehicle Request <fleet/request>: (Only for the Belgian payroll localization) Blocks employees from requesting a new company car through the salary configurator, once the available vehicles already exceed the defined limit, helping control benefits costs.
Para acessar o menu de configurações, vá para .
Alerta de data final do contrato
O campo Alerta de Data Final do Contrato mostra quantos dias antes do fim de um contrato de veículo um alerta deve ser enviado. Os responsáveis <fleet/responsible> recebem um email informando que um contrato de veículo está prestes a expirar no número de dias definido neste campo.
Responsáveis
Para determinar a pessoa responsável por um contrato, abra um contrato individual. A pessoa listada como Responsável na seção Informações do Contrato do contrato recebe o alerta.
Para abrir um contrato de uma lista de todos os contratos, navegue até , e todos os contratos aparecem na lista. Clique em um Contrato para abri-lo. Na seção Informações do contrato, procure em Responsável para ver quem recebe os alertas de vencimento.
Um contrato individual também pode ser aberto a partir de um veículo específico navegando até e clicando em um veículo individual. No formulário do veículo, clique no botão inteligente fa-book Contratos no topo da página. Apenas contratos associados ao veículo aparecem na lista. Clique em um contrato individual para abri-lo. A pessoa Responsável é listada no contrato.
Nova solicitação de veículo
Insira o tamanho máximo da frota que pode ser atingido através do fluxo do configurador de salário. Quando o número total de veículos disponíveis (veículos sem um motorista atribuído) é igual ou inferior a este limite, os funcionários podem solicitar um novo carro da empresa. Uma vez que os veículos disponíveis excedem o limite, a opção de solicitação é ocultada.
Adicionar um veículo
Para adicionar um novo veículo à frota a partir do painel Veículos, clique no botão Novo no canto superior esquerdo, e um formulário de veículo em branco é carregado. Em seguida, prossiga para inserir as informações do veículo no formulário do veículo.
Campos do formulário do veículo
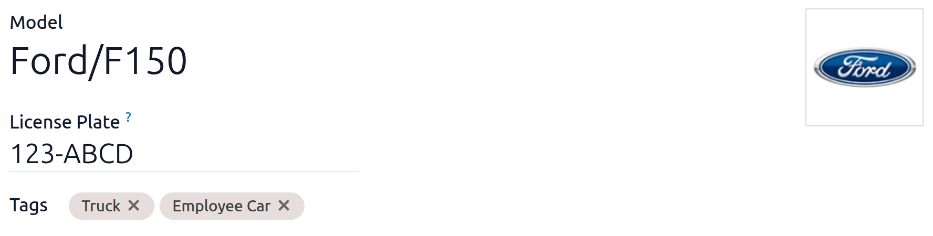
Model: Using the drop-down menu, select the vehicle's model. Once a model is selected, additional fields may appear on the form. If the model is not listed, type in the model name, and click either Create "model", or Create and edit... to create a new model and edit the model details <fleet/add-model>.
License Plate: Enter the vehicle's license plate number.
Tags: Select any tags from the drop-down menu, or type in a new tag. There is no limit on the amount of tags that can be selected.
Motorista
Esta seção do formulário do veículo está relacionada à pessoa que está dirigindo o carro no momento, bem como a planos de possível alteração do motorista no futuro.
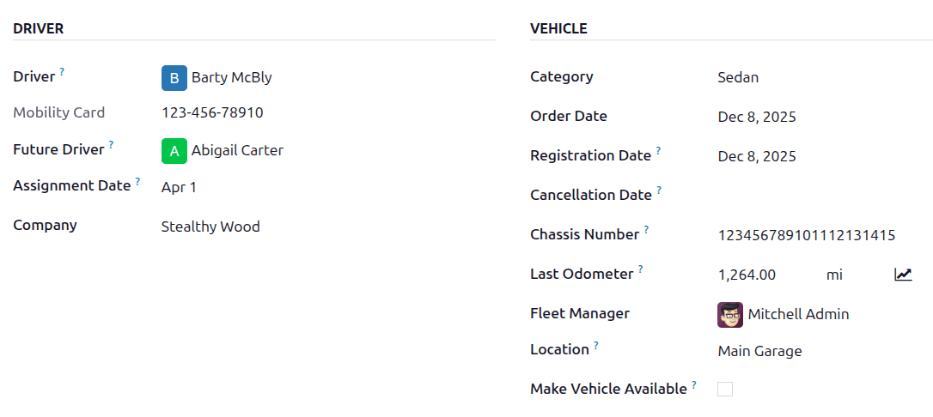
Driver: Using the drop-down menu, select the driver for the vehicle. If the driver is not listed, create the new driver and edit the driver details <fleet/new_vehicle/add-driver>.
Mobility Card: If the selected driver has a mobility card (such as a gas card) listed on their employee record in the Employees application, the mobility card number automatically appears in this field. If there is no mobility card listed, and one should be added, edit the employee record <employees/hr-settings> in the Employees application.
Future Driver: If the next driver for the vehicle is known, select the next driver from the drop-down menu. Or, type in the next driver and click either Create "future driver" or Create and edit... to create a new future driver, and edit the driver details <fleet/new_vehicle/add-driver>.
Assignment Date: Using the calendar selector, select when the vehicle is available for another driver. If this field is left blank, that indicates the vehicle is currently available, and can be assigned to another driver. If it is populated, the vehicle is not available for another driver until the selected date.
Company: Select the company from the drop-down menu. This field only appears in a multi-company database.
Criar um novo motorista
Se o motorista ainda não estiver no sistema, primeiro deverá ser configurado e adicionado aà base de dados. É possível adicionar um novo motorista pelos campos Motorista ou Próximo motorista no formulário de veículo <fleet/new_vehicle/vehicle-form>.
Primeiro, digite o nome do novo motorista no campo Motorista ou Próximo motorista e, em seguida, clique em Criar e editar…. É exibido um formulário Criar motorista ou Criar próximo motorista, dependendo do campo que iniciou o formulário.
Os formulários Criar Motorista e Criar Motorista Futuro são idênticos e são armazenados no aplicativo Contatos. Configure o novo contato, depois clique em Salvar.
Veículo
Esta seção captura detalhes físicos-chave de um veículo. Selecionar um Modelo existente pode preencher automaticamente alguns campos.
Preencha os seguintes campos no formulário:
Category: Using the drop-down menu, select the vehicle category from the available options. If the Inventory app is installed, the category affects any configured dispatch management system.
Order Date: Using the calendar selector, select the date the vehicle was ordered. Keeping track of how long vehicles have been in the fleet can help when making decisions on expensive repairs, or help decide when to surrender a vehicle.
Registration Date: Using the calendar selector, select the date the vehicle was registered. Many regions require proper registration, so keeping track of registration dates is important.
Cancellation Date: Using the calendar selector, select the date the vehicle lease expires, or when the vehicle is no longer part of the fleet (e.g., sold, plates surrendered).
Chassis Number: Enter the chassis number in the field. This is known in some countries as the VIN (Vehicle Identification Number) number. Every vehicle has a unique number, so in the event of a theft or accident, a vehicle can be identified with this unique number.
Last Odometer: Enter the last known odometer reading in the number field. Using the drop-down menu next to the number field, select whether the odometer reading is in kilometers (km) or miles (mi). Keeping track of a vehicle's mileage is crucial when determining the value of the vehicle for both tax purposes and resale value.
Fleet Manager: Select the fleet manager from the drop-down menu, or type in a new fleet manager, and click either Create or Create and edit....
Location: Type in the specific location where the vehicle is typically located in this field. The entry should clearly explain where the vehicle can be found, such as Main Garage or Building 2 Parking Lot. This is crucial information for companies with many locations where vehicles are stored.
Make Vehicle Available: Click the checkbox if the vehicle can be selected when an employee fills out the salary configurator <recruitment/configure-package>.
Aba Informações fiscais
Dependendo da configuração de localização da base de dados e de quais aplicativos adicionais estão instalados, outros campos podem estar presentes no formulário.
As seções abaixo são padrão e aparecem para todos os veículos, independentemente de outros aplicativos instalados ou configurações de localização.
Fiscalização
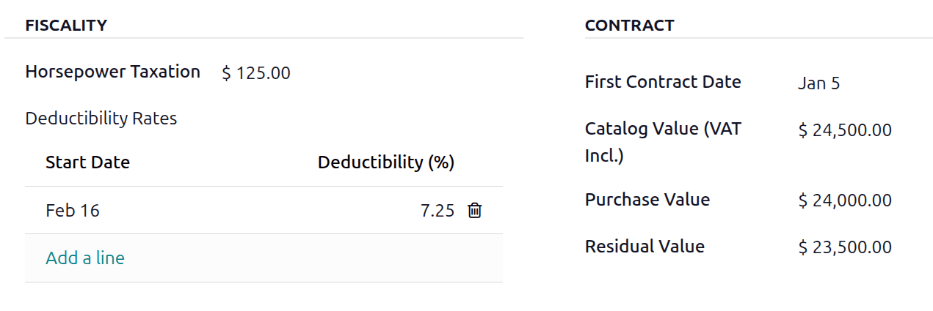
Horsepower Taxation: Enter the amount that is taxed based on the size of the vehicle's engine. This is determined by local taxes and regulations, and varies depending on the location. It is recommended to check with the accounting department to ensure this value is correct.
Deductibility Rates: Configure the dates and percentages of the vehicle-related costs (fuel, maintenance, depreciation, etc.) that can be deducted from the company's taxable income. The Start Date field indicates when the deduction begins, and the Deductibility (%) field indicates the percentage to be deducted.
Contrato
First Contract Date: Select the start date for the vehicle's first contract using the calendar selector. Typically this is the day the vehicle is purchased or leased.
Catalog Value (VAT Incl.): Enter the MSRP (Manufacturer's Suggested Retail Price) for the vehicle at the time of purchase or lease.
Purchase Value: Enter the purchase price or the original value of the lease for the vehicle.
Residual Value: Enter the current value of the vehicle.
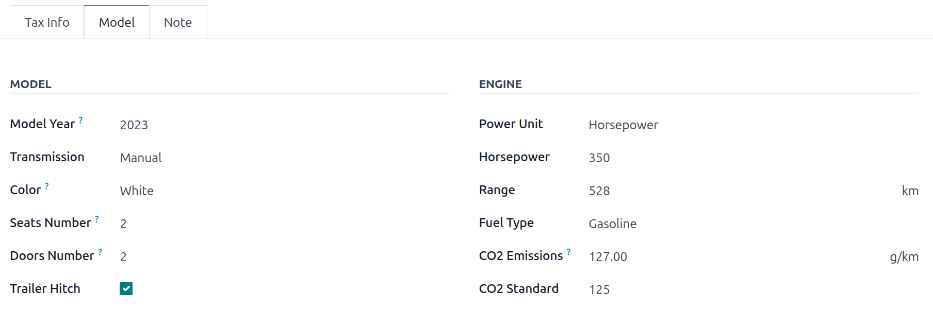
Aba Modelo
Se o modelo do novo veículo já estiver configurado no banco de dados, as seções Modelo e Motor serão preenchidas com as informações correspondentes. Se o modelo não estiver no banco de dados e a aba Modelo precisar ser configurada, configure o novo modelo de veículo <fleet/add-model>.
Verifique as informações na aba Modelo para garantir que estejam precisas. Por exemplo, a cor do veículo ou se um engate de reboque está instalado são exemplos de informações comuns que podem precisar ser atualizadas.
Aba Notas
Insira notas sobre o veículo nesta seção.