Adicionar novos candidatos
Uma vez que um candidato envia uma candidatura, seja usando a candidatura online ou enviando um email para um alias de posição de trabalho, um cartão de candidato é automaticamente criado na aplicação Recrutamento.
Entretanto, em alguns casos, pode ser necessário criar candidatos manualmente na base de dados. Isso pode ser necessário se, por exemplo, uma empresa aceitar inscrições em papel pelo correio ou se estiver encontrando candidatos em potencial em uma feira de empregos presencial.
Para visualizar os candidatos atuais, navegue até o aplicativo e clique no cartão do cargo desejado. Isso revela a página Candidaturas, que exibe todos os candidatos para essa função específica, na visualização Kanban padrão, organizada por estágios.
Adicione novos candidatos a partir da página Candidaturas de uma posição de trabalho usando: o botão de adição rápida <recruitment/quick-add-applicant>, ou o botão Novo <recruitment/create-new-applicant>.
Adição rápida
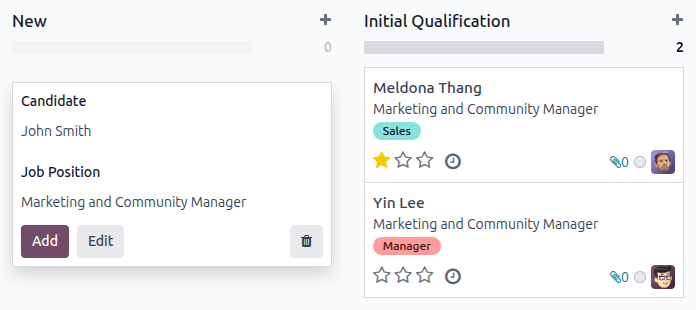
Na página Candidaturas, clique no botão de adição rápida, representado por um pequeno ícone fa-plus (mais) no canto superior direito de cada etapa, para adicionar um novo candidato nessa etapa.
Digite as seguintes informações no cartão:
Candidate: Select the applicant from the drop-down menu. Displays as the card title in the Kanban view of the Applications page. If the candidate is not in the system (from a previous application, or is a current employee), after entering the applicant's name, click Create "(candidate)".
Job Position: The current job position populates this field. If needed, the job position can be changed by selecting a different position from the drop-down menu. If a different job position is selected, after the card is created, the card appears on the Applications page for that newly-selected job position.
Depois que as informações forem inseridas, clique em Adicionar. O candidato aparece na lista e um novo cartão de candidato em branco é exibido.
Se preferir, após inserir o Candidato no cartão Kanban que aparece, clique em Editar, e um formulário detalhado de candidato é carregado. Consulte a seção Formulário de novo candidato <recruitment/applicant-details> para detalhes sobre como preencher o formulário.
Ao fazer uma adição rápida, clicar fora de um cartão vazio ou clicar no ícone fa-trash-o (lixeira) descarta o candidato.
Formulário de novo candidato
Na página Candidaturas, clique no botão Novo no canto superior esquerdo, e um formulário de candidatura em branco é carregado.
No novo formulário de candidatura, os campos Posição de Trabalho e Recrutador são preenchidos de acordo com as configurações da posição de trabalho, por padrão. Além disso, os campos Departamento e Empresa na aba Detalhes também podem ser preenchidos, se esses detalhes estiverem configurados na posição de trabalho.
Preencha os campos das seções a seguir no formulário de novo candidato.
Seção Candidato
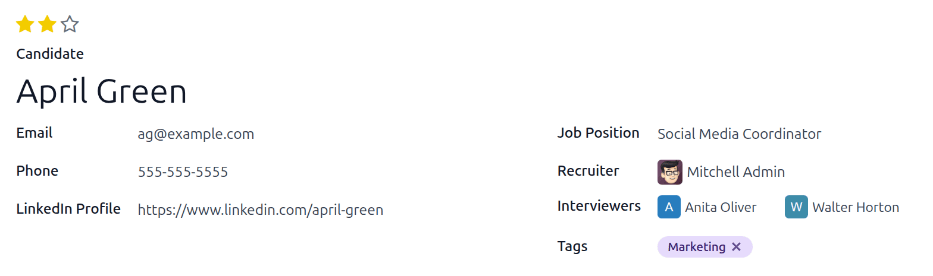
Evaluation: Represents a rating for the applicant: one star (fa-star fa-star-o fa-star-o) is Good, two stars (fa-star fa-star fa-star-o) is Very Good, and three stars (fa-star fa-star fa-star)is Excellent.
Candidate: Enter the applicant's name. This field is displayed as the card title in the Kanban view of the Applications page. This is the only required field on the form.
Email: Enter the applicant's email address.
Phone: Enter the applicant's phone number.
LinkedIn Profile: Enter the web address for the applicant's personal profile on LinkedIn.
Job Position: Select the job position the applicant is applying for. This field is populated by default, but can be changed if necessary.
Recruiter: Select the user responsible for the entire recruitment process for the job position.
Interviewers: Using the drop-down menu, select the people to conduct the interviews. The selected people must have either recruiter or officer rights configured for the Recruitment application to appear in the drop-down list. Refer to the Direitos de acesso documentation for more information.
Tags: Select as many tags as desired from the drop-down menu. To add a tag that does not exist, type in the tag name, then click Create "new tag" from the resulting drop-down menu.
Aba Notas
Insira quaisquer notas sobre o candidato nesta aba. Essas notas são visíveis apenas internamente, para usuários que têm os direitos de acesso apropriados.
Aba Detalhes
A aba Detalhes contém várias informações sobre o candidato e a posição de trabalho.
Seção do candidato
Insira as seguintes informações nos respectivos campos:
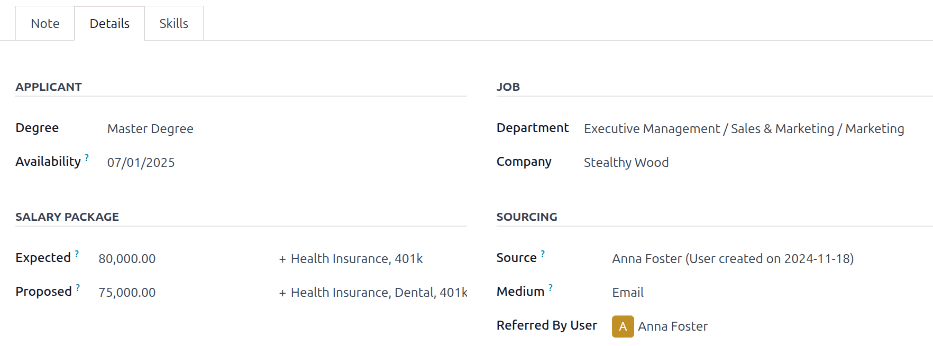
Degree: Select the applicant's highest level of education from the drop-down menu. Options are: Graduate, Bachelor Degree, Master Degree, or Doctoral Degree. The Graduate option indicates the applicant graduated at the highest level of school before a Bachelor's degree, such as a high school or secondary school diploma, depending on the country.
Availability: Select the available start date for the applicant. To select a date, click on the field to reveal a popover calendar. Use the fa-angle-left (left) and fa-angle-right (right) arrows on either side of the month to navigate to the desired month, then click the desired date. Leaving this field blank indicates the applicant can start immediately.
Seção de pacote salarial
Configure tanto o salário oferecido quanto proposto e benefícios nesta seção. Preencha os seguintes campos:
Expected: Enter the amount the applicant is requesting in this field. The number should be in a XX,XXX.XX format. The currency is determined by the localization setting for the company.
Other Benefits: If any benefits are requested by the applicant, enter them in the blank Other Benefits text field to the right of the Expected salary field. The benefits should be short and descriptive, such as 4 Weeks Vacation or Dental Plan.
Proposed: Enter the amount to be offered to the applicant for the role in this field. The number should be in a XX,XXX.XX format.
Other Benefits: If any benefits are offered to the applicant, enter them in the Other Benefits text field to the right of the Proposed field. The benefits should be short and descriptive, such as Unlimited Sick Time or Health Insurance.
Seção Vaga de emprego
Os campos a seguir são preenchidos automaticamente ao criar um novo candidato, contanto que esses campos sejam especificados no formulário de posição de emprego. A edição dos campos é possível, se desejado.
Department: select the department the job position falls under from the drop-down menu.
Company: select the company the job position is for using the drop-down menu. This field only appears when in a multi-company database.
Seção de origem
Esta seção contém os detalhes sobre a forma como o candidato se candidatou à posição de emprego. Essa informação é necessária para indicações de funcionários e permite relatórios sobre os canais com maior geração de candidatos.
Source: Using the drop-down menu, select where the applicant learned about the job position. The following options come preconfigured in Odoo: Search engine, Lead Recall, Newsletter, Facebook, X, LinkedIn, Monster, Glassdoor, and Craigslist. To add a new Source, type in the source, then click Create "(new source)".
Medium: Using the drop-down menu, specify how the job listing was found. The preconfigured options are: Banner, Direct, Email, Facebook, Google Adwords, LinkedIn, Phone, SMS, Television, Website, X (formerly "Twitter"), or [Push Notifications] (website name). To add a new Medium, type in the medium, then click Create "(new medium)".
Referred By User: If referral points are to be earned for this job position in the Referrals application, select the user who referred the applicant from the drop-down menu. The Referrals application must be installed for this field to appear.
Aba Habilidades
É possível adicionar habilidades ao cartão do candidato. Para obter detalhes sobre como adicionar habilidades, consulte a documentação Criar novos funcionários <employees/skills>.