Documentos
O Odoo Documentos permite que você armazene, visualize e gerencie arquivos no Odoo.
Pastas e documentos são organizados em seções acessíveis pela árvore à esquerda. As seguintes seções estão disponíveis:
All: displays all folders and files the user has access to.
fa-building Company: contains folders and files shared across the company. Access is determined by the access rights <documents/access-rights> defined for the folder and file.
fa-hdd-o My Drive: the user's personal workspace for organizing and accessing files and folders they own or have uploaded.
fa-users Shared with me: includes files that have been shared with the user but are not part of any parent folder they have access to.
fa-clock-o Recent: shows recently modified files the user has permission to view or edit.
fa-trash Trash: stores deleted files and folders <documents/deletion-delay>.
Clique em uma seção na árvore para visualizar seu conteúdo. Selecione uma pasta para abri-la, gerenciá-la <documents/folders> e acessar seus arquivos.
Clique em um arquivo para abri-lo e executar ações disponíveis <documents/documents>. Para fechar o arquivo, pressione Esc ou clique no ícone fa-remove (fechar). Você também pode arrastar e soltar um arquivo ou pasta para movê-lo para outra pasta ou seção.
Configuração
Atraso de exclusão
Por padrão, itens movidos para a lixeira permanecem lá por 30 dias antes de serem excluídos permanentemente. Para ajustar este delay, vá para e edite o campo Delay de exclusão (dias).
Centralização de arquivos
A centralização de arquivos permite organizar automaticamente todos os arquivos associados a um aplicativo específico em pastas dedicadas. Ela é ativada por padrão para cada aplicativo após a instalação. Para desabilitar a centralização de arquivos, modificar a pasta padrão ou configurar as tags a serem adicionadas aos arquivos específicos do aplicativo, vá para e edite a configuração relevante na seção Centralização de Arquivos.
Pastas
Você pode organizar arquivos em pastas disponíveis nas seções fa-building Empresa ou fa-hdd-o Meu Drive.
Para criar uma pasta, selecione a seção desejada na árvore, clique em Novo e selecione Pasta. Na janela pop-up, insira o Nome da pasta e clique em Salvar. Para criar uma subpasta, selecione a pasta pai primeiro, depois siga os mesmos passos.
Para gerenciar uma pasta ou subpasta, selecione-a e clique no ícone fa-cog (Ações) acima da árvore. As seguintes opções estão disponíveis no menu:
fa-download Download: Download the folder as a .zip file, including its files and sub-folders.
fa-pencil-square-o Rename: Modify the folder's name.
fa-share-alt Share: Share the folder and manage its access rights <documents/access-rights>.
fa-star-o Add star: Mark a folder as a favorite for quicker access. This setting is user-specific and does not affect other users' workspaces. You can then use the Starred filter <search/favorites> to navigate to your favorite folders quickly.
fa-info-circle Info & Tags: View the folder's details <documents/details-panel> and chatter.
fa-trash Move to trash: Move the folder and its content to the trash <documents/deletion-delay>.
fa-cog Actions on Select: Define the server actions that are available (as buttons) for the files in the folder. Click an action to add or remove it. Click Add Custom Action to create a new one <reference/actions/server>.
fa-cog Automations: Create automation rules.
AI Auto-sort: Use Odoo AI to automatically organize the files in the folder and trigger actions based on the provided AI prompt. Add the corresponding actions for your prompt in the lower section of the popup. This option requires the Odoo AI app to be installed.
Arquivos
Para fazer upload de um arquivo, selecione a pasta desejada na árvore, clique em Novo e selecione Upload.
Links de URL
Para adicionar um link para uma URL (por exemplo, um vídeo) e torná-lo acessível a partir de uma pasta, clique em Novo e selecione Link. Digite a URL, adicione um Nome e selecione a Pasta apropriada.
Planilhas
Para criar uma planilha, clique em Novo e selecione Planilha.
Gerenciando arquivos
Vários botões estão disponíveis na barra superior ao abrir um arquivo:
the fa-cog Actions menu, which includes the options described below
Share: to share the file and manage its access rights <documents/access-rights>
Download
any buttons defined for the folder <documents/folders>
As seguintes opções estão disponíveis no menu fa-cog Ações:
fa-files-o Duplicate: Create a copy of the file. In the popup, select or create the destination folder, then click Duplicate in destination folder's name.
fa-trash Move to Trash: Move the file to the trash <documents/deletion-delay>.
fa-pencil-square-o Rename
fa-info-circle Info & tags: View the file's details <documents/details-panel> and chatter.
fa-sign-in Move: Move the file to another folder. In the popup, select or create the destination folder, then click Move to destination folder's name.
fa-external-link-square Create shortcut: A shortcut is a pointer to a file, allowing access from multiple folders without duplicating the file. In the popup, select or create the destination folder, then click Create a shortcut in destination folder's name.
fa-history Manage versions: View all versions of the file in upload order, download a specific version, or upload a new one as needed.
fa-lock Lock: Protect the file from any modifications.
fa-link Copy Links: Copy the file's URL for sharing. Access is controlled based on the file's access rights <documents/access-rights>.
fa-scissors Split PDF: Split a PDF file <documents/pdfs>.
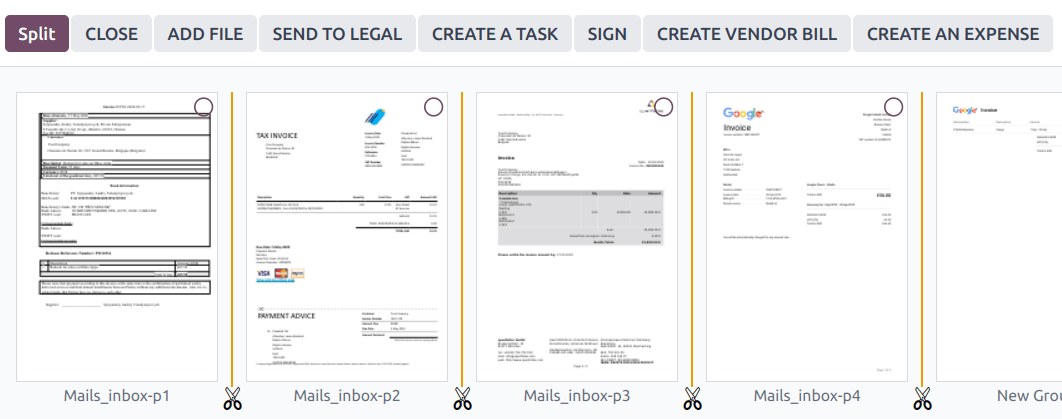
Dividindo e mesclando PDFs
Para dividir um PDF em páginas individuais ou grupos de páginas, abra o PDF, clique no botão fa-cog Ações e selecione fa-scissors Dividir PDF. Clique no ícone fa-scissors (tesoura) entre as páginas para remover uma divisão se necessário, depois clique em Dividir para confirmar.
Para mesclar arquivos PDF, siga estas etapas:
Navigate to the folder containing the files you want to merge.
Hold down Ctrl and click the relevant files.
Click the fa-cog Actions button and select fa-scissors Merge PDFs.
If needed, click Add file to browse and select a PDF file from your computer.
Click the fa-scissors (scissors) icon between the files.
Click Split to merge them.
Solicitando arquivos
Solicite arquivos dos usuários como um lembrete para que eles façam upload de arquivos específicos. Para fazer isso, siga estas etapas:
Click New and select Request.
Enter a Document Name and select the person you're requesting it from in the Request To field.
If needed, set a Due Date In, edit the Folder where the file should be added, add Tags, and write a Message.
Click Request.
Um espaço reservado para o arquivo faltante é criado na pasta selecionada. Uma vez que o arquivo estiver disponível, clique no espaço reservado para fazer upload dele.
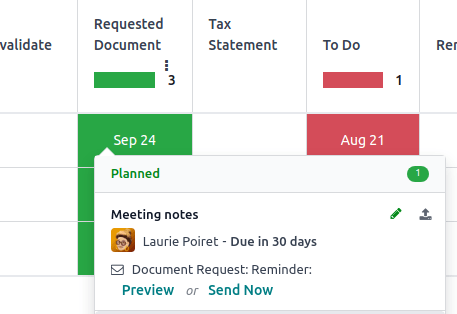
Para ver a lista de todos os arquivos solicitados, alterne para a visualização de Atividade do aplicativo Documentos e vá para a coluna Documento Solicitado. Clique na data de um arquivo solicitado para visualizar seus detalhes. Você pode então:
Upload a file using the fa-upload (upload) button;
Edit the activity using the fa-pencil (edit) button;
Cancel the activity using the fa-remove (cancel) button;
Send a reminder email. Click Preview to preview the content of the reminder email if needed, then Send Now.
Para enviar um e-mail de lembrete para todos os arquivos solicitados, clique no ícone fa-ellipsis-v (reticências) na coluna Documento Solicitado e selecione Solicitação de Documento: Lembrete.
Painel de detalhes
Para visualizar as informações e tags de uma pasta ou arquivo, selecione a pasta ou arquivo, depois clique no ícone fa-cog (para pastas) ou no botão fa-cog Ações (para arquivos) e selecione fa-info-circle Informações & Tags.
O painel de detalhes permite o seguinte:
Change the file's folder or the folder's name.
View the file's or folder's size and the folder's item count.
Change the file's or folder's owner and contact. By default, the person who creates a file or folder is set as its owner and granted full access rights to it. To change it, select the required user from the dropdown list. The contact is a person who only has Viewer access rights <documents/access-rights> to the file or folder, e.g., an existing supplier in the database.
Access the chatter.
Para fechar o painel de detalhes, clique no botão fa-remove (remover) no canto superior direito.
Aliases de e-mail
Você pode usar um alias de email para salvar automaticamente arquivos enviados para o alias de email em uma pasta específica. Para configurar um alias de email para uma pasta, siga estas etapas:
Make sure a custom alias domain <email-inbound-custom-domain> is configured in the General Settings.
Select the folder where files should be saved.
Click the fa-info-circle (Info & Tags) in the upper-right corner next to the view icons.
In the details panel, enter the desired email alias.
Optionally, specify an Activity type and assignee to create an activity when a file is received via the alias.
Optionally, select the Tags <documents/tags> to automatically apply to the files created through the alias.
Marcadores
Tags ajudam a organizar e categorizar arquivos, facilitando sua busca e filtragem. Para configurar tags para arquivos, acesse . Clique em Novo para criar uma nova tag. Insira o Nome da Tag, selecione uma Cor e opcionalmente adicione uma Dica que aparece ao passar o mouse sobre a tag.
Para adicionar tags a um arquivo, abra o arquivo, clique em fa-cog Ações, selecione fa-info-circle Informações e Tags e, no painel de detalhes, selecione uma tag no menu suspenso Tags (identificável pelo seu espaço reservado Adicionar tags).
Registros vinculados
Para vincular o arquivo a um registro específico, selecione o modelo apropriado no menu suspenso Vinculado a (identificável pelo seu espaço reservado Nenhum modelo vinculado), depois selecione o registro desejado.
Direitos de compartilhamento e acesso
Os direitos de acesso podem ser definidos em:
folders: Select the folder, click the fa-cog (gear) icon, and select Share.
files: Open the file and click Share in the top bar.
Para conceder acesso a usuários ou contatos específicos, siga estas etapas:
In the fa-user-plus (Invite people) field, select the users or contacts you want to grant access to from the dropdown menu or enter their email address.
Set the Role field to Viewer or Editor.
If desired, toggle the Notify switch off to avoid sending a notification email.
Click Share to grant access (with or without a notification) or Copy Links to copy the sharing link to the clipboard.
Para configurar Acesso geral para Usuários internos ou Acesso através de link, selecione Visualizador, Editor ou Nenhum (para restringir completamente o acesso). Para Acesso através de link, você também pode especificar se a pasta ou arquivo deve ser Detectável (ou seja, acessível através de navegação). Clique em Salvar para aplicar as alterações e depois em Copiar Links para copiar o link de compartilhamento para a área de transferência.
Gerenciamento de arquivos entre aplicativos
Você pode salvar arquivos ou anexar arquivos existentes no app Documentos de qualquer registro.
To save an attachment to the Documents app, hover over an attachment in the record's chatter and click the fa-hdd-o (Add to Documents) icon.
To attach a file to a record from the record's chatter, click the Add from Documents icon, select the desired file, and click Add from Documents to add the raw file, or Paste Link(s) to insert a link to the file (and preserve the document's access rights <documents/access-rights>).
To insert a file from Documents into the Editor de rich-text do Odoo, type /file, then select the desired file, and click Add from Documents to add the raw file, or Paste Link(s) to insert a link to the file (and preserve the document's access rights <documents/access-rights>).
Digitalização de arquivos com IA
Os arquivos disponíveis na pasta Finanças podem ser digitalizados. Selecione o arquivo, clique em Criar Nota Fiscal do Fornecedor, Criar Fatura do Cliente ou Criar Nota de Crédito do Cliente e clique em Enviar para Digitalização.