Solicitar uma assinatura
Pelo aplicativo Odoo Sign ou diretamente de um registro Odoo, você pode:
request the signature of one or more signers on a one-off document or envelope of multiple one-off documents <sign/request-signatures/one-off>
use templates <sign/request-signatures/templates> to request the signature of one or more signers on frequently used documents
Quando um documento ou envelope de documentos <sign/request-signatures/create-envelope> foi totalmente assinado, ou seja, concluído e assinado por todos os signatários, o(s) documento(s) assinado(s) e o certificado de conclusão <sign/security/certificate-of-completion> são enviados por email ao solicitante e a quaisquer contatos adicionados em CC quando a solicitação de assinatura foi configurada <sign/request-signatures/configure-request>.
Documentos únicos
Do aplicativo Sign
Para solicitar a assinatura de um documento único ou envelope de documentos <sign/request-signatures/create-envelope> do aplicativo Sign:
Go to or , click Upload PDF, then select and open the relevant .pdf document(s). If the document needs to be imported from the Documentos app, click the fa-cog (Actions) icon beside the name of the view, then .
Se você está criando um envelope de documentos que inclui um documento salvo no aplicativo Documentos, importe esse documento antes de adicionar documentos subsequentes <sign/request-signatures/create-envelope>.
Prepare the document(s) for signing <sign/request-signatures/prepare-document> by adding the relevant fields; add additional signers and/or documents, if relevant.
Click Send.
Complete the relevant fields of the New Signature Request <sign/request-signatures/configure-request> window.
If you are:
one of the signers and you are ready to sign the document directly, click Sign Now, then complete and sign the document(s) <sign/sign-document/signature-request>.
not one of the signers or a signing order has been defined and you need to sign the document after other signers, click Send.
De um registro Odoo
Para solicitar a assinatura de um documento único ou envelope de documentos <sign/request-signatures/create-envelope> de um registro Odoo:
With the relevant record open, click the fa-cog (Actions) icon in the upper-left corner, then fa-file-text Request Signature.
In the New Signature Request window, click Upload PDF, select the relevant .pdf document(s), then click Open.
Prepare the document(s) for signing <sign/request-signatures/prepare-document> by adding the relevant fields; add additional signers and/or documents, if relevant.
Click Send.
Complete the relevant fields of the New Signature Request <sign/request-signatures/configure-request> window.
Ao enviar uma solicitação de assinatura de um registro Odoo, o cliente relacionado (ou a parte relevante) é automaticamente adicionado como signatário.
If you are:
one of the signers and you are ready to sign the document directly, click Sign Now, then complete and sign the document(s) <sign/sign-document/signature-request>.
not one of the signers or a signing order has been defined and you need to sign the document after other signers, click Send.
Modelos
Quando o mesmo documento único ou envelope de múltiplos documentos <sign/request-signatures/create-envelope> precisa ser usado regularmente, criar e usar um modelo pode economizar tempo e simplificar o fluxo de trabalho. Os modelos são preparados para assinatura da mesma forma que documentos únicos, adicionando os campos, signatários, documentos e tags necessários, conforme relevante.
Criar um modelo
Para criar um modelo:
Go to .
Click Upload PDF, then select and open the relevant .pdf document(s). If the document needs to be imported from the Documentos app, click the fa-cog (Actions) icon beside the name of the view, then .
Se você precisar fazer upload de vários documentos, ou seja, criar um envelope de documento <sign/request-signatures/create-envelope>, e um dos documentos estiver salvo no aplicativo Documents, importe esse documento antes de adicionar documentos subsequentes <sign/request-signatures/create-envelope>.
Depois de criar o modelo, você pode começar a editá-lo <sign/request-signatures/edit-template>.
Editar um modelo
Um modelo pode ser editado a qualquer momento, desde que ainda não tenha sido usado para enviar uma solicitação de assinatura.
Para editar um modelo, vá para e clique no modelo relevante para abri-lo. Alternativamente, passe o mouse sobre o modelo, clique no ícone fa-ellipsis-v (reticências verticais) no canto superior direito do cartão, depois clique em Edit.
Edite o modelo:
Prepare the document(s) for signing <sign/request-signatures/prepare-document> by adding or editing fields, and, if relevant, adding or removing signers and/or documents.
Optionally, define or edit settings for specific signers <sign/request-signatures/signer-settings>, such as requiring additional authentication, allowing a signer to be replaced, or assigning a fixed signer.
Optionally, define or edit general settings for the template by clicking the fa-cog (cog) icon beside the template name, then clicking fa-cog :
By default, the name of the template is the name of the document that was uploaded, or, in the case of a document envelope <sign/request-signatures/create-envelope>, the name of the first document uploaded. If desired, edit the name of the template.
Tags: Add tags <sign/configuration/tags> to categorize the template.
Model: Select the Odoo model to which the template is linked to restrict the template to signatures requests made from records of that model <sign/request-signatures/template-odoo-record>. Leave the field empty to make the template available from any model.
Redirect Link: Add a url to which the user is redirected after signing the document, e.g., to a Thank you page, or to your company's homepage.
Documents folder: Define in which folder in the Documents app <documents/folders> the documents using this template should be saved once fully signed.
Documents tags: Determine which Documents-app tags <documents/tags> should be assigned to documents using this template once fully signed.
Authorized Users: Determine which specific users are authorized to view and use this template.
Valid for: Set a default number of days after which signature requests using this template expire; enter 0 if signature requests should not expire.
A data de validade de uma solicitação de assinatura sempre pode ser modificada ao configurar a solicitação de assinatura <sign/request-signatures/configure-request>.
In the Communication tab, type a default text that will be added when a signature request using this template is sent via email; the text can still be edited before sending.
Digite / para abrir o powerbox <essentials/html_editor/commands>, depois use comandos para inserir títulos, listas com marcadores, documentos, imagens, etc.
If Manage template access is enabled in the main Sign settings <sign/configuration/settings>, it is also possible to configure the following fields:
Authorized Groups: Define user groups whose members are authorized to view and use this template.
Responsible user: By default, this is set to the user who created the template, but a different user can be selected.
Usar modelos
Os modelos podem ser usados ao iniciar uma solicitação de assinatura a partir do aplicativo Sign <sign/request-signatures/template-sign-app> ou diretamente a partir de um registro Odoo <sign/request-signatures/template-odoo-record>.
Do aplicativo Sign
Ao usar um modelo, há duas maneiras de uma solicitação de assinatura ser enviada a partir do aplicativo Sign:
via direct email to one or more specific signers; or
via a shareable link, provided the document or document envelope has only one signer. This option is useful when multiple individuals need to sign a personal copy of a document that requires a single signature, e.g., a non-disclosure agreement.
Para enviar uma solicitação de assinatura usando um template para um ou mais signatários específicos do aplicativo Sign:
Go to to see all existing templates.
From the Kanban or list view, click Send on the line of the relevant template. Alternatively, from the Kanban view, click on a template to open it, then click Send.
Complete the relevant fields of the New Signature Request <sign/request-signatures/configure-request> window.
If you are:
one of the signers and you are ready to sign the document directly, click Sign Now, then complete and sign the document(s) <sign/sign-document/signature-request>.
not one of the signers or a signing order has been defined and you need to sign the document after other signers, click Send.
Para copiar um link para um documento ou envelope de documento baseado em template:
Go to to see all existing templates.
From the Kanban or list view, click Share on the line of the relevant template. Alternatively, from the Kanban view, click on a template to open it, then click Share.
Optionally, update the Valid Until date if the signature request link should expire; leave this blank if the signature request does not expire.
Click fa-clone to copy the link to your clipboard.
De um registro Odoo
Para enviar uma solicitação de assinatura usando um template de um registro Odoo:
With the relevant record open, click the fa-cog (Actions) icon in the upper-left corner, then fa-file-text Request Signature.
In the New Signature Request window, select the relevant Template from the dropdown.
Complete the relevant fields of the New Signature Request <sign/request-signatures/configure-request> window.
If you are:
one of the signers and you are ready to sign the document directly, click Sign Now, then complete and sign the document(s) <sign/sign-document/signature-request>.
not one of the signers or a signing order has been defined and you need to sign the document after other signers, click Send.
Gerenciar templates
Gerencie templates acessando . Por padrão, os templates são mostrados em uma visualização Kanban, com cards exibidos horizontalmente.
Para cada template, as seguintes informações são exibidas:
the name of the template
the month and year in which the template was created
the avatar of the Responsible user for the template; this is by default the user who created the template, but this can be changed in the configuration settings of the template if Manage template access is enabled in the main Sign settings <sign/configuration/settings>
any tags assigned to the template
the number of documents created using the template for which a signature request is In Progress
the number of documents created using the template that have been fully Signed
Passar o mouse sobre o card do template revela um ícone fa-ellipsis-v (elipse vertical) no canto superior direito. Clique no ícone para:
Edit a template <sign/request-signatures/edit-template> that has not yet been used to send a signature request. Alternatively, click on a template to open it for editing.
Duplicate a template. The duplicated template can then be edited <sign/request-signatures/edit-template> as needed.
Archive a template that is not currently needed.
Select a Color to add a colored bar to the left side of a card to visually differentiate it.
Preparar um documento para assinatura
Para preparar qualquer documento para assinatura, adicione os campos relevantes <sign/request-signatures/add-fields> para cada signatário.
Também é possível:
add additional documents <sign/request-signatures/create-envelope>
configure and add signers <sign/request-signatures/signers>
add tags <sign/request-signatures/add-tags>
Adicionar campos a um documento
Para adicionar um campo a um documento, arraste-o do painel esquerdo e solte-o no local apropriado do documento.
Campos dos seguintes tipos de campo <sign/configuration/field-types> requerem configuração adicional quando são adicionados a um documento:
Initial: When this field is added to a multi-page document, a pop-up message asks if the field should be added to all pages of the document, or only the current page.
Radio: By default, two radio buttons are added; there must always be a minimum of two options. To increase or decrease the number of options, click on one of the radio buttons, then under Options, use the fa-caret-up (increase) or fa-caret-down (decrease) icons as needed. Each radio button can be repositioned independently by clicking and dragging it.
Selection: To define options, type each option on a new line in the Options text box, ensuring you have pressed Enter after each option. To delete options, remove the corresponding text from the text box.
Strikethrough: To use this field to allow signers to reject a certain phrase or phrases, position the field on top of the relevant text by dragging it. Ensure that the field is not Mandatory to allow the signer to freely decide which phrases to reject.
Uma vez que um campo foi adicionado, é possível:
Reposition the field: Hover over the field until the fa-hand-paper-o (hand) icon appears, then click and drag the field to the desired position.
Change the size of the field: Hover over the bottom edge, right edge, or bottom-right corner to reveal resize arrows. Drag the vertical or horizontal resize arrows to adjust the height or width, respectively, or drag the diagonal resize arrows to scale both dimensions simultaneously.
Modify certain attributes of the field: Click on the field to open it, make the necessary changes, then click Save.
Dependendo do tipo de campo <sign/configuration/field-types>, os atributos que podem ser modificados incluem:
the Placeholder text, i.e., the temporary text the signer sees before starting to complete the field
whether or not a field is a Mandatory field
whether or not a field that is configured to be auto-completed <sign/configuration/auto-fill> is Read-only
the horizontal alignment of the text within the field
Remove a field: Click on the field to open it, then click fa-trash (remove) to remove the field from the document.
Duplicate a field: Click on the field to open it, then click fa-clone (duplicate) to create a copy of the field. Alternatively, use your regular keyboard shortcuts to copy and paste a field.
Envelopes de documento
Um envelope de documento permite que múltiplos documentos sejam assinados simultaneamente ou enviados para assinatura em uma única solicitação de assinatura. É possível criar um envelope de documento único ou um template <sign/request-signatures/templates> baseado em um envelope de documento.
Para criar um envelope de documento durante o upload inicial do arquivo, após clicar em Upload PDF, selecione os documentos .pdf relevantes e clique em Open.
Para adicionar um ou mais documentos após o upload inicial do arquivo:
Open the initial document or document envelope, then click Add in the Documents section.
Select the relevant .pdf document(s), then click Open.
Adicionar e configurar signatários
Por padrão, um documento ou envelope de documento tem um signatário. Signatários adicionais podem ser adicionados <sign/request-signatures/add-signers> e configuração avançada pode ser definida <sign/request-signatures/signer-settings> para um ou mais signatários.
Adicionar signatários
Para adicionar signatários adicionais a um documento ou envelope de documento:
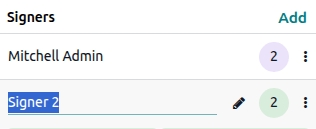
Open the document or document envelope, then click Add in the Signers section.
Optionally, edit the name of the signer by hovering over the name, e.g., Signer 2, clicking the fa-pencil (pencil) icon, then typing the new name.
Configurações do signatário
Para definir configuração adicional para signatários, clique no ícone fa-ellipsis-v (reticências verticais) na linha do signatário. Para cada signatário, as seguintes opções estão disponíveis:
Authentication: Require the signer to authenticate using a specific authentication method <sign/security/authentication>.
Can delegate: Allow the signer to be replaced <sign/request-signatures/change-signers> after the signature request has been sent.
Assign to: Assign a specific contact as signer by selecting them from the dropdown.
Configurar a solicitação de assinatura
Após preparar um documento único ou envelope de documento para assinatura <sign/request-signatures/prepare-document> ou selecionar um template, clique em Send, depois configure a solicitação de assinatura na janela New Signature Request.
Para cada signatário, selecione um contato ou digite um endereço de email. Opcionalmente, ative Signing Order <sign/request-signatures/signing-order> para controlar a ordem na qual o documento ou envelope de documento é assinado.
Também é possível:
set a Valid Until date <sign/request-signatures/validity> after which the signature request expires
set Reminders <sign/request-signatures/validity> to be sent at fixed intervals
enable Add certificate on each page to add the reference of the certificate of completion <sign/security/certificate-of-completion> to each page of the document(s)
have one or more parties notified when the document is fully signed by adding the relevant contact(s) or email address(es) in the CC field
add a message to the signature request email
add attachments to the signature request via the fa-paperclip (paperclip) icon at the bottom of the window, or, to add an attachment saved in the Documents app, click the Documents app icon
schedule the sending of the signature request via the fa-clock-o (clock) icon
Ordem de assinatura
Quando um documento ou envelope de documento precisa ser assinado por várias partes e a ordem de assinatura é importante, é possível definir a Ordem de assinatura ao configurar a solicitação de assinatura. Isso controla a ordem em que seus destinatários recebem o(s) documento(s) para assinatura.
Para definir uma ordem de assinatura:
In the New Signature Request window, enable Signing Order.
Change the order by editing the number beside each signer, e.g., changing a 3 to a 2 in the first column.
O signatário indicado na posição 1 recebe a solicitação de assinatura primeiro, e cada destinatário recebe a solicitação apenas após o destinatário anterior ter assinado o documento.
Datas de validade e lembretes
Para documentos que precisam ser assinados dentro de um período específico, você pode indicar a última data possível de assinatura usando o campo Válido até ao configurar a solicitação de assinatura. Após esta data, o documento não é mais acessível através do link no email de solicitação de assinatura.
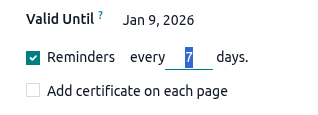
Se a solicitação de assinatura não expirar, deixe este campo em branco.
Para definir lembretes automáticos, ative Lembretes e, em seguida, defina o intervalo, em dias, em que os lembretes devem ser enviados até que o documento tenha sido assinado pelo signatário.
Gerenciar solicitações de assinatura e documentos assinados
Todas as solicitações de assinatura que foram enviadas são visíveis em . A visualização de lista e a visualização Kanban oferecem diferentes possibilidades:
Na visualização de lista:
See the overall Status of the signature request, e.g., To Sign, Signed, Cancelled.
fa-refresh Resend a signature request manually.
fa-pencil-square-o Sign a document or document envelope.
fa-download Download the fully signed document(s).
For a cancelled signature request, click fa-info Details to see the details <sign/request-signatures/manage-form> of the request.
Na visualização Kanban:
See the status of individual signers, per signature request:
When a signer has fully signed the document(s), the checkbox is ticked, the signer's name appears in green, and the date of the signature is added after the name.
When a signature request is cancelled, the signers name appears in red with a fa-times (cross) beside it, followed by the date on which the signature request was cancelled.
See any tags added to the document(s).
Click the fa-clock-o (clock) icon to schedule an activity related to the signature request.
Click the fa-ellipsis-v (vertical ellipsis) icon in the top-right of the card to reveal more options:
See the signature request's Details <sign/request-signatures/manage-form>.
Cancel a signature request that has not been fully signed.
Archive a signature request.
Select a color dot to add a colored bar to the left side of a card to visually differentiate it.
Detalhes da solicitação de assinatura
Para visualizar os detalhes de uma solicitação de assinatura, vá para , mude para a visualização Kanban, clique no ícone fa-ellipsis-v (reticências verticais) no card da solicitação de assinatura relevante e selecione Detalhes.
Usando os botões no topo do formulário, você pode:
Preview the document.
Download the document and, if available, its certificate of completion <sign/security/certificate-of-completion>.
Cancel the signature request if it has not been fully signed.
As seguintes informações estão disponíveis no formulário:
The overall Status of the signature request, i.e., To Sign, Signed, or Cancelled
Tags: any tags <sign/configuration/tags> added to the signature request
Valid until: the expiration date <sign/request-signatures/validity> of the signature request
Reminder: the reminder settings <sign/request-signatures/validity> of the signature request
Linked to: the Odoo model and record <sign/request-signatures/one-off-record> linked to the signature request, if applicable.
Signers: the list of signers, including their Role (i.e., the name given to the signer when the document was being prepared for signing <sign/request-signatures/add-signers>; by default, Signer 1, Signer 2, etc.), email address, and signature status. Click Resend to manually resend the request to a signer.
Contacts in copy: contacts added in the CC field when the signature request was created
Activity Logs: a complete log of actions performed on the signature request, such as its creation, views, downloads, signatures, or refusals <sign/sign-document/decline>.
Substitua um signatário ou atualize o endereço de e-mail de um signatário
Um signatário pode ser substituído se a opção Pode delegar foi habilitada para esse signatário <sign/request-signatures/signer-settings> quando o documento estava sendo preparado para assinatura. Para substituir um signatário, clique em seu nome na aba Signatários, depois clique novamente no nome e selecione o novo signatário.
Para atualizar o endereço de e-mail de um signatário, clique duas vezes no nome do signatário ou, se a opção Pode delegar foi habilitada para o signatário, clique no nome, depois clique no ícone fa-arrow-right (Link Interno) ao lado dele e atualize o endereço de e-mail no formulário de contato.
A solicitação de assinatura é automaticamente enviada ao novo signatário ou endereço de e-mail ao salvar ou ao navegar para longe da solicitação de assinatura ou do formulário de contato.