Inserir e vincular dados do Odoo
Vários elementos do seu banco de dados Odoo podem ser inseridos em uma planilha Odoo, nomeadamente:
lists, i.e., data from a list view <studio/views/multiple-records/list>
pivot tables, i.e., data from a pivot view <studio/views/reporting/pivot>
charts, i.e., data from a graph view <studio/views/reporting/graph>
Cada vez que uma lista, tabela dinâmica ou gráfico é inserido, uma fonte de dados <spreadsheet/insert/data-sources> é criada. Esta fonte de dados conecta a planilha ao seu banco de dados Odoo, recuperando informações atualizadas toda vez que a planilha é aberta, a página do navegador é recarregada, ou dados são manualmente atualizados clicando em os-refresh-data na barra de menu.
Listas inseridas <spreadsheet/insert/list> e tabelas dinâmicas inseridas <spreadsheet/insert/pivot-table> usam fórmulas com funções de lista <spreadsheet/insert/list-functions> e funções de tabela dinâmica <spreadsheet/insert/pivot-table-functions-static> específicas do Odoo para recuperar dados do seu banco de dados e podem ser manipuladas ainda mais na planilha. Certos elementos de gráficos inseridos <spreadsheet/insert/chart> podem ser modificados, mas nenhuma manipulação de dados ou computação é possível.
Também é possível:
add clickable links <spreadsheet/insert/clickable-links> to Odoo menu items, to other sheets of the same spreadsheet, or to external URLs
insert financial data <spreadsheet/insert/financial-data> from your Odoo database using Odoo-specific spreadsheet functions
paste data from another Odoo spreadsheet, Excel spreadsheet, or Google Sheet directly into any Odoo spreadsheet
Fontes de dados
Fontes de dados, que são criadas cada vez que uma lista <spreadsheet/insert/list>, tabela dinâmica <spreadsheet/insert/pivot-table>, ou gráfico <spreadsheet/insert/chart> é inserido em uma planilha Odoo, conectam a planilha e o modelo relevante no seu banco de dados, garantindo que os dados permaneçam atualizados e permitindo que você acesse os dados subjacentes <spreadsheet/insert/accessing-data>.
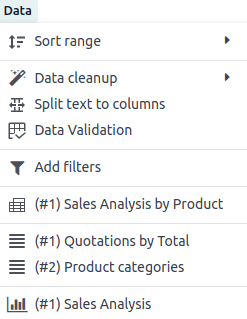
Cada fonte de dados é definida por propriedades que podem ser acessadas via menu Dados. Fontes de dados são identificadas pelos seus respectivos ícones oi-view-pivot (tabela dinâmica), oi-view-list (lista) ou fa-bar-chart (gráfico), seguidos por seu ID e nome, ex.: oi-view-pivot (#1) Análise de Vendas por Produto.
Clicar em uma fonte de dados abre as propriedades relacionadas em um painel à direita da planilha.
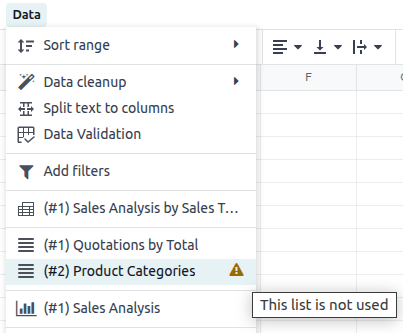
Um aviso no menu Dados identifica quaisquer fontes de dados para as quais a lista ou tabela dinâmica correspondente não aparece mais na planilha.
Deletar um gráfico inserido, por outro lado, também deleta a fonte de dados subjacente.
Acessando dados subjacentes
Os dados subjacentes de uma lista inserida, tabela dinâmica ou gráfico podem ser acessados a qualquer momento. Para visualizar:
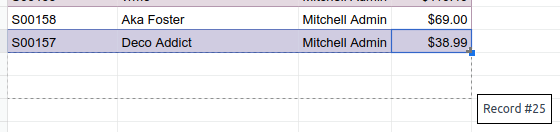
an individual record of an inserted list, right-click any cell of the relevant row, then select fa-eye See record
a list of records referenced by an individual cell of an inserted pivot table, right-click the cell, then select fa-eye See records
a list of records represented by a data point of an inserted chart, click the data point.
Para retornar à planilha após visualizar os dados subjacentes, clique no nome da planilha nas abas de navegação no topo da página.
Inserir uma lista
Para inserir uma lista:
With the relevant list view open in your database, click the fa-cog (Actions) icon beside the name of the view, then oi-view-list .
Para inserir apenas registros específicos, selecione os registros relevantes, clique no botão fa-cog Ações que aparece no topo centro da tela, depois em oi-view-list Inserir na planilha.
In the window that opens, edit the Name of the list if needed.
O nome da lista é usado no nome da aba e nas propriedades da lista <spreadsheet/insert/list-properties>.
Edit the number of records, i.e., rows, to be inserted if needed.
Por padrão, o número exibido é o número de registros visíveis na primeira página da lista. Por exemplo, se a lista contiver 150 registros mas apenas 80 estiverem visíveis, este campo mostrará 80.
Embora os dados da sua lista se mantenham atualizados graças à conexão com seu banco de dados, uma lista inserida não se expandirá automaticamente para acomodar novos registros, como uma nova categoria de produto ou um novo vendedor.
Se você antecipar que novos registros serão adicionados, considere adicionar linhas extras ao inserir a lista. Registros/linhas também podem ser adicionados manualmente <spreadsheet/insert/list-add-records> após a planilha ter sido inserida.
Sua empresa atualmente tem dez categorias de produtos e você insere essa lista em uma planilha. Se uma 11ª categoria de produto for criada e sua lista inserida tiver apenas dez linhas, a nova categoria será inserida na posição apropriada na planilha, removendo assim uma categoria existente.
Uma forma de evitar isso é adicionar linhas extras <spreadsheet/insert/list-add-records> ao inserir a lista.
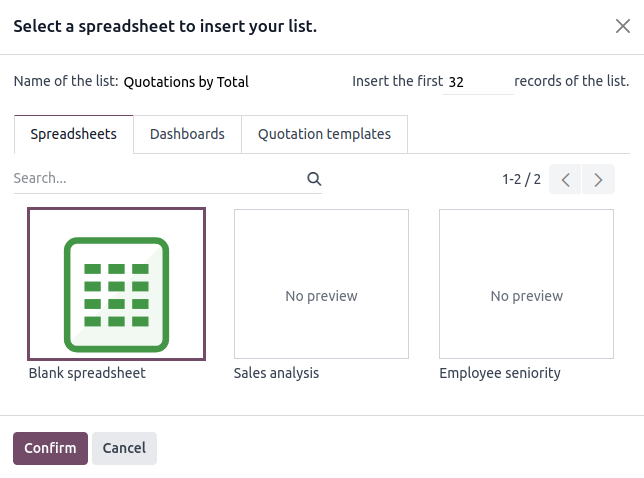
Click Blank spreadsheet to create a new spreadsheet, or select in which existing spreadsheet the list should be inserted.
Ao inserir uma lista em uma nova planilha, a planilha é salva no aplicativo Odoo Documents na pasta pessoal fa-hdd-o Meu Drive.
Click Confirm.
A lista é inserida em uma nova aba na planilha. A aba na barra inferior mostra o nome da lista seguido pelo ID da lista, por exemplo, Cotações por Total (Lista #1). Um painel no lado direito da tela mostra as propriedades da lista <spreadsheet/insert/list-properties>.
Funções de lista
Quando uma lista é inserida em uma planilha, as seguintes funções são usadas para recuperar o cabeçalho e os valores de campo, respectivamente:
=ODOO.LIST.HEADER(list_id, field_name)
=ODOO.LIST(list_id, index, field_name)
Os argumentos da função são os seguintes:
list_id: the ID assigned when the list is inserted. The first list inserted into a spreadsheet is assigned list ID 1, the second, list ID 2, etc.
index: identifies the line on which the record appeared in the list before insertion. The first line has an index of 1, the second an index of 2, etc.
field_name: the technical name of the field.
Propriedades da lista
As propriedades da lista aparecem no lado direito da tela quando uma lista é inserida. Elas podem ser acessadas a qualquer momento através do menu Dados clicando na lista relevante, conforme indicado pelo ícone oi-view-list (lista), ou clicando com o botão direito em qualquer lugar da lista e clicando em oi-view-list Ver propriedades da lista.
As seguintes propriedades da lista são exibidas, algumas das quais podem ser editadas:
List #: the list ID. List IDs are assigned sequentially as additional lists are inserted into the spreadsheet.
List Name: the name of the list. Edit this if needed. Note that editing the list name in the list properties does not modify the list name shown in the sheet name, and vice versa.
Model: the model from which the data has been extracted.
Columns: the fields of the model that were visible when the list was inserted.
Domain: the rules used to determine which records are shown. Click Edit domain <search/custom-filters> to add or edit rules.
Sorting: how the data is sorted, if applicable. To add a sorting rule, click Add, select the field, then choose whether sorting should be Ascending or Descending. Delete a sorting rule by clicking the fa-times (delete) icon.
Para duplicar <spreadsheet/insert/list-duplicate> ou excluir <spreadsheet/insert/list-delete> a fonte de dados de uma lista, clique no ícone fa-cog (engrenagem) e então clique em fa-clone Duplicar ou fa-trash Excluir conforme apropriado.
Gerenciar uma lista inserida
Depois que uma lista de um banco de dados Odoo foi inserida em uma planilha Odoo, você pode:
add records <spreadsheet/insert/list-add-records>, i.e., rows
add fields <spreadsheet/insert/list-add-fields>, i.e., columns
duplicate the list <spreadsheet/insert/list-duplicate> to create a new, identical data source
delete the list and its underlying data source <spreadsheet/insert/list-delete>
Adicionar registros/linhas a uma lista
Para adicionar registros a uma lista, use um dos seguintes métodos:
Select the last row of the table, then hover over the blue square until the plus icon appears. Click and drag down to add the desired number of rows. The cells of the new rows are populated with the appropriate formula <spreadsheet/insert/list-functions> to retrieve the list values. If there is corresponding data in your database, the cells are populated.
Position your cursor in the top left cell of the sheet, click from the menu bar, then select the appropriate list. In the pop-up window, indicate the number of records to insert and click Confirm. An updated list is inserted, overwriting the previous list.
Adicionar campos/colunas a uma lista
Para adicionar campos/colunas a uma lista:
Select the column to the right or left of where the new column should be inserted.
Click os-insert-col then os-insert-col-before or os-insert-col-after from the menu bar, or right-click then os-insert-col-before Insert column left or os-insert-col-after Insert column right as appropriate.
Copy the header cell of any column, paste it into the header cell of the new column, and press Enter.
Double-click the new header cell then click on the field name that appears in quotation marks at the end of the formula; a list of all the technical names of the fields of the related model appears.
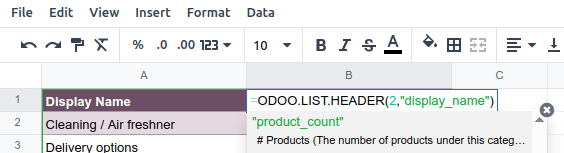
Select the appropriate field name and press Enter. The field's label appears in the header.
Para conhecer o nome técnico de um campo, navegue até a visualização relevante, ative o modo de desenvolvedor <developer-mode>, depois verifique o nome do campo passando o mouse sobre o ponto de interrogação ao lado do rótulo do campo.
With the header cell selected, double-click on the blue square in the bottom-right corner. The cells of the column are populated with the appropriate formula to retrieve the list values. If there is corresponding data in your database, the cells are populated.
Duplicar uma lista
Duplicar uma lista por meio das propriedades da lista cria uma fonte de dados adicional. Isso permite que diferentes manipulações sejam realizadas nos mesmos dados dentro de uma planilha.
Com as propriedades da lista <spreadsheet/insert/list-properties> abertas, clique no ícone fa-cog (engrenagem) e depois em fa-clone Duplicar.
A nova fonte de dados recebe o próximo ID de lista disponível. Por exemplo, se nenhuma outra lista tiver sido inserida enquanto isso, duplicar Lista #1 resulta na criação de Lista #2.
Ao contrário de quando você insere uma lista, uma lista duplicada não é inserida automaticamente na planilha. Para inseri-la, realize as seguintes etapas:
Add a new sheet by clicking the os-plus (add sheet) icon at the bottom left of the spreadsheet.
Click from the menu bar, then select the appropriate list.
Define the number of records to insert and click Confirm.
Edit the List Name in the properties panel if needed.
Rename the sheet by right-clicking on the sheet tab, selecting Rename, and entering the new sheet name.
Excluir uma lista
Para excluir completamente uma lista e a fonte de dados subjacente de uma planilha, realize as seguintes etapas em qualquer ordem:
Delete the spreadsheet table using your preferred means, e.g., via keyboard commands, spreadsheet menus, or by deleting the sheet. This deletes the visual representation of the data.
From the properties panel <spreadsheet/insert/list-properties> of the relevant list, click the fa-cog (gear) icon then fa-trash Delete. This deletes the data source of the list from the spreadsheet.
Inserir uma tabela dinâmica
Para inserir uma tabela dinâmica:
With the relevant pivot view open in your database, click Insert in Spreadsheet.
In the window that opens, edit the Name of the pivot if needed.
Esse nome é usado no nome da planilha e nas propriedades da tabela dinâmica <spreadsheet/insert/pivot-table-properties>.
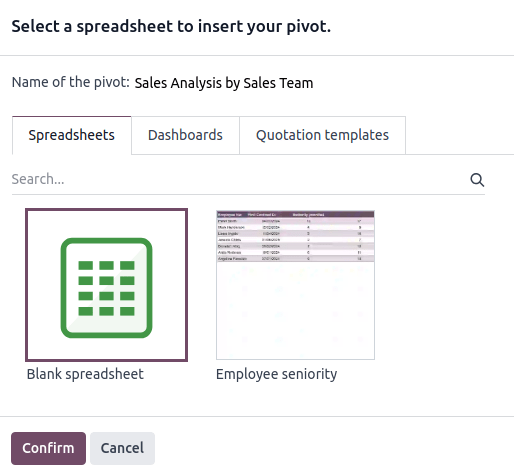
Click Blank spreadsheet to create a new spreadsheet, or select in which existing spreadsheet the pivot table should be inserted.
Ao inserir uma tabela dinâmica em uma nova planilha, a planilha é salva no aplicativo Odoo Documents na pasta pessoal fa-hdd-o Meu Drive.
Click Confirm.
A tabela dinâmica é inserida em uma nova planilha da planilha. A aba da planilha na barra inferior mostra o nome da tabela dinâmica seguido pelo ID da tabela dinâmica, por exemplo, Análise de Vendas por Equipe de Vendas (Tabela Dinâmica #1). Um painel no lado direito da tela mostra as propriedades da tabela dinâmica <spreadsheet/insert/pivot-table-properties>.
Funções de tabela dinâmica
Uma tabela dinâmica inserida que não foi convertida para uma tabela dinâmica dinâmica usa as seguintes funções para recuperar os valores de cabeçalho e campo, respectivamente:
=PIVOT.HEADER(pivot_id, [domain_field_name, …], [domain_value, …])
=PIVOT.VALUE(pivot_id, measure_name, [domain_field_name, …], [domain_value, …])
Os argumentos das funções são os seguintes:
pivot_id: the ID assigned when the pivot table is inserted. The first pivot table inserted in a spreadsheet is assigned pivot ID 1, the second, pivot ID 2, etc.
measure_name: the technical name of what is being measured, followed by the type of aggregation, e.g., product_uom_qty:sum.
domain_field_name: the technical name of the field used as a dimension, e.g., user_id, or, if the dimension is a time period, the technical name of the date field, followed by the time period, e.g., date_order:month.
domain_value: the ID of the record, or, if the dimension is a time period, the date or time period targeted.
Propriedades da tabela dinâmica
As propriedades da tabela dinâmica aparecem no lado direito da tela quando uma tabela dinâmica é inserida. Elas podem ser acessadas a qualquer momento através do menu Dados clicando na tabela dinâmica relevante, conforme indicado pelo ícone oi-view-pivot (dinâmica), ou clicando com o botão direito em qualquer lugar da tabela dinâmica e clicando em oi-view-pivot Ver propriedades da tabela dinâmica.
As seguintes propriedades da tabela dinâmica são mostradas, algumas das quais podem ser editadas:
Pivot #: the pivot table ID. Pivot table IDs are assigned sequentially as additional pivot tables are inserted in the spreadsheet.
Name: the name of the pivot table. Edit this if needed. Note that editing the name in the pivot table properties does not modify the name shown in the sheet name, and vice versa.
Model: the model from which the data has been extracted.
Columns and Rows: dimensions you are using to categorize or group data from the model.
Measures: what you are measuring, or analyzing, based on the dimensions you have chosen.
Para poder manipular as propriedades de uma tabela dinâmica, converta uma tabela dinâmica estática para uma tabela dinâmica dinâmica <spreadsheet/dynamic-pivot-tables/create>.
Domain: the rules used to determine which records are shown. Click Edit domain <search/custom-filters> to add or edit rules.
Para duplicar <spreadsheet/insert/pivot-table-duplicate> ou deletar <spreadsheet/insert/pivot-table-delete> a fonte de dados de uma tabela dinâmica, clique no ícone fa-cog (engrenagem) e depois em fa-clone Duplicar ou fa-trash Deletar.
Gerenciar uma tabela dinâmica inserida
Depois que uma tabela dinâmica de um banco de dados Odoo for inserida em uma planilha Odoo, você pode:
convert it to a dynamic pivot table <spreadsheet/dynamic-pivot-tables/create> to be able to manipulate the dimensions and measures
duplicate the pivot table <spreadsheet/insert/pivot-table-duplicate> to create a new, identical data source
delete the pivot table and its underlying data source <spreadsheet/insert/pivot-table-delete>
Duplicar uma tabela dinâmica
Duplicar uma tabela dinâmica através das propriedades da tabela dinâmica cria uma fonte de dados adicional. Isso permite que diferentes manipulações sejam realizadas nos mesmos dados dentro de uma planilha.
Por exemplo, você pode ver os mesmos dados agregados por diferentes dimensões ou usar filtros globais para deslocar a data e criar tabelas dinâmicas que comparem os dados do período atual com um período anterior.
Para duplicar uma tabela dinâmica, execute os seguintes passos:
With the pivot table properties <spreadsheet/insert/pivot-table-properties> open, click the fa-cog (gear) icon then fa-clone Duplicate.
The duplicated pivot table is automatically inserted into a new sheet in the spreadsheet, with the pivot table properties open in the right panel.
Edit the Name in the properties panel and the sheet tab if needed.
A nova fonte de dados recebe o próximo ID de tabela dinâmica disponível. Por exemplo, se nenhuma outra tabela dinâmica tiver sido inserida nesse meio tempo, duplicar Tabela Dinâmica #1 resulta na criação de Tabela Dinâmica #2.
Excluir uma tabela dinâmica
Para excluir completamente uma tabela dinâmica e a fonte de dados subjacente de uma planilha, execute os seguintes passos em qualquer ordem:
Delete the spreadsheet table using your preferred means, e.g., via keyboard commands, spreadsheet menus, or by deleting the sheet. This deletes the visual representation of the data.
From the properties panel <spreadsheet/insert/pivot-table-properties> of the relevant pivot table, click the fa-cog (gear) icon then fa-trash Delete. This deletes the data source of the pivot table.
Inserir um gráfico
Para inserir um gráfico de um banco de dados Odoo em uma planilha Odoo:
With the relevant graph view open in your database, click Insert in Spreadsheet.
In the window that opens, edit the Name of the graph if needed.
Click Blank spreadsheet to create a new spreadsheet, or select in which existing spreadsheet the chart should be inserted.
Ao inserir um gráfico em uma nova planilha, a planilha é salva no aplicativo Odoo Documents na pasta pessoal fa-hdd-o Meu Drive.
Click Confirm.
Os gráficos são inseridos na primeira aba da planilha. Um painel no lado direito da tela mostra as propriedades do gráfico <spreadsheet/visualize/customize-charts>, onde vários aspectos da configuração e design do gráfico podem ser modificados.
Manage charts <spreadsheet/visualize/manage-charts>
Inserir links clicáveis
Adicionar links para informações relacionadas ou de suporte pode tornar seu relatório ou painel mais amigável e eficaz.
Você pode inserir um link clicável de qualquer célula da planilha <spreadsheet/insert/clickable-links-cell> para:
an Odoo menu item
another sheet inside the same spreadsheet
an external URL
Você pode inserir um link clicável de qualquer gráfico <spreadsheet/insert/clickable-links-chart> para um item de menu Odoo.
Inserir um link clicável a partir de uma célula
Para inserir um link clicável a partir de uma célula:
Click fa-link from the menu bar or right-click on the cell, then click fa-link Insert link. Next, depending on the desired outcome, perform one of the following actions:
Click the fa-bars (menu) icon, then Link an Odoo menu. Select the relevant menu item from the list or click Search more to choose from a list of all menu items. Click Confirm.
Click the fa-bars (menu) icon, then Link sheet, then choose the relevant sheet from the current spreadsheet.
Under Link, type a URL.
Enter or edit the label for the link in the Text field.
Click Confirm.
Inserir um link clicável a partir de um gráfico
Para inserir um link clicável de um gráfico para um item de menu do Odoo:
Hover over the top right of the chart's box, then click the fa-bars (menu) icon, then fa-pencil-square-o Edit. The chart properties appear at the right of the screen.
At the bottom of the fa-sliders Configuration tab of the chart properties panel, click under Link to Odoo menu, then select a menu.
Passe o mouse sobre o canto superior direito da caixa do gráfico para verificar se um novo ícone fa-external-link (external link) foi adicionado.
Inserir dados financeiros
Ao construir relatórios e painéis, pode ser útil incluir certos dados relacionados à contabilidade, como IDs de contas, créditos e débitos de contas específicas e datas do início e fim do ano fiscal.
Funções de planilha específicas do Odoo <spreadsheet/functions/odoo> permitem recuperar esses dados contábeis do seu banco de dados e inseri-los em uma planilha.