Salários
No Odoo, os salários são calculados e determinados por cinco fatores: tipos de estrutura <payroll/structure-types> salarial, estruturas <payroll/structures> salariais, regras <payroll/rules>, parâmetros de regra <payroll/rule-parameters> e outros tipos de entrada <payroll/other-input>. Juntos, esses fatores determinam como o salário de cada funcionário é calculado.
Cada tipo de estrutura contém uma ou mais estruturas dentro dela. Cada estrutura contém um conjunto de regras, e toda regra usa parâmetros para definir como valores específicos são calculados. Entradas adicionais (como bônus ou deduções) também podem ser incluídas para ajustar o salário final.
Quando os contracheques são calculados, o Odoo calcula o tempo trabalhado do funcionário a partir de suas entradas de trabalho, depois aplica a estrutura, regras e parâmetros relevantes do tipo de estrutura atribuído ao funcionário para determinar sua remuneração total.
Tipos de estrutura
No Odoo, um tipo de estrutura agrupa estruturas salariais relacionadas. Quando um contrato especifica um tipo de estrutura, apenas as estruturas dentro desse tipo são usadas para calcular o salário do funcionário. Cada tipo de estrutura contém estruturas individuais dentro dele, cada uma contendo um conjunto de regras para processar uma entrada de folha de ponto.
Os tipos de estrutura definem aspectos principais da configuração de folha de pagamento, incluindo a frequência com que os funcionários são pagos, suas horas de trabalho, a estrutura salarial padrão e se os salários são fixos (baseados em salário) ou variáveis (baseados em hora).
Visualize tipos de estrutura existentes navegando até .
Dois tipos de estrutura padrão são pré-configurados no Odoo: Funcionário e Trabalhador.
Normalmente, Funcionário é usado para funcionários assalariados, e é por isso que o Tipo de Salário Padrão é um Salário Fixo, e Trabalhador é normalmente usado para funcionários pagos por hora, então o tipo de salário é Salário por Hora.

Novo tipo de estrutura
Se os tipos de estrutura padrão não atenderem às necessidades da empresa, vá para e clique em Novo para criar um tipo de estrutura personalizado.
Proceda para inserir as seguintes informações nos campos:
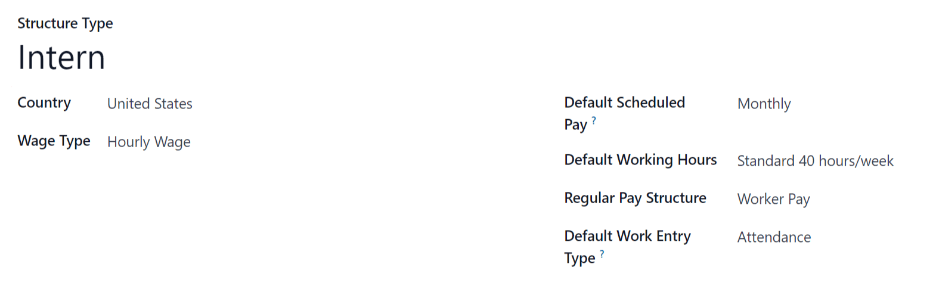
Structure Type: Enter the name for the new structure type, such as Employee or Worker.
Country: Select the country that the new structure type applies to from the drop-down menu.
Wage Type: Select the wage type for the structure:
Fixed Wage: For salaried employees who receive the same wage every pay period.
Hourly Wage: For employees paid based on hours worked during a pay period.
Default Scheduled Pay: Select the typical pay schedule for the new structure type from the drop-down menu. This indicates how often this specific type of structure is paid out.
Default Working Hours: Select the default working hours for the new structure type from the drop-down menu. All available working hours for the currently selected company appear in the drop-down menu. The default working hours are the Standard 40 hours/week option. If the needed working hours do not appear in the list, a new set of default working hours can be created <payroll/new-default-working-hours>.
Regular Pay Structure: Type in the name for the regular pay structure. It is used as the default option when generating payslips.
Default Work Entry Type: Select the default work entry type which is used to create all work entries for the employee.
Novo horário de trabalho padrão
Para criar novas horas de trabalho padrão, digite o nome das novas horas de trabalho no campo Horas de Trabalho Padrão no formulário do novo tipo de estrutura. Clique em Criar e editar. Um formulário de horas de trabalho padrão aparece. O formulário de horas de trabalho padrão tem duas seções: uma seção de informações gerais e uma aba listando todas as horas de trabalho individuais por dia e hora. Quando o formulário estiver completo, clique em Salvar e Fechar.
Name: Type in the name for the new default working hours. This should be descriptive and clear to understand, such as Standard 20 Hours/Week.
Flexible Hours: Check the checkbox to let employees adjust their start and end times while maintaining the same total daily hours.
Company Full Time: Enter the number of hours per week an employee needs to work to be considered a full-time employee. Typically, this is approximately 40 hours, and this number affects what types of benefits an employee can receive, based on their employment status (full-time vs part-time).
Average Hour Per Day: Auto-populated based on the working hours in the Working Hours tab. This entry affects resource planning by determining how many resources can be used per workday.
Work Time Rate: This percentage is auto-generated based on the entry for the Company Full Time and the working hours configured in the Working Hours tab. This number should be between 0.00% and 100%, so if the percentage is above 100%, it is an indication that the working times and/or Company Full Time hours need adjustment.
Company: Select the company that can use these new default working hours from the drop-down menu. Leave this field blank if the hours are available for all companies.
Timezone: Select the time zone to be used for the new default working hours from the drop-down menu.
Working Hours Tab: This tab is where each day's specific working hours are listed. When a new default working hour form is created, the Working Hours tab is pre-populated with a default 40-hour week, with each day divided into three timed sections.
Cada dia inclui períodos de manhã (8:00–12:00), almoço (12:00–13:00) e tarde (13:00–17:00), configurados usando o formato de hora 24 horas.
Para ajustar qualquer uma destas horas, clique no campo e modifique a hora usando os menus suspensos ou digite a hora desejada diretamente.
Estruturas
Estruturas salariais são as diferentes situações em que um funcionário pode ser pago dentro de uma estrutura específica, e são especificamente definidas por várias regras.
O número de estruturas que uma empresa precisa para cada tipo de estrutura depende de quantas maneiras diferentes os funcionários são pagos e de como seu pagamento é calculado. Um exemplo comum de uma estrutura adicional é um Bônus.
Para visualizar todas as várias estruturas para cada tipo de estrutura, vá para .
Cada tipo de estrutura <payroll/structure-types> lista as diversas estruturas associadas a ele. Cada estrutura contém um conjunto de regras que a definem.
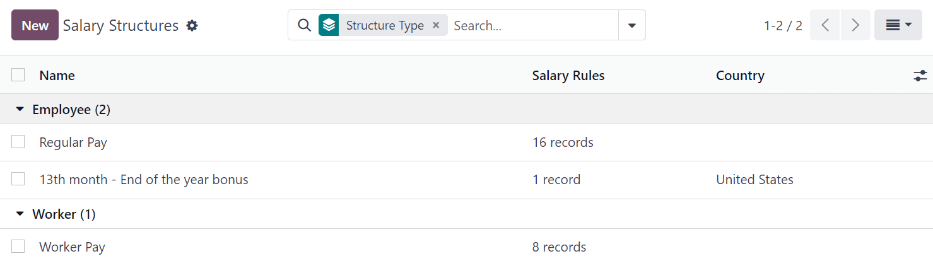
Clique em uma estrutura para visualizar suas Regras de Salário. Estas regras definem como o contracheque será calculado para o funcionário.
Regras salariais
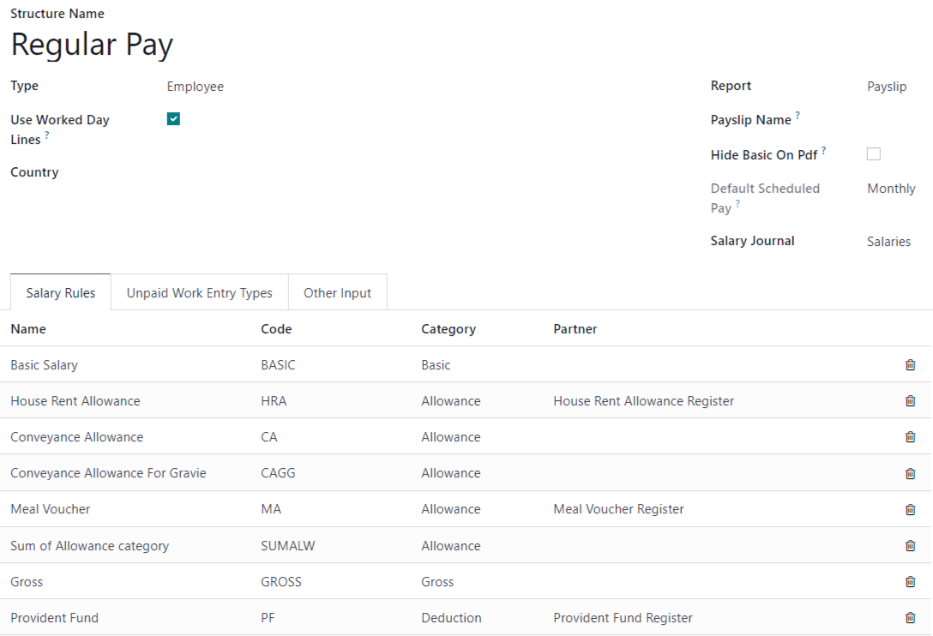
Cada estrutura tem um conjunto de regras salariais usadas para calcular os vários valores considerados no pagamento. Estas regras são configuradas pela localização e afetam o cálculo dos salários.
Para visualizar todas as regras, vá para . Clique em uma estrutura (como Pagamento Regular) para visualizar todas as regras.
Adicionar uma nova regra
Para fazer uma nova regra, clique em Novo e um formulário em branco de Regras de Salário é carregado. Digite as seguintes informações na metade superior do formulário:
Rule Name: Enter a name for the rule. This is the name displayed in the payslip.
Code: Enter a code to be used for the new rule. This is case sensitive and is used as the rule ID. This field is required.
Category: Using the drop-down menu, select the category the rule applies to, or enter a new category. The category is used to group rules and access their total sum.
Salary Structure: Using the drop-down menu, select the salary structure the rule applies to, or enter a new one. This field is required.
Sequence: Enter a number indicating when the rule is calculated, in the sequence of all other rules. Rules are processed one after another based on their sequence number. Rules with a lower sequence number are calculated first, and their results can be used by rules with a higher sequence number. This field is required.
Appears on Payslip: Check the checkbox to have the rule visible on the employee payslip PDF.
Contributes to Employer Cost: Check the checkbox to include the rule when computing the employer cost of a payslip.
Aba Geral
Preencha as seguintes seções da aba Geral. Estas configurações determinam quando e como a regra é calculada.
Condições
Condition Based on: Using the drop-down menu, select if the rule is calculated and displayed as a line in the payslip form view. Choose from one of the following options:
Always True: The rule is always calculated. No other configurations are needed for this section.
Salary Input: This introduces a dynamic benefit to the structure. This appears as a field in the Payroll tab of the Employee form, the Inputs tab of the payslip, or both. The value of this field is added to the amount of the rule. If selected, the following additional fields appear and must be configured:
Input on: Specify where this field should appear and which object it should belong to, the Employee, the Payslip, or both. If both are selected, the value on the payslip automatically defaults to the value from the employee record, but it can be overwritten directly on the payslip for a specific payroll run.
Section: This groups several inputs into one expandable section on the form view. Only one option is available by default, Inputs.
Unit: Click the corresponding radio button to determine how the benefit is displayed. The available options are:
Monetary: A number with currency.
Quantity: A number.
Percentage: A number with a % sign.
Checkbox: Indicates boolean values.
Input Description: Enter a short explanation of when the input is applicable.
Default Value: Enter the default value, either a monetary amount, quantity, or percentage. This is determined by what is selected for the Unit. If necessary, add a Suffix in the field to the right of this value, such as per km.
Se Caixa de Seleção for selecionada para a Unidade, este campo muda para Selecionado por Padrão. Clique na caixa de seleção para ter a regra ativa por padrão.
Depends On: Select another rule that has a salary input, and use its value to determine whether this rule should be hidden.
Other Input: Select this to check if a payslip line exists with the same type. When selected, a Condition Other Input field appears. Using the drop-down menu, select the type of input the rule is based on, such as Deduction, Reimbursement, etc.
Python Expression: Select this to have the rule calculated using a Python script. The script is evaluated using the local dictionary. The right side lists the Available variables and the Output:
Available variables:
payslip: The hr.payslip object.
employee: The hr.employee object.
version: The hr.version object.
result_rules: A dictionary containing the rules amounts, quantities, rates and totals (previously computed).
categories: A dictionary containing the computed salary rule categories (the sum of the amount of all the rules belonging to that category):
total: rule total
amount: rule amount
quantity: rule quantity
rate: rule rate
ytd: rule year to date value
worked_days: A dictionary containing the computed worked days, where each key is a work entry type code, and each value is a worked_days object. This object contains many variables, with the most important ones being:
number_of_days: The number of days registered in the payslip duration with this work entry type.
number_of_hours: The number of hours registered in the payslip duration with this work entry type.
is_paid: Whether or not this work entry type is added as an unpaid work entry on this payslip structure.
inputs: A dictionary containing the computed inputs where key is the other input type code and value is the sum of the payslip input lines with the same code.
Output:
result: The boolean is True if the rule should be calculated, or False if otherwise.
Domain: Select this option to apply the rule only if it matches the configured Applicability Domain. Configure the Applicability Domain that appears beneath this option when selected.
Calcular
Esta seção determina o valor final da regra, que consiste no valor base, na quantidade e na taxa. O total da regra é total = amount * quantity * (rate/100).
Usando o menu suspenso, selecione uma das seguintes opções para o campo Tipo de Valor:
Percentage (%): Defines the values for the total calculation. When selected, configure the following fields:
Percentage based on: A Python expression is evaluated using the localdict, and its value is assigned to the rule amount.
Quantity: A Python expression is evaluated using the localdict, and its value is assigned to the rule quantity.
Percentage (%): A decimal number assigned to the rule rate.
Fixed Amount: The amount and quantity is defined, with a rate of 100%.
Quantity: A Python expression is evaluated using the localdict, and its value is assigned to the rule quantity.
Fixed Amount: Enter a decimal number which is assigned to the rule amount.
Other Input: Select this to fetch the rule amount from the payslip input lines that have the same other input type with rate of 100% and quantity of 1.0. When selected, an Amount Other Input field appears beneath it. Using the drop-down menu, select the type of input it is, such as Deduction, Tips, or Expenses.
Python Code: This is the more complex version of the Percentage (%) option, where a whole Python script is written then evaluated using the localdict. This includes a list of Available variables and an Output list.
Available variables:
payslip: hr.payslip object
employee: hr.employee object
version: hr.version object
result_rules: A dict containing the rules amounts, quantities, rates and totals (previously computed), where the key is the rule code, and the value is dict with the following keys:
total: rule total
amount: rule amount
quantity: rule quantity
rate: rule rate
ytd: rule year to date value
categories: A dict containing the computed salary rule categories (sum of amount of all rules belonging to that category) where key is the category code and value is the sum of the rules total values.
worked_days: A dict containing the computed worked days where key is the work entry type code and value is the worked_days object contain many variables, but most important ones are:
number_of_days: The number of days registered in the payslip duration with this work entry type.
number_of_hours: The number of hours registered in the payslip duration with this work entry type.
is_paid: Dictates whether or not this work entry type is added as unpaid work entry on this payslip structure.
inputs: A dict containing the computed inputs Where key* is the other input type code and value is the sum of the payslip input lines with the same code.
Output:
result: float, base amount of the rule
result_rate: float, which defaults to 100.0 (%)
result_qty: float, quantity, which defaults to 1
result_name: string, name of the line. This defaults to the name field of the salary rule (useful if the name depends or should depend on something computed in the rule).
Contribuição da empresa
Usando o menu suspenso, selecione o terceiro envolvido eventual no pagamento de salário dos colaboradores.
Aba Exibição
Esta seção determina a aparência da regra no PDF do holerite disponível para o colaborador e define a estética da regra.
Primeiro, selecione uma Cor para a regra usando o seletor de cores. Em seguida, marque a caixa de seleção Título para exibir apenas o título e a descrição da regra salarial e ocultar quaisquer valores numéricos.
Marque as caixas de seleção Indentado, Espaço Acima, Negrito, Sublinhado e Itálico para ativar as opções.
Por fim, digite uma Descrição para a regra, que é exibida abaixo do nome da regra.
Aba Financeiro
Esta seção determina como a regra afeta os vários diários contábeis e como o salário líquido é calculado para os colaboradores. Configure os seguintes campos nesta seção:
Debit Account: Using the drop-down menu, select the debit account for the rule.
Credit Account: Using the drop-down menu, select the credit account for the rule.
Split on names: Enable this option to split the accounting entries for this rule according to the payslip line name. Splitting the entries provides more visibility for deductions and reimbursements, or for salary adjustments.
Excluded from Net: Check this checkbox to exclude the rule's calculations from the net salary rule in journal entries. A specific debit and credit account should be set to independently classify it.
Set employee on account line: Check this checkbox to have the employee's name visible on the journal items.
Parâmetros de regra
Os parâmetros de regra informam ao Odoo como calcular cada linha de um holerite. Para visualizar os parâmetros de regra configurados, navegue até .
Todos os parâmetros de regra são exibidos. Clique em um parâmetro de regra individual para visualizar os detalhes.
Cada parâmetro de regra exibe o nome da regra, o código, quando a regra está ativa e o valor do parâmetro.
Outros tipos de entrada
Ao criar holerits, às vezes é necessário adicionar outras entradas para circunstâncias específicas, como gorjetas, comissões, despesas ou deduções. Essas outras entradas podem ser encontradas navegando até .
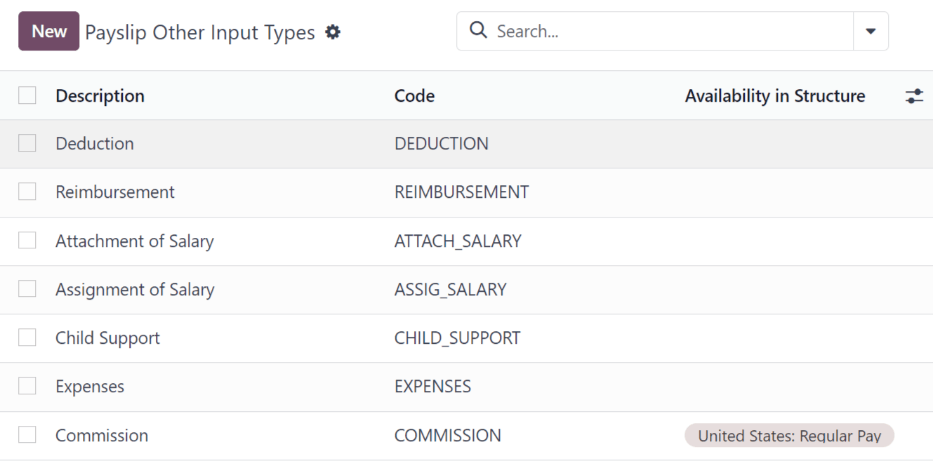
Se um novo tipo de entrada é necessário e não aparece na lista, clique no botão Novo para criar um novo tipo de entrada. Digite a Descrição, o Código e selecione a qual estrutura se aplica no campo Disponibilidade na Estrutura.
Marque a caixa de seleção Disponível em anexos se a entrada deve ser uma vinculação salarial.
