Agendar entrevistas
Uma entrevista presencial, virtual ou por telefone pode ser agendada de uma de duas maneiras através da aplicação Recruitment, seja pela equipe de recrutamento <recruitment/schedule_interviews/recruitment-scheduled>, ou pelo candidato <recruitment/schedule_interviews/applicant-scheduled>.
Com um simples arrastar e soltar, o Odoo envia um email ao candidato com um link de autoatendimento, o candidato reserva o horário e envia a reunião ao calendário de todos. Sem mais emails ou ligações de ida e volta.
A equipe de recrutamento marcou entrevistas
Quando um candidato chega ao estágio de entrevista, a equipe de recrutamento deve marcá-la conciliando uma data e hora adequadas entre o candidato e os entrevistadores.
Para marcar a entrevista, navegue até ao cartão do candidato, indo primeiro ao , e clicando no cartão em questão. Isto abre a página Candidaturas para esse cargo. Em seguida, clique no cartão do candidato desejado para ver o formulário de candidatura detalhado.
Para agendar uma entrevista por telefone, virtual ou presencial, clique no botão inteligente fa-calendar No Meeting no topo do registro do candidato.
Se já houver uma reunião agendada, o botão inteligente exibirá 1 reunião, com a data da próxima reunião abaixo dele. Se mais de uma reunião estiver agendada, o botão exibirá Próxima reunião, com a data da primeira reunião futura abaixo dele.
Clicar no botão inteligente Meetings carrega um calendário, mostrando as reuniões e eventos agendados para o usuário atualmente conectado, bem como os funcionários listados na seção Attendees, localizada à direita do calendário.
Para alterar as reuniões e eventos atualmente carregados que estão a ser apresentados, desmarque um participante cujos eventos do calendário devem ser ocultados. Apenas os participantes marcados são visíveis no calendário.
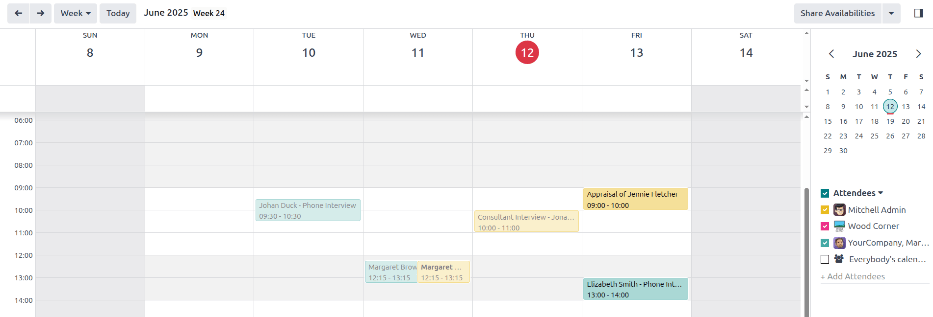
Para adicionar uma reunião ao calendário na vista Dia ou Semana, clique na hora de início da reunião e arraste para baixo até à hora de fim. Fazer isso seleciona a data, a hora e a duração da reunião.
Também é possível adicionar reuniões nesta visão, clicando no dia e na faixa horária pretendidos.
Ambos os métodos fazem aparecer uma janela pop-up Novo evento <recruitment/schedule_interviews/event-card>.
Janela pop-up de novo evento
Clicar em uma grade correspondente à hora e data abre a janela pop-up Novo evento para marcar uma reunião.
Insira as informações no formulário. Os únicos campos obrigatórios são o título da reunião e os campos Início (e data/hora de fim).
Uma vez inseridos os dados do cartão, clique em Salvar e Fechar para guardar as alterações e criar a entrevista.
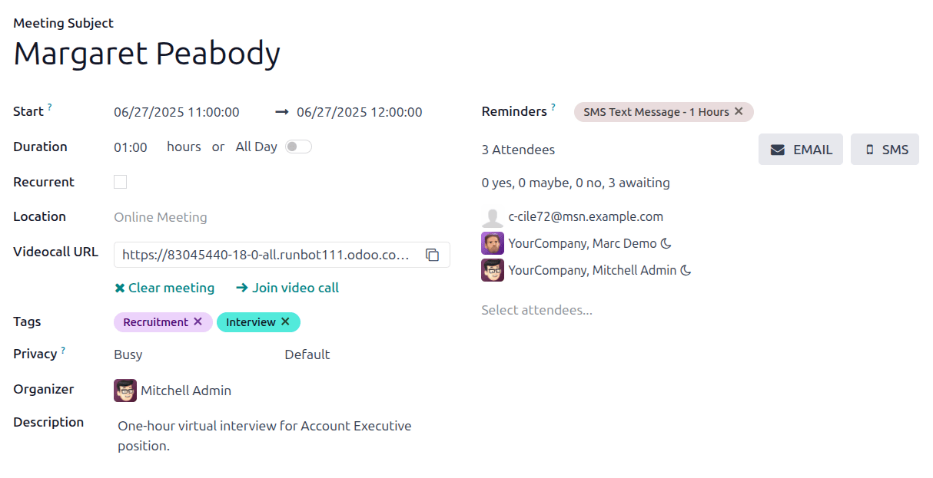
Depois de inserir o nome obrigatório da reunião, os campos disponíveis para modificação no cartão Novo evento são os seguintes:
Meeting Title: Enter the subject for the meeting. This should clearly indicate the purpose of the meeting. The default subject is the Candidate name entered on the applicant's card.
Start: Configure the start and end date and times for the meeting. Clicking either of these fields opens a calendar pop-up window. Click on the desired date to select it, and then enter the time in the corresponding field. Click fa-check Apply to close the window.
All Day: Tick the box to schedule an all-day interview. If this box is ticked, the Start field changes to Start Date.
Attendees: Select the people who should attend the meeting. The default attendees are the prospective candidate, and the assigned recruiter for the job position. Add as many other people as desired.
Videocall URL: If the meeting is virtual, or if there is a virtual option available, click fa-plus Odoo meeting, and a URL is automatically created for the meeting, which populates the field.
Description: Enter a brief description in this field. There is an option to enter formatted text, such as numbered lists, headings, tables, links, photos, and more. Use the powerbox feature, by typing a / to reveal a list of options.
Percorra as opções e clique no item desejado. O item é exibido no campo e pode ser modificado. Cada comando apresenta uma janela pop-up diferente. Siga as instruções de cada comando para completar a entrada.
Mais opções
Para acrescentar informações adicionais à reunião, clique no botão Mais opções no canto inferior direito da janela pop-up Novo evento <recruitment/schedule_interviews/event-card>. Preencha qualquer um dos seguintes campos adicionais:
Duration: this field auto populates based on the Start (and end) date and time. If the meeting time is adjusted, this field automatically adjusts to the correct duration length. The default length of a meeting is one hour.
Recurrent: if the meeting should repeat at a selected interval (not typical for a first interview), tick the checkbox next to Recurrent. Several additional fields appear when this is enabled:
Timezone: using the drop-down menu, select the Timezone for the recurrent meetings.
Repeat: choose Daily, Weekly, Monthly, Yearly, or Custom recurring meetings. If Custom is selected, a Repeat Every field appears beneath it, along with another time frequency parameter (Days, Weeks, Months, or Years). Enter a number in the blank field, then select the time period using the drop-down menu.
Repeat on: enabled when the Weekly option is selected in the Repeat field. Choose the day the weekly meeting falls on.
Day of Month: configure the two drop-down menu options to select a specific day of the month, irrespective of the date (e.g. the first Tuesday of every month). To set a specific calendar date, choose Date of Month and enter the calendar date in the field (e.g. 15 to set the meeting to occur on the fifteenth of every month).
Until: using the drop-down menu, select when the meetings stop repeating. The available options are Number of repetitions, End date, and Forever. If Number of repetitions is selected, enter the number of total meetings to occur in the blank field to the right. If End date is selected, specify the date using the calendar pop-up window, or type in a date in a MM/DD/YYYY format. Forever schedules meetings indefinitely.
Location: enter the location for the meeting.
Tags: select any tags for the meeting using the drop-down menu, or add a new tag by typing in the tag and clicking Create "tag". There is no limit to the number of tags that can be used.
Privacy: select if the organizer appears either Available or Busy for the duration of the meeting. Next, select the visibility of this meeting, using the drop-down menu to the right of the first selection. Options are Public, Private, and Only internal users. Public allows for everyone to see the meeting, Private allows only the attendees listed on the meeting to see the meeting, and Only internal users allows anyone logged into the company database to see the meeting.
Organizer: the employee who created the meeting is populated in this field. Use the drop-down menu to change the selected employee.
Reminders: select a reminder from the drop-down menu. Default options include Notification, Email, and SMS Text Message, each with a specific time period before the event (hours, days, etc). The chosen reminder chosen alerts the meeting participants of the meeting, via the selected option at the specified time. Multiple reminders can be selected in this field.
Enviar a reunião para os participantes
Uma vez inseridas as alterações na janela pop-up Novo evento <recrutamento/schedule_interviews/event-card> e os detalhes da reunião estiverem corretos, a reunião pode ser enviada aos participantes, por e-mail ou mensagem de texto, a partir do formulário de evento expandido (o que é visto ao clicar no botão Mais opções na janela pop-up Novo evento).
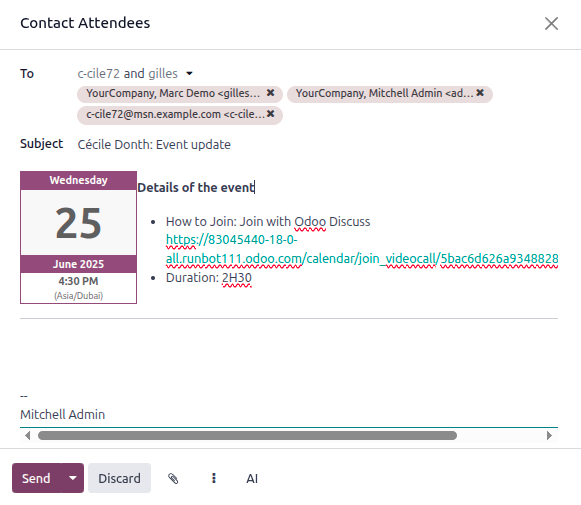
Para enviar a reunião por email, clique no botão fa-envelope EMAIL ao lado do campo Participantes no formulário de reunião expandido.
Uma janela pop-up de configuração do e-mail Contatar Participantes é exibida. Uma mensagem de e-mail pré-formatada, usando o modelo padrão :guilabel:`Calendário: Atualização de eventos", preenche o campo do corpo da mensagem.
O candidato, os seguidores da candidatura, bem como o usuário que criou a reunião, são adicionados ao Para por padrão. Faça as alterações desejadas no email.
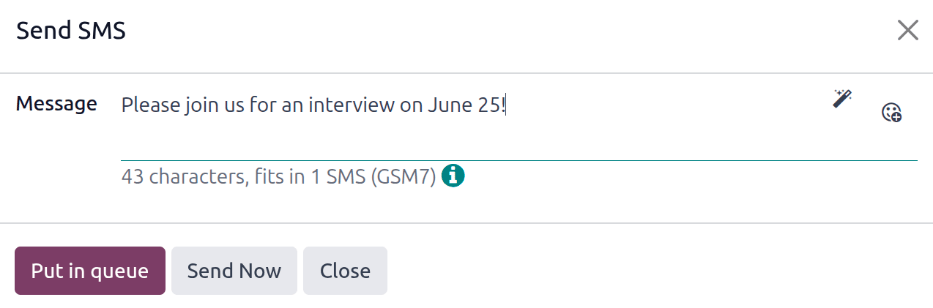
Para enviar a reunião por mensagem de texto, clique no botão fa-mobile SMS ao lado do campo Participantes no formulário de reunião expandido. Uma janela pop-up Enviar SMS aparece.
Na parte superior, uma banner azul aparecerá se algum participante não tiver um número de celular válido e listará quantos registros são inválidos. Se um contato não tiver um número de celular válido listado, clique em Fechar e edite o registro do participante e, em seguida, repita essas etapas.
Quando não aparecer nenhuma mensagem de aviso, escreva a mensagem a ser enviada aos participantes no campo Mensagem. Para adicionar emojis à mensagem, clique no ícone oi-smile-add (adicionar sorriso) no lado direito da janela pop-up.
O número de caracteres e a quantidade de mensagens de texto necessárias para enviar a mensagem (de acordo com critérios GSM7) aparece abaixo do campo Mensagem. Clique em Colocar na fila para enviar o texto posteriormente, após outras mensagens agendadas, ou clique em Enviar agora para enviar a mensagem imediatamente.
Entrevistas agendadas pelos candidatos
Coordenar horários de entrevista normalmente requer várias trocas de email e pode desacelerar o processo de recrutamento. Ativar o agendamento de autoatendimento do Odoo remove esse gargalo: quando um candidato é movido para uma etapa de entrevista, o sistema envia automaticamente um link de agendamento, registra o slot selecionado e atualiza todos os calendários relevantes.
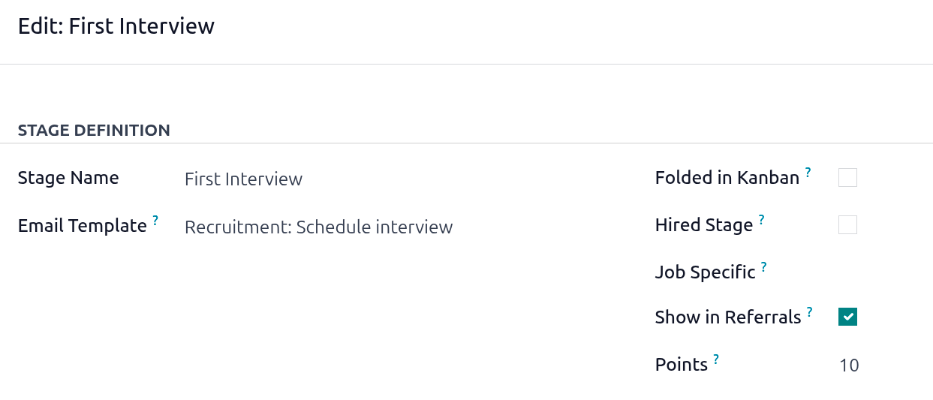
Esta automação está desativada por padrão. Para ativá-la, atribua o modelo de email Recrutamento: Agendar Entrevista à etapa Primeira Entrevista ou Segunda Entrevista (veja recruitment/schedule_interviews/modify-stage).
Modificar estágio
Modifique <recruitment/modify-stages> a etapa Primeira Entrevista ou Segunda Entrevista para que o campo Modelo de Email da etapa seja definido como Recrutamento: Agendar entrevista.
Enviar e-mail
Após configurar as etapas Primeira Entrevista ou Segunda Entrevista para enviar emails <recruitment/schedule_interviews/modify-stage>, arraste e solte o cartão do candidato em uma dessas etapas para enviar o email.
Entrevista auto-agendada
Quando o candidato recebe o email, ele clica no botão Agendar minha entrevista na parte inferior do email. Isso navega o candidato para uma página de agendamento online privada, que é apenas acessível através do link enviado por email.
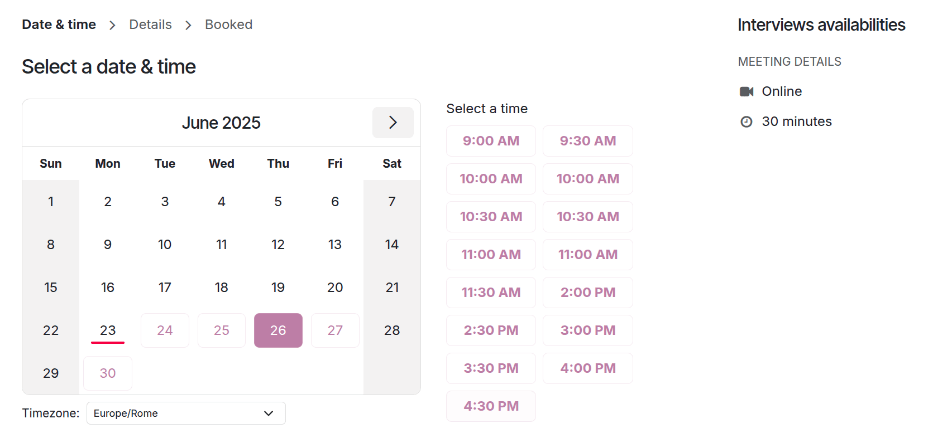
Esta página apresenta os DETALHES DA REUNIÃO no lado direito da tela. Isto inclui o formato e a duração da reunião. Neste exemplo, a entrevista é virtual (fa-video-camera Online) e a duração é de meia hora (fa-clock-o 30 minutos).
Em seguida, o candidato clica em um dia disponível no calendário, indicado por texto em roxo. Após um dia ser selecionado, ele clica em um dos horários disponíveis para selecionar essa data e hora.
Uma vez selecionada a data e a hora, o candidato é conduzido a uma página Adicione mais detalhes sobre você. Esta página solicita que o candidato introduza o seu Nome completo, E-mail e Número de telefone. A informação de contato inserida neste formulário é a forma como o candidato é contatado para lembrá-lo da entrevista agendada.
Quando tudo for inserido na página Adicione mais detalhes sobre você, o candidato clica no botão Confirmar compromisso e a entrevista é marcada.
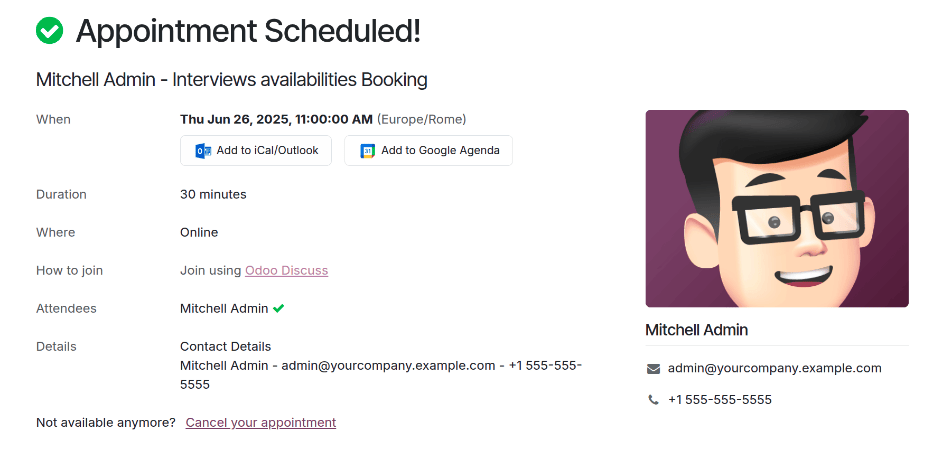
Depois de confirmar a entrevista, o candidato é encaminhado para uma página de confirmação, onde são apresentados todos os detalhes da entrevista. A opção de adicionar a reunião aos calendários pessoais do candidato está disponível, através dos botões Adicionar ao iCal/Outlook e Adicionar ao Google Agenda, abaixo dos detalhes da entrevista.
O candidato também pode cancelar ou reagendar a entrevista, se necessário, com o link Cancelar sua consulta na parte inferior da confirmação.