Regras de automação
As regras de automação permitem a execução de uma ou mais ações predefinidas em resposta a um gatilho específico, por exemplo, criar uma atividade quando um campo é definido para um valor específico ou arquivar um registro 7 dias após sua última atualização.
Ao criar uma regra de automação, é possível adicionar condições que devem ser atendidas <studio/automated-actions/conditions> para que a regra de automação seja executada, por exemplo, a oportunidade deve ser atribuída a um vendedor específico ou o estado do registro não deve ser Rascunho.
Para criar uma regra de automação com Odoo Studio:
Open Studio <studio/access> and click Automations, then New.
Give the automation rule a clear, meaningful name that identifies its purpose.
Select the Trigger <studio/automated-actions/trigger> and, if necessary, fill in the fields that appear on the screen based on the chosen trigger.
Click Add an action <studio/automated-actions/action> in the Actions To Do tab.
Select the Type of action and complete the relevant fields based on the chosen action.
Click Save & Close or, to define additional actions, Save & New.
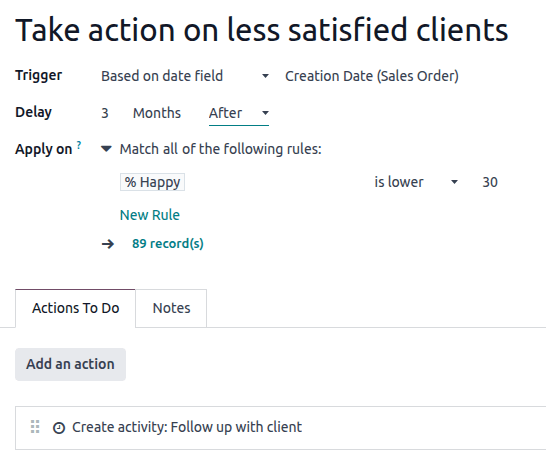
Para garantir acompanhamento de clientes menos satisfeitos, esta regra de automação cria uma atividade 3 meses após a criação de um pedido de venda para clientes com percentual de satisfação inferior a 30%.
Disparo
O Trigger é usado para definir que tipo de evento precisa ocorrer para a regra de automação ser executada. Os triggers disponíveis dependem do modelo. Cinco categorias de trigger estão disponíveis no total:
studio/automated-actions/trigger-values-updated
studio/automated-actions/trigger-email-events
studio/automated-actions/trigger-timing-conditions
studio/automated-actions/trigger-custom
studio/automated-actions/trigger-external
Adicionando condições
Filtros de domínio permitem determinar quais registros uma regra de automação deve direcionar ou excluir. A filtragem eficiente melhora o desempenho geral, pois evita processamento desnecessário em registros que não são afetados pela regra.
Dependendo do trigger escolhido, é possível definir uma ou mais condições que um registro deve atender antes e/ou depois que um trigger ocorra.
The Before Update Domain defines the conditions a record must meet before the trigger event occurs, e.g., the record must have Type = Customer Invoice and Status = Posted.
Com o modo desenvolvedor ativado, clique em Edit Domain, se disponível, depois em New Rule.
The Apply on domain defines the conditions a record must meet after the trigger event occurs, e.g., the customer invoice must have Payment Status = Partially Paid.
Com o modo desenvolvedor ativado, clique em Edit Domain depois em New Rule.
Quando um trigger <studio/automated-actions/trigger> ocorre, por exemplo, o status de pagamento de uma nota fiscal de cliente postada é atualizado, a regra de automação verifica as condições definidas e apenas executa a ação <studio/automated-actions/action> se o registro corresponder àquelas condições.
Valores atualizados
Acione ações automatizadas quando mudanças específicas ocorrem no banco de dados. Os triggers disponíveis nesta categoria dependem do modelo e são baseados em mudanças comuns, como adicionar uma tag específica (por exemplo, a uma tarefa) ou definir o valor de um campo (por exemplo, definir o campo User).
Selecione o trigger e depois selecione um valor se necessário.
Eventos de e-mail
Acionar ações automatizadas ao receber ou enviar e-mails.
Condições de tempo
Acione ações automatizadas em um ponto no tempo relativo a um campo de data ou à criação ou atualização de um registro. Os seguintes triggers estão disponíveis:
Based on date field: The action is triggered a defined period of time before or after the date of the selected date field, e.g., 30 days before the contract end date.
After creation: The action is triggered a defined period of time after a record is created and saved.
After last update: The action is triggered a defined period of time after an existing record is edited and saved.
Para configurar um trigger Timing Conditions, com modo desenvolvedor ativado <developer-mode>:
Select the appropriate Trigger from the Timing Conditions category. If you select the Based on date field trigger, select the relevant date field.
Configure the Delay to determine the execution date time of the action(s). To do so, enter the number of Minutes, Hours, Days, or Months after which the action should be triggered. If you selected the Based on date field trigger, the action can be triggered After or Before the selected date field.
Optionally, add conditions <studio/automated-actions/conditions> that the record must meet before and/or after the rule is triggered.
Click fa-cloud-upload Save manually.
Click fa-arrow-right Scheduled action to open the Automation Rules: check and execute scheduled action.
Esta ação agendada verifica as datas e horas de execução que foram alcançadas desde sua execução anterior e executa a(s) ação(ões) relacionada(s), se relevante. Por padrão, a ação agendada é definida para Executar a cada 4 horas, o que geralmente é suficiente para atrasos como 3 meses após a data do pedido ou 7 dias após a última atualização.
Se alguma regra de automação tiver um gatilho baseado em tempo com um atraso inferior a 40 horas, por exemplo, 3 horas antes da data e hora do início do evento, a frequência da ação agendada é aumentada automaticamente, por exemplo, para Executar a cada 18 minutos. Isso permite que a ação seja executada próxima à sua data e hora de execução agendada.
Click Run manually at the top left.
Esta etapa é crítica para evitar que a regra seja executada retroativamente em registros históricos. Executar manualmente a ação agendada inicializa o timestamp da última execução na regra de automação, que é um elemento chave da lógica de execução <studio/automated-actions/trigger-timing-conditions-logic> da regra.
Click the automation rule name in the breadcrumbs to return to the automation rule setup.
Add the action(s) to be executed <studio/automated-actions/action> then, when all actions have been defined, click fa-cloud-upload Save manually.
A ação é executada na primeira vez que a ação agendada Regras de automação: verificar e executar é executada após a data e hora de execução ser alcançada e quando as condições são atendidas.
Lógica de execução
Ao usar um gatilho baseado em tempo, uma ação é executada apenas quando a data e hora de execução cai entre a última execução da ação agendada e a execução atual (seja agendada ou executada manualmente), ou seja:
última execução --> data e hora de execução --> execução atual
Esta nova regra de automação será aplicada para contratos cuja data de término é pelo menos 30 dias após a criação da regra, ou seja, uma data de término de 14 de novembro ou posterior.
Para um contrato com data de término de 14 de novembro, a data e hora de execução da ação é 23h59 de 15 de outubro. A ação será executada na primeira vez que a ação agendada Regras de automação: verificar e executar é executada após essa data e hora ter passado, ou seja:
last run of the scheduled action: 11:00 pm on October 15
execution date time: 11:59 pm on October 15
current run of the scheduled action: 3:00 am on October 16
Personalizado
Acionar ações automatizadas:
On create: when a record is saved for the first time.
On create and edit: when a record is saved for the first time and any subsequent time.
On deletion: when a record is deleted.
On UI change: when a field's value is changed on the Form view <studio/views/general/form>, even before the record is saved.
Para os gatilhos Ao criar e editar e Ao mudar na interface, você deve então selecionar o(s) campo(s) a ser(em) usado(s) para acionar a regra de automação no campo Ao atualizar.
Opcionalmente, você também pode definir condições adicionais a serem atendidas para acionar a regra de automação no campo Aplicar em.
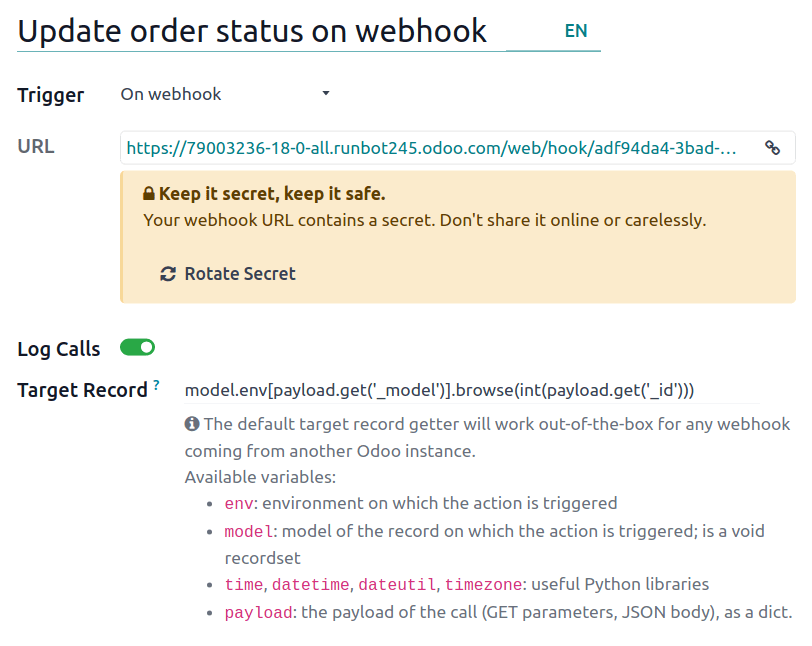
Externo
Acione ações automatizadas com base em um evento específico em um sistema ou aplicação externa usando um webhook.
Após o webhook ser configurado no Odoo, onde a URL do webhook é gerada e o registro de destino é definido, ele precisa ser implementado no sistema externo.
Ações
Após definir o trigger <studio/automated-actions/trigger> da regra de automação, clique em Adicionar uma ação na aba Ações a Executar para definir a(s) ação(ões) a serem executadas.
Isso significa, por exemplo, que se você definir uma ação Atualizar registro e depois uma ação Enviar email onde o email referencia o campo que foi atualizado, o email usa os valores atualizados. No entanto, se a ação Enviar email for definida antes da ação Atualizar registro, o email usa os valores definidos antes do registro ser atualizado.
Para alterar a ordem das ações definidas, clique no ícone oi-draggable (alça de arrasto) ao lado de uma ação e arraste-a para a posição desejada.
Atualizar registro
Esta ação é usada para atualizar um dos campos (relacionados) do registro. As seguintes opções estão disponíveis:
Update: updates the selected field with the specified value.
Update with AI: updates the selected field dynamically based on the AI prompt provided. This option requires the Odoo AI app to be installed.
Sequence: update the selected field with a defined sequence.
Compute: updates the selected field dynamically using Python code.
Para definir a ação:
With the Update, Update with AI, Sequence or Compute option selected, as relevant, select or search for the field to be updated or computed. If needed, click the oi-chevron-right (right arrow) next to the field name to access the list of related fields.
Provide the relevant information based on the option selected.
Atualizar
Selecione ou insira o valor atualizado para o campo.
Se um campo many2many <studio/fields/relational-fields-many2many> estiver sendo atualizado, escolha se o campo deve ser atualizado Adicionando, Removendo, ou Definindo-o como o valor selecionado ou por Limpando-o.
Atualização com IA
Insira um prompt para instruir o Odoo AI como atualizar o campo. Digite / para abrir as Ferramentas de prompt de IA; use o Seletor de Campo para informar ao Odoo AI quais campos relacionados verificar para contexto, e o Seletor de Registros para fornecer valores possíveis para o campo atualizado.
Sequência
Selecione uma sequência existente ou, para criar uma nova sequência:
Click Search more, then click New.
In the window that opens, enter the Name of the sequence.
In the Sequence tab, configure the sequence:
Prefix: characters added before the next number in the sequence.
Suffix: characters added after the next number in the sequence.
Sequence Size: determines the number of digits in every number in the sequence. If needed, leading zeros are added before the number to achieve the indicated sequence size, e.g., for a sequence size of 5, the first number in the sequence is 00001.
Step: determines the increments between the numbers in the sequence.
Next Number: the next number that will be used in the sequence, without leading zeros.
Click Save.
No exemplo, cada novo cliente recebe uma referência sequencial com o prefixo #-REF-%(year)s-, onde %(year)s é o ano atual incluindo o século, e o sufixo /CL, por exemplo, #-REF-2025-00001/CL, #-REF-2025-00002/CL, etc.

Calcular
Digite o código a ser usado para calcular o valor do campo.
Criar Registro e Duplicar Registro
Essas ações são usadas para criar um novo registro ou duplicado em qualquer modelo.
Para definir a ação:
With Create Record or Duplicate Record selected as the Type of action, as relevant, select the required model in the Record to Create field; the field contains the current model by default.
Specify a Name for the record, or, if the action duplicates a record, indicate the record being duplicated in the Duplicate from field.
If the new or duplicated record is being created on another model, select a field in the Link Field field to link the record that triggered the creation of the new or duplicated record.
Criar atividade
Esta ação é usada para agendar uma nova atividade vinculada ao registro.
Para definir a ação:
With Create Activity selected as the Type of action, select the appropriate Activity Type from the dropdown menu.
Enter a Title.
Indicate by when the activity should be completed by specifying a number of Days, Weeks, or Months in the Due Date In field.
Select a User type:
To always assign the activity to the same user, select Specific User, then add the user in the Responsible field.
To target a user linked to the record dynamically, select Dynamic User (based on record). If needed, change the User Field by clicking on the placeholder field name then selecting or searching for the user field in the list that appears. Clicking the oi-chevron-right (right arrow) next to the field name allows you to access related fields if needed.
Optionally, add a Note to provide more information about the activity.
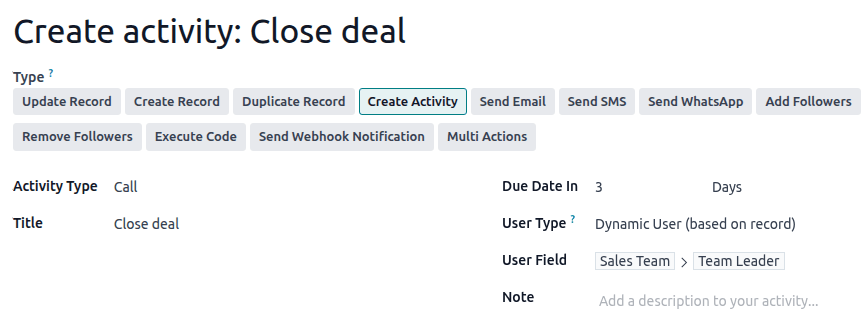
Para fazer isso, defina o Tipo de Atividade para Chamada e o Tipo de Usuário para Usuário Dinâmico (baseado no registro). Clique no campo de espaço reservado e selecione Equipe de Vendas, em seguida, clique no oi-chevron-right (seta para a direita) e selecione Líder de Equipe.
Enviar e-mail e enviar SMS
Essas ações são usadas para enviar um email ou mensagem de texto para um contato vinculado a um registro específico.
Para definir a ação:
With Send Email or Send SMS selected as the Type of action, as relevant, select or create an Email Template or SMS Template.
In the Send Email As or Send SMS As field, choose how you want to send the email or text message.
Para um email, selecione:
Email: to send the message as an email to the recipients of the Email Template.
Message: to post the message on the record and notify the record's followers.
Note: to send the message as an internal note visible to internal users in the chatter.
Para uma mensagem de texto, selecione:
SMS (without note): to send the message as a text message to the recipients of the SMS template.
SMS (with note): to send the message as a text message to the recipients of the SMS template and post it as an internal note in the chatter.
Note only: to only post the message as an internal note in the chatter.
Enviar WhatsApp
Esta ação é usada para enviar uma mensagem WhatsApp para um contato vinculado a um registro específico.
Com Enviar WhatsApp selecionado como o Tipo de ação, selecione o Modelo WhatsApp apropriado no menu suspenso.
Adicionar e remover seguidores
Esta ação é usada para inscrever/desinscrever contatos existentes como seguidores do registro.
Com Adicionar Seguidores ou Remover Seguidores selecionado como o Tipo de ação, conforme relevante, selecione um Tipo de Seguidores:
To always add/remove the same contact(s), select Specific Followers then select the contact(s) from the dropdown menu. Multiple contacts can be added/removed.
To add/remove a contact linked to the record dynamically, select Dynamic Followers. If needed, change the Followers Field by clicking on the placeholder field name then selecting or searching for the partner field in the list that appears. Clicking the oi-chevron-right (right arrow) next to the field name allows you to access related fields if needed.
Executar código
Essa ação é usada para executar o código Python. Você pode escrever o código na aba Código usando as seguintes variáveis:
env: environment on which the action is triggered
model: model of the record on which the action is triggered; is a void recordset
record: record on which the action is triggered; may be void
records: recordset of all records on which the action is triggered in multi-mode; this may be left empty
time, datetime, dateutil, timezone: useful Python libraries
float_compare: utility function to compare floats based on specific precision
log(message, level='info'): logging function to record debug information in ir.logging table
_logger.info(message): logger to emit messages in server logs
UserError: exception class for raising user-facing warning messages
Command: x2many commands namespace
action = {...}: to return an action
Enviar notificação de Webhook
Esta ação é usada para enviar uma solicitação de API POST com os valores dos Campos selecionados para a URL do webhook especificada no campo URL.
A Amostra de carga fornece uma visualização dos dados incluídos na solicitação usando dados de um registro aleatório ou dados fictícios, se não houver registro disponível.
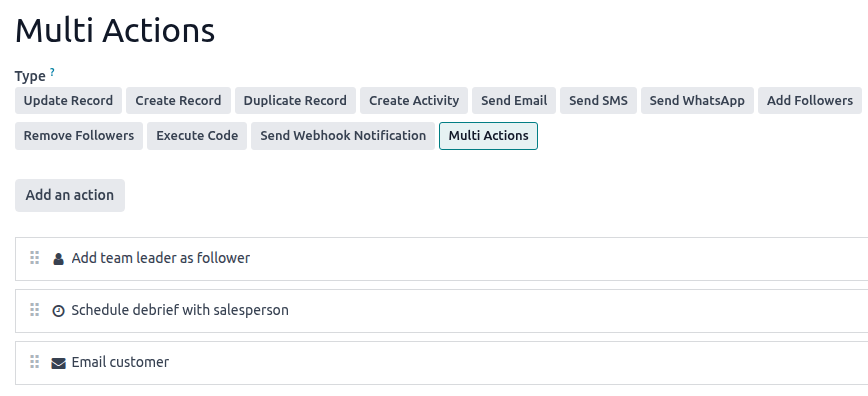
Ações múltiplas
Esta ação é usada para disparar múltiplas ações (vinculadas ao modelo atual) ao mesmo tempo.
Para definir as ações:
With Multi Actions selected as the Type of action, click Add an action.
In the Add: Child Actions pop-up:
select one or more existing actions and click Select; or
click New, define the action to be executed, then click Save & Close or, to create additional actions, Save & New .
Repeat as many times as needed.